Showing posts with label CMHH Projects. Show all posts

Wednesday, 11 May 2022

Things Are Being Sorted Out....


...in more ways than one. I am NOT making furnishings for this loft corner yet, but helping friends go through years' worth of mini stash did turn up that Gothic window at the left; I had seen a rather spectacular steam punk hall tree while browsing for inspiration, and it needed a Gothic window sort of thing. There were three in the stash we were sorting out, so serendipity strikes again. It is quite an inexpensive laser-cut plywood window, and I made it more useful for my purposes by carefully cutting out three further, horizontal bits to open up the base. The finished product will actually sit at this level or very close to it.

For those who are new to this blog (welcome to my new followers!), the furnishings in the photo pre-existed the actual creation of the corner vignette, except for the radiator. The chair and rug gave me my colour scheme, and the tall black table with the vase on it will be my take-off point for making the hall tree. I'd also like to make a side table to hold wine or coffee and a book, and who knows what else will be created, in black and whatever I find that will add to the steam punk look!

Last Wednesday afternoon was sorting, and this afternoon will be spent on doing more stash sorting, as Marilyn (Charminis) is currently housing all the containers and needs them out of there. Who knows what other odd and interesting items will turn up? I rescued two tiny, tank-like things from the garbage last week that will serve very nicely as air tanks or other weird steam punk stuff....

Thursday, 5 May 2022

Working Away Rather Unspectacularly....


 One of the UFO's from my previous post has been worked on. This is a re-purposed industrial,  steam punk loft corner, with two floors, that was a Camp MiniHaHa project some years ago. One of its more interesting components was a spiral staircase; well, it has driven me to the point where I've decided to do away with it altogether - I just cannot fit it realistically into the space I wanted it in!

What has been done is that the building carcass is now glued and pinned up, which means I can begin plotting the lighting; there is a purpose-built false roof to hold the batteries for the LED lights. Yesterday, while helping clear out a stash of  a friend's miniature materials, I found some small brass bells, which make great tops for industrial lights, and that is what this vignette is intended to get. I have some wonderful textured brick paper for the outside, and will do the roof as verdigrised copper, as originally planned, with a faux finish on card. It will look rather like the roof of Floriana (q.v.) but I'd like to drag some verdigris drips down the walls here and there....

With the re-thinking of how this will go, I've come across some interesting steam punk ideas for furnishings, and have decided to be smart and finish the building itself before I start on the furnishings; I always make way more than the space can hold. It will be a corner of a two-story steam punk loft apartment for the owner (female, as far as I know!) who owns the book shop in the books, also a steam punk project from Camp. I'm heading towards a lot of dulled copper, as I'm working with a very autumnal colour scheme, for the pipes against the cream-coloured walls, and also want to put lots of art work on those walls.

Wednesday, 23 September 2020

Loft Project Radiator


The last two Wednesday virtual mini meetings I was able to attend, I worked on the radiator for the Loft Project apartment. This is the result, finished during our session today; it will be spray-painted a nice ivory enamel colour, to counter all the darker, autumnal colours I hope to use in this project.


The radiator is made of paired, glued craft sticks with decorative ends made from inexpensive wooden fan blades; I had a lot of those, as they were what the spiral stairs were supposed to be made of. (I still haven't completely given up on the stairs, but am  weighing my options there.)

The craft sticks were drilled to take a piece of brass wire to thread them together, and the horizontal "pipes" are flat round wooden spacer beads cannibalised from an old necklace. Two brass, knurled beads cover the upper ends of the wire. The "pipes" are made of plastic kit waste, which I actually managed to drill with my pin vice, to take the ends of the wires that hold the radiator fins together. The faucet is made of sewing pin bits and beads, again drilled in place on the plastic waste pipes. I did not drill through my finger tips, but admit that I did poke my finger with my awl blade....

Knitting is going on; one and a half socks, three knitted slippers, and half a mitten are on the go right now. There are also some partially finished, small knitting projects left over from pre-Covid, that I fully intend to finish (i.e., my intentions are good, we'll have to see if I achieve them!)


Sunday, 6 September 2020

Window Blinds

I decided to add some window blinds, rolled up of course, to the two windows in the Loft Project. As well, I papered the two ceilings in the project. The photo below shows what I found to use;


The ceilings are an ogee-patterned, textured scrapbooking paper; two sheets were plenty to do both ceilings, make a mistake, and still have paper left over for some future small project. The paper was from Michael's. I also used odd stuff to create the blinds; a piece of wallpaper frieze, about 4" or 10 cm wide, that I had picked up from the freebie table at camp, thinking it might make good wainscoting for a witch or wizard scene. Combined with fringe (selvedge of a piece of natural cotton muslin), mini braid, gold embroidery cord, and a jump ring and tiny bit cut off a jewelry finding, all rolled onto a skewer, created the blind in the photo below;


I like it, as does the Carpenter-in-Chief! Tomorrow, I'll hang the blinds, and put hardware on the windows.

Thursday, 3 September 2020

More Progress


The lower edge has been finished, again with a file folder cardboard strip faux painted to match the stained oak floor finish. Originally the space between the pillars was going to house the spiral stairs, but I am still not sure about those! The pillars will be enamel-painted in cream, with some aging to give them character. They are made from the wooden inside of some commercial tassels, and some doweling; remember, this building is intended to be cast iron construction.

The table, chair, ottoman and rug were originally intended for this project, and I still like them in this space. The vase is an inexpensive Mexican ceramic, with some very old (like, among the earliest I ever made!) grasses and plants in it; the colour works with the overall autumnal effect I associate with steam punk interiors, and I've always loved mossy green glazes.


The upper level is still bare; I will likely re-purpose the pencil sharpener Victrola with a wooden base and some more interesting colouring, but it would suit the setting. The interior window openings are framed, the windows are glazed, but not yet fixed in place. The lower one will be partially open. And the outside of the window framing has been "rusted" and aged.

The project is developing its own character; it represents a corner of the loft apartment of the owner of the book shop in the books. As space is limited, I have to think seriously as to what is needed to give the effect I want. I am kind of interested in trying a steam punk desk or chest of drawers, based on a framework of match boxes; there are a number of very interesting ones on the internet. The walls will, of course, have "stuff" on them, like shelves and paintings and pictures.

Ideally, I'd like to do some steam punk piping, again in cream enamel, and add a radiator and assorted dials and gauges where they seem appropriate, as well as a coffee table or something; I am still looking at possibilities there. Right now, I mainly want to finish this structure. The outside walls will be brick, with the slanted roof sheathed in verdigrised copper. I intend to light this structure, which will be a bit of a challenge, given the lower level ceiling height; I may have to resort to wall sconces and a floor lamp there. Battery packs will be hidden in a removable roof, with the handles being disguised as chimneys; I'm thinking of a small weather station on the roof as well, and will have to see what is available for things like a miniature anemometer.

And I am thinking very seriously of doing more portions of this project in materials like matte board, foam core and the like, with faux finishes, of course.


Tuesday, 1 September 2020

Some Progress

The spiral staircase, which was a major part of this project, and the reason I came home with a pretty much unfinished building, is now hanging on by a thread - I may assign it to the burn pile! However, in the meantime, I did do some work on the Industrial Loft Project, aka the Steampunk Apartment Corner Vignette. My idea for this loft is that it is cast iron construction, so lots of metal to fake up....


My decision was to take baby steps. Yesterday, I cut fine strips of file folder card, and used it to make a finished edge around the second floor; it was faux-painted to match the stained boards, and I am quite happy with it. The same finish will eventually go around all the raw edges of the project. Above is one of the windows in the process of being glazed. The Carpenter-in-Chief said I should not have the wide muntins of the window on the outside, as rain would collect in the metal corners and the window frame would rust out. OK, I agreed, and decided that I would cover the outside edges with fine, painted strips of sturdy scrap booking card. The purplish thing is the closest I came to black, so that was the colour I chose. I think a fair amount of card will go into this construction!


It's taken most of today, but one of the windows is in place, ready to have the interior framed glued in place. We were going to make the central section swivel out, but that requires, a) pin hinging and b) pin hinging having to be drilled in a laser-cut window where you can't get your pin vise in straight. I've given myself permission to make is simpler; the upper pane will be permanently closed, while the lower one will be permanently open. It is currently under weights awaiting the glue drying. You can see the nice finish on the edges of the second floor.

I would like to suggest hardware on these windows, and will have to research that. Also, I'm thinking that roller blinds would be an interesting touch, as this loft is now a home; they would be rolled up, of course, so not too difficult to create, and could have interesting hardware too. And perhaps I'll look for an interesting dark tiny tie print for the blinds.

Sunday, 30 August 2020

Time Sure Goes Quickly....

...even when you're working on several things at once, as usual. I finished wickering the little doll's bed, just need to design and make the rockers (which were missing from my package (an estate sale purchase) and the cutlery carrier is ready to crackle and age. I've been working on sorting - again - and trying to find a punch I need that I seem to have lost or misplaced. I've also embroidered a small mat, and am glad I have an optometrist's appointment in two weeks as my eyes probably need new glasses - my vision gets blurry after about an hour's work, and then I have to stop for an hour or so.

As I would like to get back in the mini groove, I dug out an old CMHH project, from 2016 I think, which has been a bit of a thorn in my side for the past several years. It is the least finished project of all the camp projects, with the exception of the castle, as I ran into many problems in the course of trying to realize my vision. It is meant to be steam punk to match the bookshop in repurposed books project; the owner of the bookshop lives here, so I hope to have a desk with parcels ready to mail out, and all the stuff I can fit in that will add to the steam punk vision. It's pretty small, the footprint of the base is 9 x 9" or about 22 x 22 cm.


This is the structure and all its belongings; electrification stuff, the pieces of the roof which is meant to have a space for hiding the battery pack, rotating windows currently held by tape, sticks I am not sure what they are for, etc. I think there may be a set of library steps somewhere in that pile of small wood pieces! The box it was  stored in had an awful lot of unidentifiable scraps of wood, dowel and foam board in it.


That ladder thing is the beginning of the spiral staircase, made of fan blades. They're why I got so little done on this project, I think I had to make them twice. I've been studying other people's spiral stair projects, and perhaps I have figured it out. We'll see! (The steps rotate around the support pole.) The second level has to have supports at the cut-out corners of the stair opening, that's next. Once I have that sorted, I can continue on with the stairs. One tutorial I looked at used supports every four steps, and I kind of like that idea, as it creates a space under the steps that would be perfect for the imaginary inhabitant's cats.

This project is currently held together by painter's tape and gravity. I need to plot piping and electric conduits over two levels, and figure out if the battery can support the lighting needed, before I can glue it up. Here's hoping I can get my construction mojo back....


Wednesday, 5 August 2020

Okay, Things Are Changing - Again!

My effort to post here this evening resulted in the new blogger which everyone is apparently very unhappy about! With Marilyn's advice, I have reverted to Legacy Blogger, in the hope that they can fix the glitch that doesn't allow me to post photos.

With summer in full swing, and things opening up a bit, we haven't worked as often on minis; however, we did get a face-to-face last Wednesday, as our wood shipment had arrived. That means that I can soon (I hope!) get to work on the staircase for the Klompenfabriek.

In the meantime, I did sort out the books in the Book Shop in Altered Books, a CMHH project. It involved gluing books together....


Except for two shelves, they are are more or less permanently stuck. The ones that aren't are "real", i.e. opening books with text and illustrations in them. At some point, these will be replaced by other faux books. As this is a book store, the books are now in groups, like they would be in a real bookstore. Now all I have left to do is re-make the lantern for the street lamp, check out the wiring, and then this project is - mostly - finished.

In the meantime, I am working on some semi-finished projects. "Semi-finished" sounds better than UFO's! Among them is this little bench cupboard, a FAME project that Marilyn taught. I am changing it somewhat, to make it fit with some of my other furnishing items.


I also made up a puzzle box, which has a real puzzle in it; it was a "Bits 'n Bobs" project from Ann B., a British camper who came to our mini camp for a couple of years. Another SFP (that's semi-finished project!) being worked on is a lovely upholstered easy chair, for which I used the last bits of one of my favourite fabrics. This one is also a CMHH project, from Janet H. of Maggie Melinda, another former camper. I'd like to finish both the bench and the chair by next week. We'll see!

Tuesday, 21 July 2020

Books....


Almost 6 dozen of them! I decided that if I'm going to glue my books together in the Books project, then they'll not be some of the special ones I got as gifts over the years. Those will stay separate, and I will cope with them when (if?) the shelves tip over again.

And it occurred to me too that in a bookstore, the same books get grouped together on the shelves; that's what I should probably do with the books that are sort of assembled now. There are some children's books, so perhaps I should put those on a separate shelf.

Tomorrow should be another miniature workshop via Skype, and I intend to work on plants. There are quite a few of them that need shaping, gluing onto stems, and planting. I found two nearly used-up tubes of toothpaste, so that will give me two white flower pots for the red- or pink-leaf plants.

Saturday, 18 July 2020

Sometimes, Mess Occurs!


The last few days, I've been involved in photographing and writing up my completed Camp MiniHaHa projects for the past 17 years, for a blog the camp has begun to help us cope with no actual camp this year due to Covid-19.

This was the only completed project still to be photographed. The last time it went on display somewhere, some (!) damage occurred, and it turned out a bit more extensive than I thought. The only thing that didn't get messed up at that display was the"glass" portion of the street lamp; I think our cat was responsible for that disappearing. However, I continue to hold out hope that I will find that missing centre one of these days, if only my memory would kick in and tell me where the heck I put it the last time I saw it.

When I made the two bookshelves at the left, I had a hard time getting them to fit within the confines of the space in the altered books. Well, I have admitted again and again that I am straight-line challenged, and in sanding them - manually, with a piece of sandpaper around a block - the ends were somewhat rounded. Access to the box interior is by removing the back wall; the shelves stand against that back wall. I hate to glue anything down permanently, and the hundred or more books in this setting may just have to be stuck together  to keep them on those shelves. But I will try sticking them on shelf-sized slices of acetate first; if they fall out, they will fall out as a unit and not as individual books, I hope!

The first solution (I'd love for it to be the permanent one!) is to glue a solid wooden plinth under each shelf, to even things out. The shelves are, however, tall and top-heavy, so I suspect more support will have to be found. Already repaired are the front window, and a very tiny delicate book stand, that lost one of its  wee supports.

 Perhaps I should consider a system where I can slide the entire shelf on a support that is part of the back wall, books and all. Oh well, here's to experimentation!

Sunday, 26 April 2020

What Happens When You Surf the BLogs

This post is geared towards those readers who also check in on the Dutch blog, Huis ter Swinnendael. I stumbled across it just minutes ago, and was surprised to see the little painted bench in the most recent blog entry. I own perhaps half a dozen copies of the magazine, Dolls House Nederland, bought second-hand along with some other Dutch magazines, as well as a few copies I picked up in person at the Arnhem Show, and I treasure them.


In the June 2010 issue of Dolls House Nederland, I found the tutorial for this bench, fell in love with it and made my own version for my Provencal Scent Shop, a Camp MiniHaHa project from some years ago. The bench sits outside its ochre wall, with a zinc planter filled with lavender on its top. The bench is dated 2013 - I date most of my projects.


Huibrecht's experience with Rika echoes my own; some years ago, two friends and I went to the Arnhem Show; one Dutch Canadian (me), one American Canadian (my mini friend Debbie P.) and one English miniaturist (Anne B.) We couldn't navigate our way through pre-payment for the tickets, so one of the staffers offered to deliver them to us, on arrival, at our hotel. It turned out to be one of the senior staff of the magazine, who stayed and chatted with us for nearly an hour. A very warm welcome to the show, indeed! I have always appreciated their kindness to three travelers from away.

Ten or more years ago, the magazine ran a series of articles on constructing The Rembrandt House, with articles running for years, offering furnishings for it, as well as period accessories, that readers could make for themselves. They also ran an earlier series of articles  titled The Medieval Project, done as a series of free-standing  projects that were placed together to form a whole,  and I would sell my right arm to own all the instructions for both; I just have parts, but they are such tempting parts!

In the meantime, there was an article in that June issue of DHN for making a plant, "koraalmosje"; it is small with orange flowerets, and as I have the supplies for it, will make myself some.

I recognized some of your names in the Comments on Huibrecht's blog! We live in a very small world....

Wednesday, 1 April 2020

The Hinge Problem Is Solved


And I am very pleased with it. Do click on this photo, to see it full-screen; this will allow you to see the details.

I replaced my hinges with heavy strap hinges and plates. with lots of sturdy rivets in them. As file folder card (manila especially) is thin but strong, I used that for the hinges. They are actually set into the door post. That involved drilling with my pin vise and then reaming out the excess wood. For glue, I used the tacky and superglue method, which seems to be working well. The tiny rivets are 1/16" punch-outs in thinner card that the stuff used for the other doorway.

The lock is a miniature copy of an actual medieval lock; all it needs is to have the hasp sealed and then painted. As it takes at least an hour for the superglue and tacky combination to dry to my own personal satisfaction, I'll do that after dinner. It's made of wood, cardboard, wire and thread.


The candy shop now has a marble counter. I ended up using brown paper to do the final sanding coats with, as everything just scraped off the paint. It is not "expensive" marble, and it is a satin finish because it is old and well-used. The veining was done with both paint and ordinary pencil, with a final wash of white to blend everything. Next for this project is the false ceiling to hold the fittings for the eventual light I intend to install.

Wednesday, 25 March 2020

Candy Shop Interior


Well, I thought about it, and went ahead and painted the back of the shelves white, and added a frieze of Delft tile paper around them. I like this colour scheme, and think it should work well with glass jars of colourful candies.

The counter-top that came with the kit does not leave a lip, so I have to cut a slightly deeper one; it will, hopefully, be painted up as plain white marble with some light grey veining. The base of the candy shop, as well as the outside, will be green; this colour is traditional in the region north of Amsterdam. If you want to see what it might look like, check out the outdoor museum, De Zaanse Schans, on-line. It is a working windmill museum, with a number of typical fishermen's houses that rich people pay big bucks to live in, which are painted in this traditional green. And I do have a plan for such a typical little house, so perhaps sometime in the future....

I will try to create grooves in the tile paper, which is glued onto bristol board (not fixed in place yet!), to delineate the tiles. Then I'll experiment with a glossy finish for the tiles, as I have lots of small scraps of that paper.


Maybe some day!

Tuesday, 24 March 2020

Contemplating a Colour Scheme


I have done a (very) little more on my CMHH '19 project, intended to become a market candy shop. The tiles at the front are in place; I wanted something that looked like encaustic tiles, and this strip has been in my stash for years. It is a decorative element from a no-name brand of facial tissues. The colours include caramel brown and dark green, which is what I will use to finish this project with.

A lot of mistakes were made by me in putting this together; when the project imploded, I lost track of what I had intended. and made some changes that were not great. So I took courage and carefully pried off some sticks I had glued across the top of the box. (I thought the doors were supposed to go into the box, rather than sit on the base!). I am now trying out colours for the interior. The sub-roof is held in place by friction right now, as are the shelves. The wall is bristol board on which I will place my "Delft tiles".

The intention at this point is to have a plain marble counter top; jars of candy will sit on it. The back-splash - for lack of a better description - will likely be the Delft blue tile the box is currently sitting on. However, I think I need to paint the area behind the shelves white, and just have the narrow strip below the strip tiled. I need to think about this! The jars of candy should provide most of the colour, I feel.

My thought is to put a tiny trim strip below the tile level, paint it the same colour as the woodwork, and call that part done. Then I need to make a false ceiling, from which I will place some LED lighting; the cavity of the false ceiling would then hide the batteries and wires.

This past weekend was kind of a loss, work-wise, as I was trying to get in touch with my (very small) family to see how everyone was doing. Up to now, they are well, although I am very worried about an aunt who is in her late 80's, and lives on her own. We are staying in touch by phone.

Stay safe and well, please!

Tuesday, 17 March 2020

Tuesday


The trunk was mostly done, I finished it yesterday afternoon - well, I have more ideas for it - after going to what is likely to be the last knitting group for a while. I want to line the inside of the trunk with appropriate paper, with an illustration inside the lid, and give it a removable tray. That way, I can exhibit it open and "full" of stuff in my attic vignette. I also need to add some worn travel stickers to it. Although they are not needed as the straps act as hinges, I'd also like to add brass hinges. The trunk is from a kilnworks.weebly.com kit that was taught at my house when we still had a big mini group.

The plant stand is another kit from CMHH. The construction is all butt-glued joints, so to strengthen the plant holders, I added bits of sewing pins to strengthen the thing. The base is still giving me problems, though, and I may have to add a square base to the centre with appropriate little feet at the ends of the pedestal base.

We are housebound like so many around the world, a good opportunity to finish some stuff. My younger daughter is sort of stuck here for the foreseeable future, and sadly for her, her husband's visit here was cancelled. She is waiting for some commissioned costume work pieces to arrive here so she can work on them. The event for which they were commissioned is end April, so hopefully things will be mostly back to normal, and the event will go on. I have a - hoped-for - miniature show the beginning of May, which started all this finishing up of my mini kits.

Saturday, 14 March 2020

Today's Finished Objects (Yes!)


A mahogany bench kit, now glued up, and just awaiting its varnish coat, is another CMHH kit, made by Debbie P. from her mahogany kitchen cupboards. When they renovated their very old Nova Scotia house kitchen, she cut the original mahogany cupboards down to miniature lumber. The previously shown laundry tub and other vintage laundry paraphernalia is mahogany from that renovation as well, as is a small bookcase I still have to put together - I remembered overnight that I had a similar book case in one of my vignettes, so I dug that out to try and use it for measurements.

On the bench is a laser-cut cat treat kit, complete with a baggie of cat-shaped snacks (which I have to paint cat-treat brown), also put together. The box I will use a varnish on, as I like the laser work on it. It was made by Grandpa's Dollhouse in Ontario, and was a CMHH gift; I have another one of these to make up too.

The bench, with the addition of a cushion, can work in my Tudor Apothecary shop, a place for the rich, favoured customers to sit while awaiting their medicaments. The cat treat boxes will go into the second steam punk project (another UFO), and my older daughter's dollhouse, which was left, according to her, by an old lady to her cats. That house has been exhibited at children's libraries, with a challenge to count all the cats in it....

I have still, on purpose, not photographed all the embroidery kits I have to finish up. Hope my old eyes hold out for that!

Monday, 9 March 2020

Another Week, Some More Work

While still trying to do catch-up on all my UFO's, Real Life took some time this past week; this means that I don't have a lot finished yet, but I did start finishing things.


This is a very tiny sewing basket from a kit; there are three more rings of wood to go on top of these, then I have to tie on the cover. The kit is lovely, but I can't remember where the heck I got it! There are very basic instructions with it, but no maker. I think perhaps I picked it up in England several years ago.


The table legs are assembled, now I have to place them. I hope to use this piece in the Tudor Apothecary Shop, so I should really make a slatted shelf below this, big enough to put some carboys -
large bottles in straw baskets. They could hold all sorts of mysterious potions....


Done! Another old kit, an antique wash tub with soap shelf, laundry forks, and stocking stretchers. For now, these will go into my scullery/laundry room, if I can find space for them. This kit came from Camp MiniHaHa some years ago. I am still attempting to figure out how to make the washboard without the suggested  window framing; I think a wood sandwich should work. There is also a wash dolly, which requires drilling half a dozen holes at an angle, plus a central hole for the handle, in a very, very tiny wooden disc. I am working up to it. The instructions are in an old Nutshell News magazine.


And finally, the bottom of the wall shelf is ready to go, and the new cupboard unit that replaces the bottle holder and narrower unit is ready for gluing. I hope to have this Camp MiniHaHa project 2019 assembled and partially furnished for the beginning of May, the Moncton Miniature and Doll Show. It doesn't have to be finished, but it should give a good idea of the finished project.

I think the counter top will have to be faux marble; the back will likely get Delft tiles; and the floor should get a strip of encaustic tile. On the gluing jig right now, besides the little sewing basket, is an octagonal side table. I am gluing and then sanding the rim pieces, one at a time. A bookshelf awaits my attention....

Monday, 14 October 2019

Beautiful Interpretation of CMHH '19Project


In the previous post,I mentioned that two of our campers were interpreting a very old Spanish restaurant kitchen, and I posted one in progress photo. This photo is Kelly's interpretation, which is nearly complete. I just love this one, and so does everyone who saw it on the CanadaMinis website.

I am working on rebuilding my kitchen into an old-fashioned neighbourhood candy store, but as we had (most enjoyable) company over the Canadian Thanksgiving holiday this weekend, I have not worked on it, except to glue on some hinges.

This one should inspire me to finish....

Friday, 11 October 2019

Oh No!


Perhaps my fingers are getting too clumsy, but my camp project imploded on Wednesday, as I was sanding after re-staining with oil stain. (The stuff I have really stinks, for days!) This has led to a rather complete re-design of the fittings, to better suit my purpose for the project as an old sweet shoppe,which I will add to my thirties market place, the kind of frugal place where kids spend their allowances and buy chocolates for their moms.

The bottle pull-out in the lower half of the kitchen and the narrow shelved cupboard next to it are out, to be re-worked into a wider shelved cabinet designed to take some of the jars of sweets. The original sides of that cupboard will thus be re-purposed. There should be a display for chocolate boxes and candy bars (if I can find vintage wrapper printies, that is), and a lollipop display as well as the two counter jars of lollipops I have in my stash. I wish I could figure out how to get the tops off, they need more lollies! The cupboard with the door will hold the scales and cash register when the box is closed. I will figure out a use for the base cupboard with the two drawers and the cubby-hole - it could hold a dustpan and brush, for example, while the drawers could hold the pewter scoops.

The entire upper row of cupboards will be replaced by shelves deep enough to take glass candy jars, which I have been collecting in three sizes. I am debating faux bins with "glass" fronts below the shelves, just in the centre. The plan is to design glass bins first of all, and then I intend to make a faux front just deep enough to hold the candy, giving the illusion the entire bin is full. (I have to make all that candy, after all!) I also have some square cookie or cracker bins in my stash, which I could make up for the project. I might even be able to make tiny display cabinets, to hold boxes of chocolate, for the upper parts of the doors.

With the upper cupboards replaced with shelves, I can put a hanging light into the shop; it is quite dark, and I want the glass candy jars visible.The lights I have are LED, and work off a coin battery which I can hide in a lift-off false roof space (thanks, Marilyn, for that idea). As well, I hope to put a three-shelf unit onto the lower left-hand door (used by Louise in her optometrist's office), to hold small jars of , for example, stick candy. The little shelf that came with the kit is too narrow to take my jars, so it will have to wait for another project.

We are having company for Canadian Thanksgiving this weekend, so I will have to wait with my smelly stain until we are on our own again next week. Happy Thanksgiving, everyone.

Saturday, 5 October 2019

Camp MiniHaHa 2019 Project


This is the prototype of the Ruffled Rooster Kitchen project, designed by Connie Sauve, that we were doing at camp, with her permission, this year. It is jam-packed with cupboards, drawers and cubbyholes, and the camper who cut out the pieces for us figures there were upwards of 4,000 or so to have enough for all the campers and the extra kits people asked for.

I have mentioned, in the past, that we tend to do as many variations of our project as there are campers, and you will see some in the photos below. There are a lot of photos, so this is a long blog entry.
Unfortunately, people started to pack up mid-afternoon on Sunday, so there are a lot of examples I was unable to get photos of.


Debbie P.s kitchen is a lovely grey-blue, the photo does not do it justice. You can see where things have been switched about to personalise the project.


This is Janice's kitchen, in blue-grey and yellow. As you can see, more switching around of the kit's components!


Myra works small, so her "kitchen" became a three-story house! This is probably 1/48th scale, as the box is 15 1/2 cm (6") wide and 17 1/2 cm (7") high. I did tell you it was a compact kit....


Iris and Kelly were both reproducing a 1700's restaurant kitchen/stove they had visited in Spain; the restaurant has been operating for nearly 300 years, and is believed to be the oldest restaurant ever. The sides and stove hood were tiled, hence the tile work; the stove portion - a huge metal beast - will go into the open space.


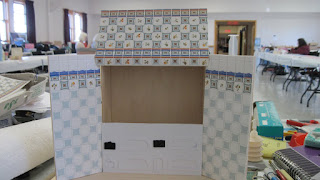
Aleeta is making the wardrobe scene from The Lion, The Witch and The Wardrobe. The kitchen has been transformed into a wardrobe, and you can see the door opening which has been cut, and which will become the entry to Narnia; she plans to do the scene of the snowy forest, street lamp and Mr. Tumnus the Faun in behind the wardrobe, thus expanding the scene.

Brandy carved her doors; she painted background scenery on the kit doors, then cut some thicker doors and carved them with trees, foliage, bear cubs, rocks and stones, to be applied over the painted background. Sadly, I didn't get a photo of that. And Patricia was creating a theatrical dressing room, complete with light bulbs around the mirror, from her kit. (No photo of that either...) Lynn and one other camper were turning their kits into Hallowe'en scenes.

Already in existence, in the prototypes, were 2 complete, beautiful kitchens, a laundry room with many flamingo accessories, and an optometrist's office. I hope to get some more photos up at some point, as three of the prototypes were made by members of my local mini group.

It was a a rather exhausting camp, with all the many pieces that needed to be assembled. My own version is partly stained, partly painted, partly done, partly not done; you get the idea. My stain had deteriorated, and they don't make it any more in the water version, only in oil, so I have to re-stain all the pieces with smelly stain. I am pulling out the bottle drawer (long and narrow on lower portion of kitchen), and will enlarge the shelves to allow for more "stuff". There are lots of little glass jars and bottles in my stash, which all need to be filled with polymer clay candy, not to mention the bins and shelves of the kit shop. I also want to add a shelf unit to the left-hand door to accommodate some jars. The drop-down table in the project will be my store counter, with a small scale on top. Did I mention that my project is intended to become an old-fashioned candy shop? It will become part of my between-the-wars market setting. To that end, I have to figure out how to make "glass" fronts for the 3 tiny drawers. That should be a challenge! And I would love to be able to figure out a way to make the tip-out "glass" shelf on the top portion into a pair of tip-out bins.

Next time, I will show some of my camp goodies, but this is enough for now, I think.