Sunday 23 December 2012

The People from the Miniature Market


Merry Christmas to all of you from the shoppers and the proprietors of the Chipping Littleham weekly market!

Thursday 20 December 2012

Miniature Flower Seller's Market Cart


This is currently the last of the market pieces; it is still a work in progress, as I have to make far more plants for it as well as a vendor for the cart.

It is a variation on the vegetable barrow; posts in the corners, a ridge beam, two end panels and side panels covered with a piece of striped "canvas". There are several brass rails not visible behind the canopy, from which will hang additional plants. The table top lifts in and out, and holds a series of flower buckets that in real life are Marr connectors (electrical caps for bare wires), from the hardware store.

Looking at the photo, I think I shall glue some small rails around the edges of the table, as they would make it possible to place small potted plants around the edges of the barrow. The stain used on this piece is one of my most favourite colours, called Ipswich Pine; it is a lovely warm rosy gold that looks wonderful on miniatures, and I use it extensively, especially as the undercoat stain on painted and distressed pieces.

The Christmas Holiday is fast approaching; we had a heavy snowfall yesterday, more than 30 cm (about 1 foot) of wet, heavy snow that stayed on all the tree branches. Most of our small cedars and birches are bent right over, touching the ground with their tops. More snow is on the way, but on the weekend it should get cold, which means it will definitely be a white Christmas here. The downside of all this lovely snow, of course, is the inevitable power outages; two lengthy ones and quite a few short blips yesterday. Fortunately, the house is warm again today. As we heat and cook with electricity, and have a well with an electric pump, power outages are more than just a slight nuisance; no hot food or drink,  no water, and no flushing of toilets, not to mention the chill that descends upon the house. I truly don't know how our ancestors read or worked by the light of a single candle.

Friday 14 December 2012

Miniature "Junque" or Antique Dealer's Stall


Probably all of us who make or collect miniatures have "homeless" minis, things we wanted to try and make or were given, that we don't have a setting for. A second-hand dealer's stall in my market acts as a showcase for some of my homeless minis. This little stall is open to being raided, and some of the children's toys are quite likely to end up in my children's nursery shop. My friend Sonia W. keeps her homeless minis in a roombox antique shop. Sharon B. has a number of small glass and brass display cabinets, in which she keeps her miniature cranberry glass and rose-patterned china.

Other excellent settings for homeless minis include attics, antique shops, and one which really appeals to me, an auction house sales room. I made some of the items in this setting, like the telescope, doctor's bag, Noah's ark and contents, some of which are in the doll's cradle, bunny on wheels, and the rocking horse, among others. The cardboard box contains Christmas decorations, but the miniature nativity scene has been moved to a Christmas roombox. The wonderful sword in the blue and white jug is a Toledo blade cocktail pick, part of a set of four, complete with colourful enamel work on the guard. If you can find a set of these, they are pretty much 1/12th scale. The "estate" crystal on the little side table is from a number of Chrysnbon sets I assembled.

This stall has no dealer, which means I have to get to work one of these days and sculpt another batch of mini people. The keeper of this stall should be just a little shifty, as some of the items he has on sale (or she!) might well have dropped off the back of a truck....

 This week a stuffed envelope of plant kits arrived in the mail; once the hectic holiday season is over I'll get out my flower-making tools and put some of these together. The plant kits are intended for the Camp MiniHaHa '12 project, which means garden design is also on the horizon. As well, I will post another plant how-to.

Welcome to the new followers of this blog, and the people who wrote to say they enjoyed the plant instructions.

For Karen B.


The clematis vine in this photo is glued to a wire armature, with the green fiberfill stuff pulled very thinly along the wires and glued in place with glue dots. The two pails contain 1/4" 3-hole punch dot roses, made with 2 or 3 shades of paper.

The garden gazebo is a Joan Swanson design from a very old Nutshell News magazine, with a floor made of air-dry clay brick. One of the pails is a miniature pail, while the other is a Marr connector, which can be bought in the electric areas of hardware stores.

Monday 10 December 2012

How to Make a Miniature Paper Poinsettia Plant


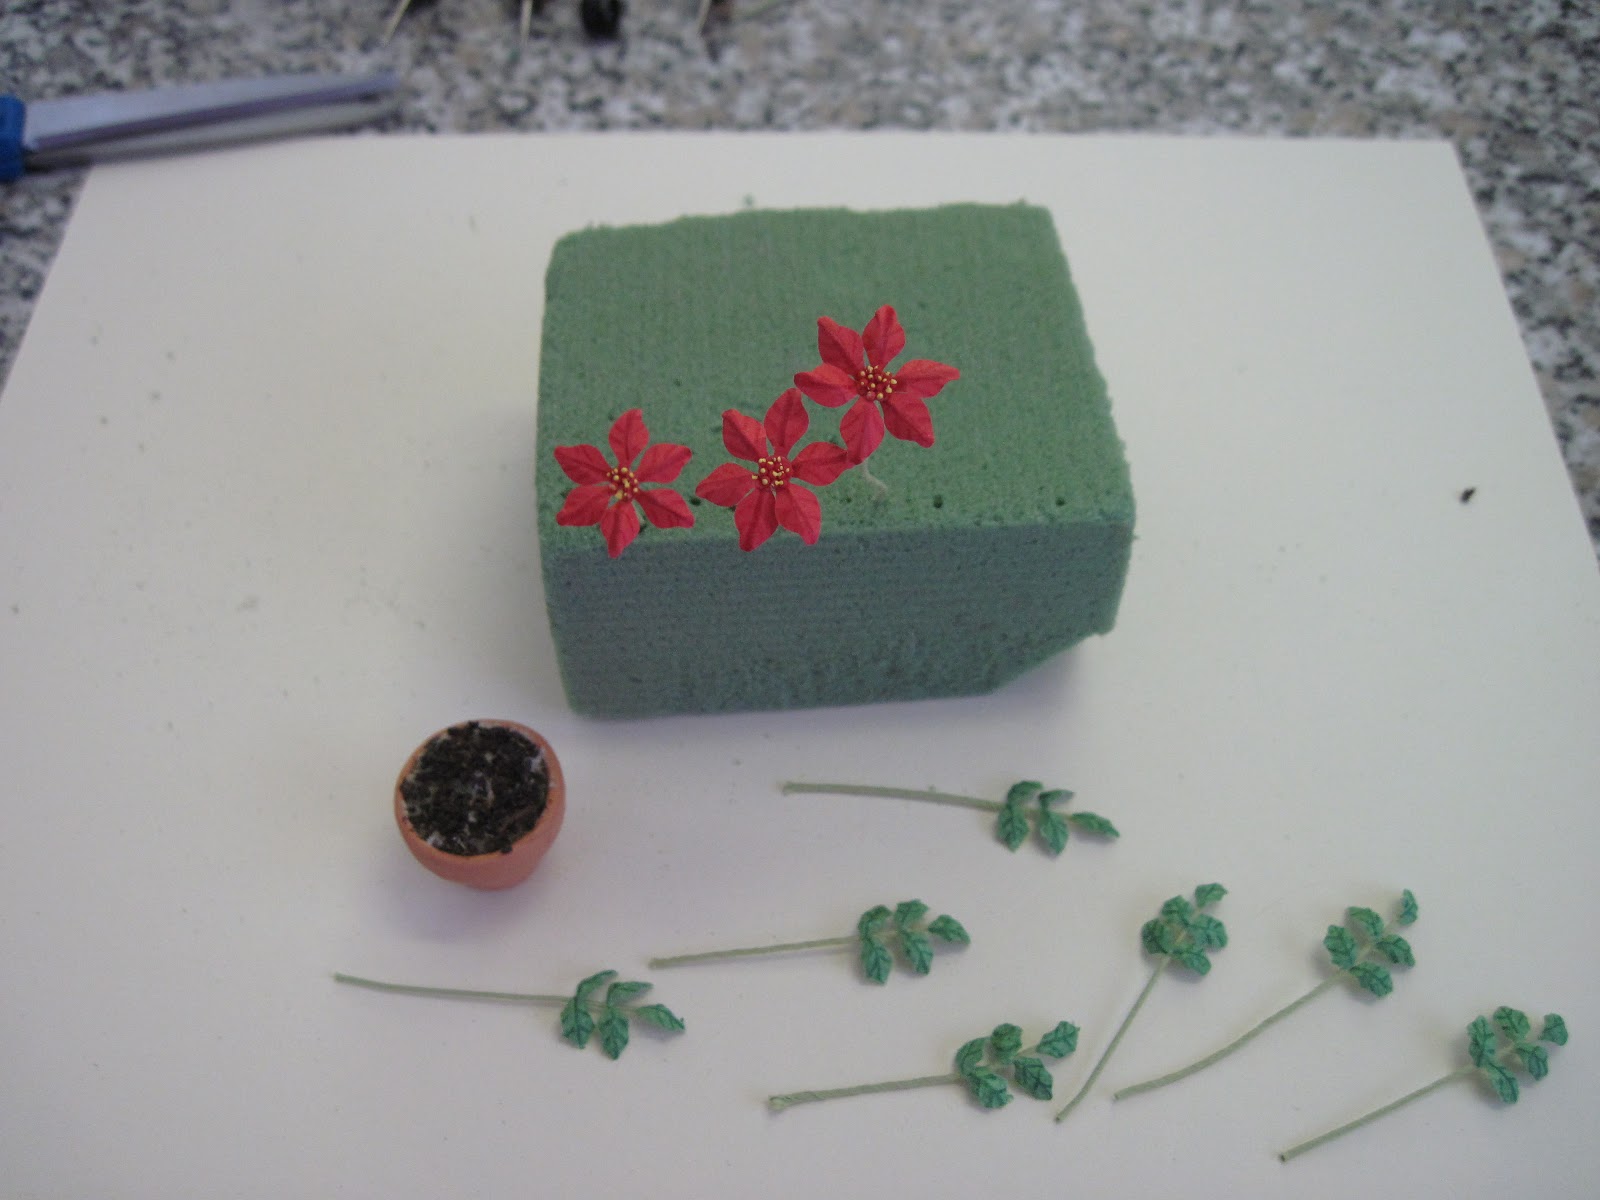
What you need is shown above: 3 x 6 red paper petal shapes, 35 green painted  paper leaf shapes, 3 small red dots, 10 pieces of paper wrapped floral wire, railroad red apples, tea leaves, tools, yellow paint, tacky glue and a prepared pot. You also need a blunt tapestry or wool needle, and a piece of craft foam for a shaping surface.

The bottom of the pot has a piece of lead split shot from the fishing dept. in the bottom, and then a plug of floral foam. I find the lead gives the pot a little heft, and makes it less like to tip over.
The red paper is commercial paper, while the green paper is hand-painted, darker on the bottom and lighter on the top. The little railroad apples were purchased at a model railroad store.

Step 1: Dip the end of 3 stems in tacky glue, stick onto the centre of a red paper dot, and allow to dry.
(Optional: Draw red veins on the tops of the petals and green veins on the leaf tops; I use a sharp colouring pencil.) Now using a blunt tapestry or wool needle, "draw" a central vein and 2 V-shaped veins on the bottom of each petal and leaf shape, echoing the coloured veining.


Step 2: Dip the tops of the red dots on the stems in tacky glue, swirl on wax paper, (this spreads and thins the glue), then dip in tiny red railroad apples. Use your fingers to push them lightly into shape. Allow to dry. The red petals and the green leaves in the photo above have been shaped with the needle. If they curl up too much, you can gently push them down over a fingertip.


Step 3: Dip the end of each petal in tacky glue, then glue to the underside of the red dot, 6 petals evenly spaced for each flower. Dip the end of each leaf into tacky glue, then place 1 on tip of each stem, and 2 pairs facing each other just below. Allow to dry. Touch the little red balls with a tiny spot of bright yellow paint; you can use a fine brush, pin, toothpick, or just the end of your finest ball stylus. Drop tacky glue on foam in pot, dip in tea leaves, push into shape and clear off edges of the pot. Allow to dry thoroughly.


Step 4: Cut the stems of your flowers to size, and plant in the centre of the pot by dipping the bottom of the stems in tacky glue. Cut the stems of your leaves to size, and plant them around the poinsettia flowers. I have also made poinsettias in hot pink, salmon pink, and pale ivory with green veining. To dress up your pots, you could wrap them in coloured foil or cellophane.

These leaves and petals were punched with dollar and craft store punches. I used a leaf with a curled tip and a stem for the coloured bracts, and a holly leaf shape for the leaves. In actuality, the leaves should all be the same, as what we think of as flowers are in fact the bracts of the plant; the real flowers are the tiny red and yellow balls!

All paper flowers should be kept out of direct sunlight, as paper will fade over time. You can spray the finished plant with a matte spray. The pink and salmon poinsettias are both several years old.

I hope you enjoyed this flower tutorial! I taught poinsettias in a class some years ago, when I was still working for our local public library. If you would like more flower tutorials, let me know and I will prepare some other plants - or, you could suggest plants and I could try to "invent" them.

Tuesday 4 December 2012

Miniature Butcher's Market Stall


The butcher sells all sorts of meats, including ground beef, beef stew cubes, and oxtails. Along with those, he also sells home-made sausages of all kinds, including black pudding (which I do enjoy, in moderation). I was once asked to sell some of the black puddings to a young lady visiting my table at a show; she had a fiance who loved the stuff, and wanted to give him some in miniature. Hey, why not? So I sold her some. Angie Scarr's book once again provided the how-to's for most of the meats. Now that I have the idea, I can also copy meats from photos of the real thing.

The brass bars between the uprights hold slabs of  bacon and larger sausages, hanging on S-hooks. One of the fun things with these market stalls has been finding different scales for the various stalls. This particular scale reminds me very strongly of the scale used by my childhood best friend's parents, who had a butcher shop in Maastricht, The Netherlands. I'd really like to find a nice, in-scale meat slicer one of these days, the sort that delicatessen stores use to slice up the cold cuts.

The legs of lamb and the hams in this photo are caned, with the bones baked separately and inserted in the main portion of the meat before baking. This is a really good way of giving the impression of real raw meat.

One of the funnier stories in preparing this stall had to do with getting butcher's paper, the pink sort, just visible below the table surface under the hams; I went to a local deli, explained what I was doing, and asked if they could spare me a sheet of butcher paper. They gave me that and threw in some parchment paper as well. Total strangers are quite prepared to help miniaturists achieve reality in their settings, they don't even ask questions.

The butcher himself is another later doll; he just needs a straw hat to really look like an old-style butcher. The sandwich board is painted with real blackboard paint. The dogs, however, are vinyl dollar store finds. Every self-respecting butcher's stall should have a couple of dogs or cats hanging around waiting for a lucky spill!