Monday 3 September 2018

I Found a Box Full of Body Parts....

....and now I'm feeling very guilty. While attempting to sort our my work space, I discovered some little people I had  begun years ago, which I had completely forgotten about.


Some of these were made quite a few years ago, for the market scene and the first big project I began, the artist's studio. As well, there are two dolls intended for a park bench vignette; a pregnant mom and her toddler. There was also an elderly lady who was going to share the bench with them - they were supposed to be at a bus stop - but the old lady ended up as one of the shoppers in the market.

So now, aside from at least two more dolls for the Tudor market, I also have two or three left for the other market. The baby had movable arms, but I managed to break the shoulder joint. I guess I just put them out of sight, out of mind.

While trying to cut down on my enormous hobby stash, I also found two dolls I had forgotten about, larger size; one is a reproduction china head, the other a Chinese baby with a broken hand and in need of some new joint elastic. This is on top of a couple of practice restorations on two antiques, an Armand Marseille child and a china head Highland Mary, that I acquired very inexpensively a couple of weeks ago.

When I say to my friends that I need to live to be 150, in order to finish all my projects, I am now underestimating!

I will get back to minis soon....

Friday 27 July 2018

This Weekend....

...is our provincial Highland Games Festival. It starts off this evening with music and a reception (and smoked salmon, but I musn't be greedy!), continues on Saturday, when I will be slinging haggis is The Haggis Cafe (fundraiser), and on Sunday. The highlight for me on Saturday and Sunday will be the massed bands at the end of the day, bagpipes and drums by the St. John River, next to a very old (for Canada) Lieutenant Governor's mansion. Once upon a time I worked in that building, when it was the provincial Royal Canadian Mounted Police headquarters.

We are in another heatwave here, and there is also very high humidity. A cyanobacteria algal bloom outbreak along parts of the river has already claimed the lives of three dogs; this algae kills within fifteen minutes or so. That means no swimming in the river for local dogs.

The heatwave is bound to affect the highland dance competitors, as well as the pipe bands; I expect the St. John Ambulance crews will be kept very busy.

But on August 1st, I am doing minis with a few friends! Now that the doll display I worked on this past Wednesday at Kings Landing is done, and pretty much everything has been tidied away, I can do miniatures again! Well, I still have to re-string a couple of dolls....


Friday 20 July 2018

Catching Up Once Again

It may again be a bit quiet on the blog, as I am in the throes of organizing a miniature and doll show for the fall. Right now it is registrations, which take quite a bit of my time. Also, we are once again in a heatwave, and my energy levels are low....

I am doing a doll display this coming week, with the provincial Highland Games over the weekend; usually I spend a day at the Haggis Cafe. Yes, we made haggis again this year, and expect to serve about 200 haggis on a bun at the event. One of these days, I must do a little Scots vignette to give to the Carpenter-in-Chief, as he is the guy with the Scottish background!

Saturday 14 July 2018

Primroses


My camera and I are not getting along that well these days; it eats batteries, which means I have to leave the battery port open, and it is a struggle to close it every time. It also does not interact with the computer to rotate photos any more, much is the pity, as I had a better photo which kept insisting on going sideways even though I had rotated it straight up.

Here is the flat of primroses I mentioned in an earlier post; if you click on the photo, you can see that there is a tiny lady bug beetle on the leaf that is hanging over. Some years ago, I was given a sheet of lady bugs; during my last mini vacation, I think I figured out how they were made. You need stained glass pens and the backing of something that is self-adhesive; I've saved the backing of a sticker that states, Miniaturists Work as Little as Possible....

The sticker itself lives on the back window of my car. To make the lady bugs, you need to make a dot of red stained glass paint on the backing sheet and allow that to dry. Then make an even tinier dot of black stained glass paint next to the red one for the bug's head. You don't need to make the dots on the bug's back at this scale! Dot a tiny tacky glue dot on the leaf, place the lady bug, and allow to dry.

It adds some fun realism to miniature plants and flowers!

Tuesday 10 July 2018

Catching Up and Minis Again

I was able to have a brief, mini holiday with like-minded friends. While there, I began work on a commission for roses, to fill an incredible silver repousse vase. Today, I delivered the commission; below you will see the photo, taken at our club meeting this evening:


You can click on them to see them close-up. I am kind of surprised at how well they turned out! There is a baker's dozen of roses in the vase, along with three sprigs of baby's breath, and some rose foliage.

Before going on holiday, my younger daughter and I took a day off from working on minis, in my case, and from packing, in her case, to make a flying visit to the Guild School in Castine, ME. We hadn't planned on going, as this was just after the political brouhaha regarding our Prime Minister being castigated by the President, but we were so tired of what we were doing that we just went. Two ladies I had met in Edmonton were students at the school, as well as a number of alumni of Camp MiniHaHa. I just love seeing the displays at the school, and the people there are always very friendly and chatty.

 My daughter and I had a lovely day out, and were able to return to our respective jobs with renewed zeal. Since then, she has moved back to Alberta, and I am slowly getting things tidied up and things finished. Stay tuned, I also finished a flat of primroses, complete with ladybug on one of the leaves, and have begun an amaryllis plant for the flower shop's summer display.

Monday 21 May 2018

Sometimes Ideas Come From the Strangest Things

The Moncton show was a pretty good one for me, as I sold many plants and food items, some books and magazines, but oddly not a single piece of embroidery, on which I probably spent too much time.

We had severe flooding here, not where I live high above the river, but all along both banks of the river for many miles. The day before the show, the Trans Canada Highway between my town and Moncton was closed due to flooding. This meant a detour of close to 100 km to get around the flooded areas - there are not that many roads here!

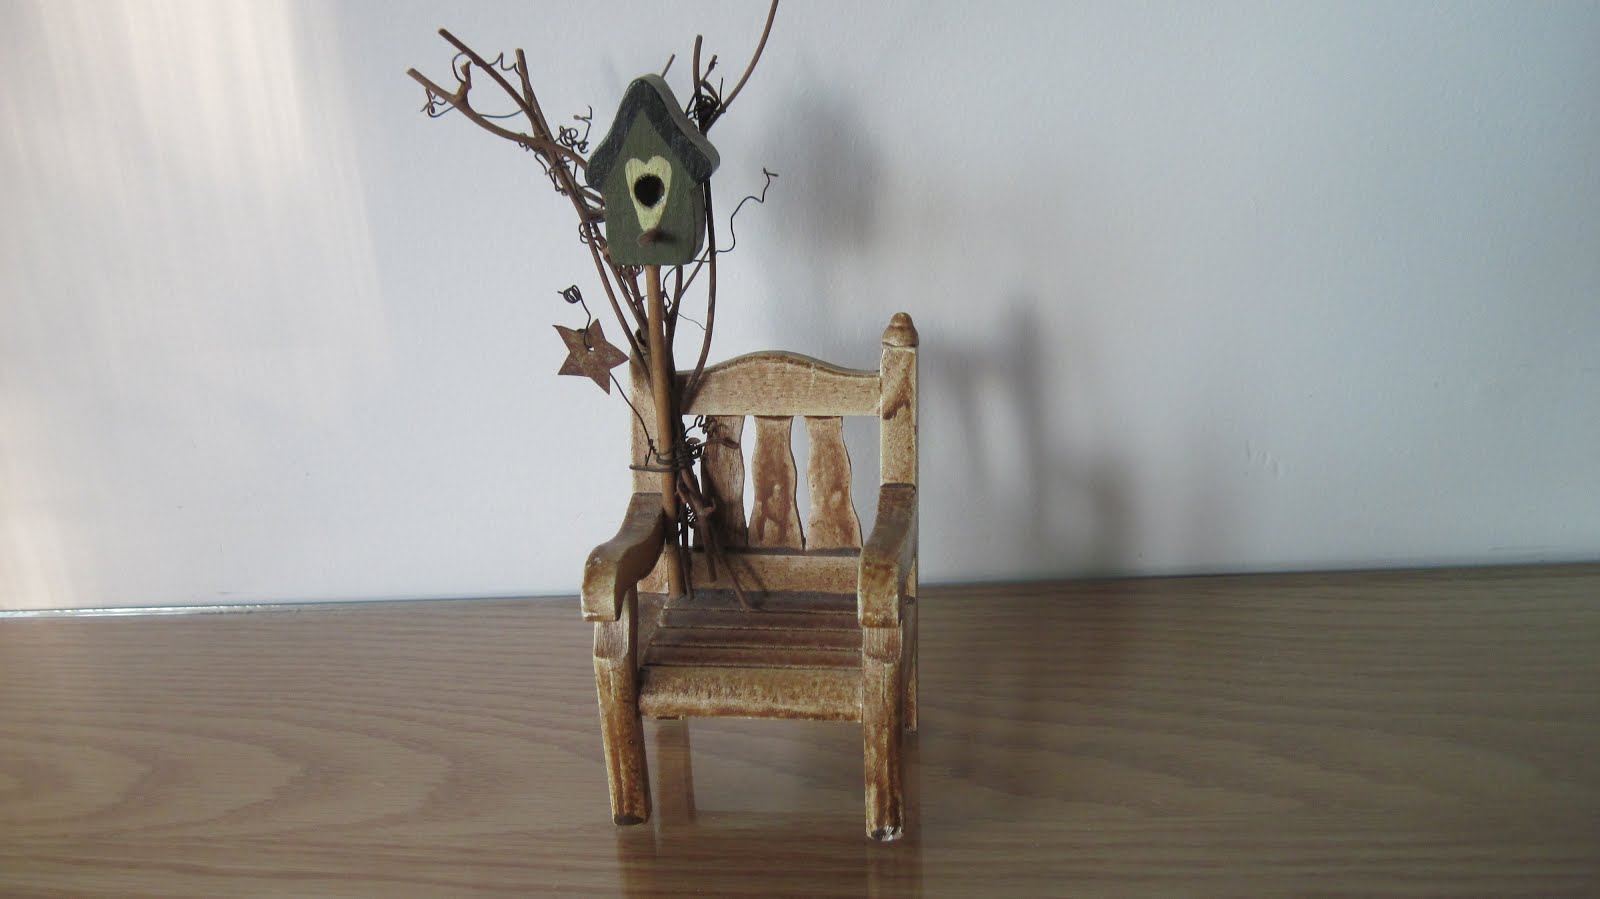
My daughter and I went up the day before, and set up for the show. That meant that the day of the show we were able to some pre-shopping. However, I didn't buy anything at that point. Towards the end of the day, I picked up a small wine bottle to go into the eventual pub and was given a lovely little miniature ceramic version of an Amsterdam canal house (I was born in Amsterdam.) But the piece that has fired my imagination is this one:


It's a simple garden chair made of some sort of dense plastic, with a bunch of grape vine twigs and tendrils, a rusty tin star, and a little birdhouse. The little vignette is very close if not exactly 1/12 scale. I knew what I wanted to do with it right away. Here is step one of the transformation process:


The yellow paving stones are too bright; this is just the first coat, with more coats of shading and sponging yet to come. I got carried away and put the dirt and moss in place before I had finished the painting. The brick structure is a brick planter. And this is how they look together:


The accessories will be removed from the chair. The twigs will be planted in the planter, along with the bird house. The star will also find a home in what I hope will become a very small garden vignette. The snow here has melted (hence, the floods!), and my primroses are up. So I visualize a flat of primroses in front of the chair, the twigs transformed into perhaps a clematis vine, and the bird house ready for spring birds. The planter will be planted with flowers, some hanging over the edges. On the chair seat, more plants, a pair of gardening gloves, garden trowel and small hand fork, and perhaps a pair of muddy rubber boots. (Yes, I know that I am likely taking liberties with the correct growing period for what I plant, but it is, after all, my idea of a garden!).

The basic work shouldn't take too long, it is the flowers and plants that will take time. For a while, I hope to enjoy looking at the vignette, but it will probably go up for sale before the winter hits us again. In the meanwhile, I will have some fun....

Saturday 28 April 2018

Class Photo


Today, for a change of pace, I taught a plant-making class. The people in the class were all new miniaturists interested in learning about plants. (Three others weren't able to make it; among other things, our area has been hard hit with a respiratory flu that takes weeks to get over.) Two of them own Ruth Hanke's book about making houseplants, but needed guidance how to proceed.

In the morning, we made a sanseviera (snake plant or mother-in-law's tongue) out of my rapidly dwindling stock of paper twist ties. There were some beautiful pots made available by one of the participants, and I got three nice pots to add to my collection. This plant is fairly easy to make, uses cutting and painting techniques, and gives a good sense of accomplishment.

In the afternoon, we made a rubber plant (Ficus), using floral tape, wire, paint etc. This one was rather more challenging, but you can see that the participants were all quite successful. With the basics under their belts, they can now attempt some of Ms. Hanke's designs on their own.

It was a fun class, I really enjoyed myself, and they seem to have found it a good day's work too.

Friday 6 April 2018

Working Away....


I'm still here, but I am working away to create some items for the Moncton Miniature and Doll Show, which happens May 5. It is slow going, but it is a beginning. There are a few needlework pieces I would like to try, the above represents a selection of pillows, mats and rugs; among the items I would like to have a go at, are bell pulls, provided I can find decent hanging findings for them. I did pick up some in Europe years ago, but am now contemplating a different shape, which will have to be purchased via the internet, fortunately with a supplier here in Canada. There is so much money involved in sending anything outside of  this country, as for example a piece of fabric on eBay for which $9.99 is being asked, along with $24.95 for postage and handling....

Postage within Canada is bad enough, but to charge nearly $25.00 for something which could easily be sent in a plain manila envelope, is pushing it as far as I am concerned!

Thursday 22 March 2018

Oh, Blah!


It must be the almost endless winter, but I find myself making flowers all the time! There are now 2 smaller shamrock plants, as well as a chrysanthemum which will go into the flower shop's autumn display window.

The mums were made from a We Love Miniatures tutorial, although I didn't exactly have the right punches. Instead, I used a sort of asterisk for the two centre petals, and a small snowflake for the remaining rows of petals. The centre is flower soft, and the finished mums were brushed with ochre chalk dust. I quite like them, and will probably make some in pink and purple, and perhaps white, to make a nice mass of chrysanthemums for the window display.

And I have started some tiny mini embroidery projects, as the Moncton Miniature and Doll Show is coming up the first Saturday in May.


Thursday 15 March 2018

Too Much Snow!

The last little flakes from a two to three day snowstorm stopped just before lunch today; we have now had 3 major snowstorms in less than a week. This morning, the Carpenter-in-Chief had to dig out a nearly meter-wide, meter-high pile of snow left at the end of our driveway by the snowplow.

So I made some more flowers. This is a Cape Daisy (Osteospermum), and is based on another design by Mette S. Laurendz, in the August 2013 issue of Dolls House and Miniature Scene. Hers featured a dark red-purple Cape Daisy, but if you google the images of this flowering plant, you will see that they have a wonderful variety of centres, not to mention a wide variety of petal colours.


It involved a bit of experimentation, but mine have a bit of purple near the central ends of the petals, done with colouring pencils; then a ring of orange stamens, made of flowersoft; and a centre of teal blue sand, over a tiny teal blue central disc. There are 8 flowers, and a dozen buds that are in various stages of opening, as well as a couple of different sizes of leaves, cut down from flower punchies, and punched out of hand-painted paper.

My original design used colouring pencils for the central circles, but it just didn't look right. The Real Life version has a narrow ring of beige stamens between the orange and the blue, but I just could not manage that in 1/12 scale.

I am pleased! Now, I think I will do a couple more shamrock plants, a little less bushy, perhaps, just in case....

30 seconds later, it is snowing again....

Sunday 11 March 2018

Saint Patrick's Day


Yes, I know that I am rather early with this post, but I had a mini day on Friday and put together this shamrock plant in time for Saint Patrick's Day. The Carpenter-in-Chief is about to finish a course on Celtic (Irish) Literature, and this was kind of inspired by that. The plant and its pot are under 3 cm (1" and a bit)  high. It is a design you can find in Joann Swanson's DIY blog. There are 25 little shamrock leaves and stems in a pot that is about 1.7 cm or 3/4" in diameter. It was remarkably quick to put together, using a tiny heart punch (do the math; that's 75 little hearts!), punched from painted paper. I am very satisfied with the shamrock, which will go into my flower shop's Spring window display. I still have to find a chocolate with green foil wrapping, to use the foil around the pot (and, of course, to satisfy my occasional chocolate cravings, too!).

While I was at it, I began cutting the pieces for two other plants, also destined for the flower shop's changeable window displays. The first one is below:


It's a white hellebore, or Christmas rose, which will be part of the Winter display. This one took time, as there are 7 open blossoms, two of which are a bit darker as they have just about finished blooming, and, I must admit, ended up having tea upset on them.... Then there are 10 buds in various stages of opening, and 10 leaf stems. Again, the same size pot as the shamrock, amazing that one can cram 26 pieces of flower wire into such a tiny area. This plant was designed by Mette S. Laurendz, from Denmark; the tutorial, which is very clear and well illustrated, is in the March 2015 issue of Dolls House and Miniature Scene magazine.

The third plant will be a either a Cape Daisy or an osteospermum; it has been begun but it will be a few days before it is finished. as I am struggling with beading on a Real Life embroidery; I keep losing count of the threads in the linen. I am again following a design by Ms. Laurendz, but I am going to change things up a bit, with a more colourful flower; both of these plants come in such a wide variety of colours, with an even wider variety of multi-colour, concentric centres. I am going to start with a white one, with faint purple at the base of the petals, and an orange and teal blue centre. For the Summer window display, this will be plant number one.

I use glue dots to adhere the flowers and plants to a clear, plastic base cut to fit the window, which just allows me to slide the displays in and out as desired!

Wednesday 14 February 2018

Happy Valentine's Day!


So I thought I'd try to make some baby's breath (gypsophila) branches, using the technique for the lady's mantle plant. It sort of worked; pale green stiffened thread, dipped in glue then in fine white sand, and then the sand is painted white.

I added three red rosebuds and a small glitter heart to the arrangement. The sparkly green vase was a gift from Camp MiniHaHa, and I think it may be a little too bright for this bouquet; however, it was the right size for these flowers.

This will go into the Spring window of my flower shop, on the left, where there is an empty space right now. There is already an Easter arrangement in the centre of the window, so perhaps I should do a St. Patrick's Day arrangement for the other side; that way, I will have covered the special days celebrated in Spring. I think Joann Swanson's DIY site may have instructions for a shamrock plant.

Spring will not actually happen here for two and a half months....


Tuesday 30 January 2018

Finished Lady's Mantle in Tub

This morning, just before lunch, this is what I had accomplished: the four elements of the arrangement for the lady's mantle plant, prior to planting. And of course, the painted tub.


And here is the finished product, photographed in front of the as yet unfurnished Tudor Apothecary Workshop and Shop. (The shop front is temporarily missing, as it is being repaired.) The plant and its tub stand just a little over 4 cm high (less than 2").


To this point, I have made velvet-leaf mullein, foxgloves, echinacea, lily of the valley, pot marigolds, St. John's Wort, hellebores, and opium poppies, besides the lady's mantle. The flowers and berries for a belladonna plant are ready to be made up into a bush. And I am thinking out the way to make a lungwort plant; these have large spotted leaves, and tiny pink and blue flowers on them, good colour for the apothecary garden.


This is not the side of the building the garden will go on, but I wanted to have them "sort of" in place. There are many more yet to come....

Now I have to go back to my complicated Real Life embroidery, in which I made a mistake that may require lots of pulling out stitches to repair. Such is life!

Monday 29 January 2018

Still Working Away!


Today I found the perfect neon yellow paint colour in, of all things, a dollar store. Since I thought I might as well have the plant the colour I wanted, I decided to repaint all the previously painted pieces, as well as make a few more. Yes, that takes time.

We are coming close to the finish with this plant. The little flower heads have to be attached one by one, with plenty of drying time in between applications, which is what is taking the time. Some of them may also need a bit of a "haircut", in that some of my earlier efforts at attaching the flower buds are somewhat skewed, to say the least. That means carefully pulling off the offending bud, trimming the stem, and re-applying the bud. So hopefully tomorrow will see this plant planted.

The tub needs to be painted to look as if it has sat in a garden in all weathers for years. Another task for tomorrow.

This sand and thread technique, while extremely time-consuming, would also work to make such plants as Queen Anne's Lace, and baby's breath (gypsophila). Perhaps I'll try three baby's breath to incorporate into a floral arrangement....

Sunday 28 January 2018

About That Lady's Mantle Plant....


It's going to take more than two days to make this plant! In the small square of floral foam at the left, are 16 sections of the finished plant; each contains 15 leaves in 3 sizes. That's 240 leaves, each of which had to be trimmed from flower heads (cut out a segment) and geranium leaves (cut off the little stem). The bud branches also have acid yellow buds made of sand, that has had to be painted as I don't have yellow sand in that colour.

In the larger block of floral foam on the right, are an uncounted number of flower buds made of tiny sections of stiffened sewing thread, again dipped in glue, then sand, and then each has to be individually painted. This is probably less than half of the flower buds needed for this plant. My lemon yellow paint is drying out, so I have to pull out gobs of it and then thin it a bit with a drop or two of water. Once that is done, I have to add just enough leaf green to get that acid shade of yellow.

To make the flower heads I have to glue 12 to 14 teeny bits of sewing thread with sand to a single stem; in all, 16 stems are needed - again, close to 240 little thread and sand buds. Are you convinced that miniature flower makers are crazy?

The design for the lady's mantle plant is from Danish miniaturist, Mette S. Laurendz. She published about four tutorials in older issues of Dolls House and Miniature Scene; this plant is from the September 2013 issue. She also sells her PDF designs via her Etsy shop, as well as finished plants and other miniatures.

I will persevere....

Saturday 27 January 2018

Some More Flowers

The cat was very helpful while I was making these! The individual flowers for the geraniums are made with a 3/32" (approx. 2.5 mm) punch-out, each of which is individually shaped. Then I put them in a small plastic container, until I am ready to glue them on to their bases. The cat's tail swept the container over and sent the tiny blossoms everywhere....


A couple of paper poinsettias were also put together; I had begun them a week ago during a mini afternoon. Two were put together that day, as one of my friends had commissioned them, so then I had to make some more of course to add to my stock for shows.

When not knocking over my tiny blossoms, the cat rubbed against the Advent project; as it is made of builder's foam, and is thus extremely light, it was a constant battle to not glue the flowers to my work surface, while protecting the vignette from the cat's affections. I only have two arms! The Carpenter-in-Chief suggested locking the cat in our bedroom,a place she is constantly attempting to sneak into.

Speaking of the Carpenter-in-Chief, he is studying the front panel of my Tudor apothecary to see how best to fix the doorpost that broke off when the panel fell. It is MDF, and will likely require a wooden support glued to the inside to keep the doorpost in place. The structure is mostly finished, just needs a base and the hinge that allows the two buildings that make up the piece to open and close. My CiC decided an apothecary needed a garden in which to cultivate healing plants, and I have started those.
But the buildings need to be on their base before I can add the garden on the side. It will have a removable wall on the front, flower beds and walks, and fruit trees which I hope to espalier along the walls. The walls will be brick, which means lots of paper clay work.

Now, in the absence of instructions for how to make a miniature amaryllis, I am going to begin on a lady's mantle plant, destined for the apothecary garden. My herb book tells me these were used medicinally both internally and externally. As the plant is rather invasive, I think I will plant my mini version in a tub to prevent it taking over the apothecary garden....

Saturday 13 January 2018

The Flu Hit, and Then It Hit Again


Apparently, Alberta is the hotbed of flu for Canada right now, so I suspect I brought the flu back with me. A day after I succumbed, my youngest daughter in Alberta, who has just moved out there, was also hit.

So I missed the FAME Little Christmas party, but I went in spirit; the carpenter-in-chief delivered my portion of the pot-luck dinner, as well as my exchange gift, so I got a gift back. The wonderful little Christmas table is ready to pop into a Christmas setting; there are wine glasses, a pair of heavy brass candlesticks, a plate of cookies, tiny table-top tree, and a wee snowman scene, as well as the gifts under the table. It was assembled and made by Sharon B.

Years ago, I was given a wooden book form, which was intended to become a Christmas setting; this may well go into that, as I think it may be a good backdrop for Christmas items on my sales tables at shows. Once the Advent project is done, I'll have a go at putting the book scene together.

The flu lasted about 5 days, then I thought I was better, and it sort of hit again. I hope to be back to normal sooner rather than later!

Wednesday 3 January 2018

Back At It

While in western Canada over the holiday season, I had a miniature visit with six members of the Miniature Enthusiasts of Edmonton (MEE), hosted by Maureen H. It was wonderful to re-acquaint myself with Maureen and Tina, both of whom are CMHH alumni, and to meet Barb, Joanne, Marg and Teresa.

Tina has a laser cutter, and gave me a gorgeous Chippendale-inspired trellis - or it could be a room divider - which may end up in the Japanese vignette. Maureen gave me one of her readable, illustrated mini books, which is going into my Steam Punk bookstore.


Isn't the trellis lovely? Laser cutters are the coolest tool created, as far as I'm concerned.

I also got back to the Advent project; the edges of the builder's foam were sealed and painted, waiting now for me to decide whether I want to "stucco" them, or cover them in muslin. The strange thing on the floor of the vignette is an old CMHH kit for a fire guard, which I am slowly putting together. (It is very cold here, like much of Canada and parts of the US, and I wish I could hibernate!)


The fire guard is made of thin mahogany (I think) veneer glued onto black fine bridal tulle. Once the glue is dry, I'll trim the netting, and add bead feet and some other decorative effects. Then I get to varnish the wood without getting any of the varnish on the tulle. We'll see....

In my stash of stuff I found a tall, cone-shaped brass fitting, like from a bolo tie, and a pair of tiny golden wings; these will be the base for making a gold-coloured Christmas angel for the setting. Tomorrow, I work so it is unlikely I'll get any minis done, so it's on to Friday. On Saturday, our FAME group is celebrating Little Christmas with a Pot Luck and a gift exchange. Lots of minis this week!