Showing posts with label Miniature Foods. Show all posts

Monday, 29 April 2019

This Is Several Days' Work!


I am not even going to try and figure out why the photo is suddenly sideways; however, I suspect the Carpenter-in-Chief has fiddled with my controls again. This is a week's worth of polymer clay baking, interspersed with being sick, feeling better, going away for several days, and being too tired to figure out how to rotate this photo!

There are pies, tarts, donuts and petits fours pastries. I experimented with liquid Fimo and oil paint for icing, and it worked very well for the white and chocolate donuts, but the pink turned out looking too much like, well, flesh; it has been repainted and glossed.

The petits fours are decorated with candied violets and angelica pieces; I first made these years ago for the baker's stall of my market. Clays change fairly frequently; soft clays and I do not get along, but the harder, professional clays do not really seem to be available here in town. I'll have to talk to staff at my local artists' store....


And the carrots are sideways too, of course. I am going to just leave it for today, but will, hopefully, have it sorted again for the next post. There are floral pieces on the go.

Wednesday, 1 June 2016

Prototypes for June Class, Part 3


The final vignette will look like the above; a small, worn bench, on it a breadboard with a loaf of bread, sitting on top of a homespun towel, and a chipped enamel mug holding a small bouquet of daisies. The whole will sit on a braided mat, which I will be demonstrating to the participants, but which they will have to do at home, as I don't have enough of the tapestry yarn to share with them.


These little rugs can also be made with heavier knitting wool, like knitting worsted; they are very simple, a  series of braids of 3 strands of yarn in mix-and-match colours, which are then glued on to a cut-to-size piece of muslin backing, using tiny dots of fabric glue. For this rug, I used beige, tan and brown yarn, with orange for contrast; the colours are close to those pioneers would have to hand, natural sheep's wool plus one dyed colour.


I put an overhand knot into the three strands, then pin that to my pant leg. As the braid progresses, I move the braid of yarn up from the pin, so I am working comfortably at a distance that suits my reach. If you are very clever, you can introduce new strands by cutting the one(s) you are replacing, securing the ends, and then beginning with the new colour; keep at least 1" of both these ends on the underside of your rug.


 When your braids are ready, start with a 1" (2.5 cm) wide line in the middle of your fabric. Allow this to dry somewhat, then coil and glue the braids around and around this central stripe. These braided rugs look best when you limit your colours to 4 or 5, and mix them up as you go around. Once you have done 2 or 3 ovals around your central line, change the colour; unknot the yarn and carefully glue the end as flat as you can to the base, then just as carefully glue the start of your new braid on top of that. When the mat is dry, you can press it with an iron. (Be careful if you use synthetic yarns, you don't want them to melt...)

Tuesday, 1 December 2015

Miniature Food

It's been a very busy 3 days, as I have been slowly gluing my book covers together and working on a commission as well as a new market stall. I don't often take commissions any more, but this is for a friend, and I just hope she likes it. She is making her book vignette into a wine and cheese shop, and is much further along than I am. I was asked to provide some of the cheeses.


Along with the various types of cheese, there are some cheese boards and some grapes, apples and pears to serve along with the cheese; the grapes should look nice placed on the grape leaves.

The fishmonger's stall has also gotten some more food items, although they still need to be placed a little more carefully! I usually use a piece of packaging plastic from blister packs to build my shop stock on, as it is so much easier to work on it flat and outside of tiny shelves or table tops. Recently I discovered that tiny glue dots called Zots work quite nicely to hold items invisibly in place. As the packaging plastic remains flexible, it is easy enough to bend it slightly to slide it into place on the table top or shelves.


I made a pile of plaice and five cooked crabs yesterday, and it took me most of the day! Now I have to rearrange the display to make room for these rather large pieces; they are partially covering the cod fillets and rainbow trout.

When I was a small child in The Netherlands, my mother would send me to the fishmonger to buy plaice; it was alive, so you chose it from the tank and the fishmonger would clean it for you to take home, nice and fresh. As I can't really remember the fish being gutted etc. I am assuming he did this out of sight of his customers!

The oysters and kippers are neatly packed into wooden boxes, decorated with seaweeds, while the scallops are in a lovely china bowl with blue and gold trim on it. In the left centre are some squid, and some lemons for colour contrast. All the fish in front of the boxes on the left and the scallops were made for me years ago by my older daughter.

Tomorrow I will need to take a look at my vegetable barrow and fruit stall, to see which items badly need to be redone....

Saturday, 28 November 2015

Books Vignette Progress Six

Today I had a good day for getting work done on my miniatures; quite necessary, because next Saturday is the model railroad show and I have some things to get ready for that. First of all, I did paint and "tile" my fishmonger's stall, and tried some of the fish my older daughter made for me to see how it all looked together:


The silvery fish look pretty good against the tiles, although I think some of the smaller fish products need to be in trays or tubs; however, the bigger fish should look quite good piled across the table. This should work nicely. I'll try to make a couple of trays tomorrow.

I took a number of very big breaths, did some calming thinking, and actually CUT INTO my book covers. The first cut was for the clerestory window, high up in the end wall. There is also "glass" in the window, now, although I still have to make the window frame inside the book vignette.


It fits and there are no huge gaps on the sides, thank heaven. Cutting through book board is very hard on knives, I used a dollar store folding box-type cutter with razor blades in it to do this job. The window is designed primarily to bring light into the interior of the box, although there will also be a set of LED lights inside.


This is a general and messy view into the book box, from the back side. The panelling for under the bay window is going in with double-sided tape, as I think that will hold better than glue in the long run. I seem to leave gaps when I glue, although I spread the stuff using an old credit card! The bay window also has glass, now, and you can just see the side door into the shop. The framing for inside and outside of this door is drying in the photo. Cutting the opening for the door took some more calming breaths! You can also see the clerestory window, minus its inner frame. And white dust, where I had to do some sanding....

For putting the plastic "glass" into the window frames, I used tiny self-adhesive double-sided glue dots; these things are tough, and they should hold the windows in place. I first used these dots (the local brand is called Zots) to glue items onto the shelf liners in my Provencal scent shop, and more than a year later, they are still holding tight. They are pretty much invisible, once they're in place.

Tomorrow, the inside window frame...


Friday, 16 October 2015

The Beginning of the Cheese Boards


Terrible photo, far too much white in the foreground! I've made pears, tiny bunches of grapes, some cheese balls, cheddar cheese, Wensleydale both plain and with cranberries, and Brie and Camembert cheeses. The board was made very quickly, just so I would have something to plan a display on.

More cheese is needed for my sales box, and I also had a request for some cheese boards. Now I need to make Edam, Gouda, Stilton and Gorgonzola, as well as some small blue cheeses and Emmenthaler.
Next batch of photos will, hopefully, be better!

I usually mix a good-sized batch of polymer clay that will make a variety of cheeses; this was the yellow cheddar and white cheeses, as well as the translucent filling for the creamy cheeses. The Dutch and Swiss cheeses are yellower and not so translucent, while the mouldy cheeses will all require blue and green worked through them; some of those will also get creamy rinds with a white bloom on them. Until the next time!

Tuesday, 17 March 2015

A Little More Mini Fast Food

Well, it's been a week; I got the flu, worked an extra day at my volunteer job (a special event), went to a funeral, and got hit by yet another snow storm/blizzard. But I did finally get up and get to work and put together some more miniature food.


Tiny hot dogs in buns, and baked potatoes with parsley and butter in foil. Now I have to go and buy supplies, i.e. a certain colour of polymer clay I am completely out of, and some ecru cotton batiste fabric to dress one of the ladies for the Tudor market. Her shoes and leather vest are ready to go, but she needs her undergarments before I can continue working.

This Saturday I am scheduled to work another day at the special event, but there is yet another snow storm in the forecast....

I am so very sick of winter!

Saturday, 7 March 2015

....And the Rest of the Food


Fish and chips, with ketchup and a lemon wedge, in a basket - it actually looks like a real take-out basket! Each piece of fish has had a bite taken out of it, to show the succulent white interior, and each basket has two pieces of battered fish. The fish batter is actually a coating of blended, powdered chalk pastels, very effective for making thin coatings. The pastels are brushed onto the unbaked polymer clay, and adhere to the clay during the baking process. Once baked, the items are given a coat of matte varnish to prevent the chalks from eventually rubbing off. The French fries are also dusted with powdered chalks; underneath, they are a raw, creamy potato colour.


Fried chicken and french fries, with ketchup, of course! Half are a breast piece and a wing, the other half a drumstick and thigh. These were fun to make; they used modeller's varnish and glass stain to get the effect of fried chicken, with yellow decorator's sand creating the "crunchy" coating. The fried chicken instructions were by Kiva Atkinson , from an old issue of Dolls House and Miniature Scene magazine.


And last, this might not be so familiar to North American fast food gourmets; it's battered sausages and chips, with mustard for the sausage and ketchup for the fries. This very British Isles dish is a version of our corn dogs, or pogos, except that they use a flour-based batter, like that used for fish. As mentioned earlier, anything that doesn't sell can go into my snack shack vignette, which is British (as no one here could read Dutch if I made it a Dutch market with Dutch signage!), and which will go into the between-the-wars  market setting. The sausages, like the steak pies, were made with caning, in which a covering is wrapped around a filling, just like the real thing, and once again, blended powdered chalks provide the colouring.

That's it for now; tomorrow I have to finish up the stuff for the hobby class I'm teaching on Monday, and then there is a Ball-Jointed Doll sweater to finish up. Once that is done, back to minis for the shows.


Friday, 6 March 2015

Miniature Foods


Eight miniature pizzas, in boxes. The two closed boxes in the front contain duplicates of some of the other pizzas. There a 5 different varieties of pizza, including a California pizza with Vidalia onion slices. These were fun to make, and finding the non-specific pizza boxes on the internet really added to the presentation. I'm happy! The sweet  pepper bits were cut down from pepper rings I made years ago, and have a translucent inner side. There's bits of ham, mushroom slices, black olives, pepperoni slices, and pineapple on these tiny pizzas, and a garnish of real, finely crushed oregano leaves.


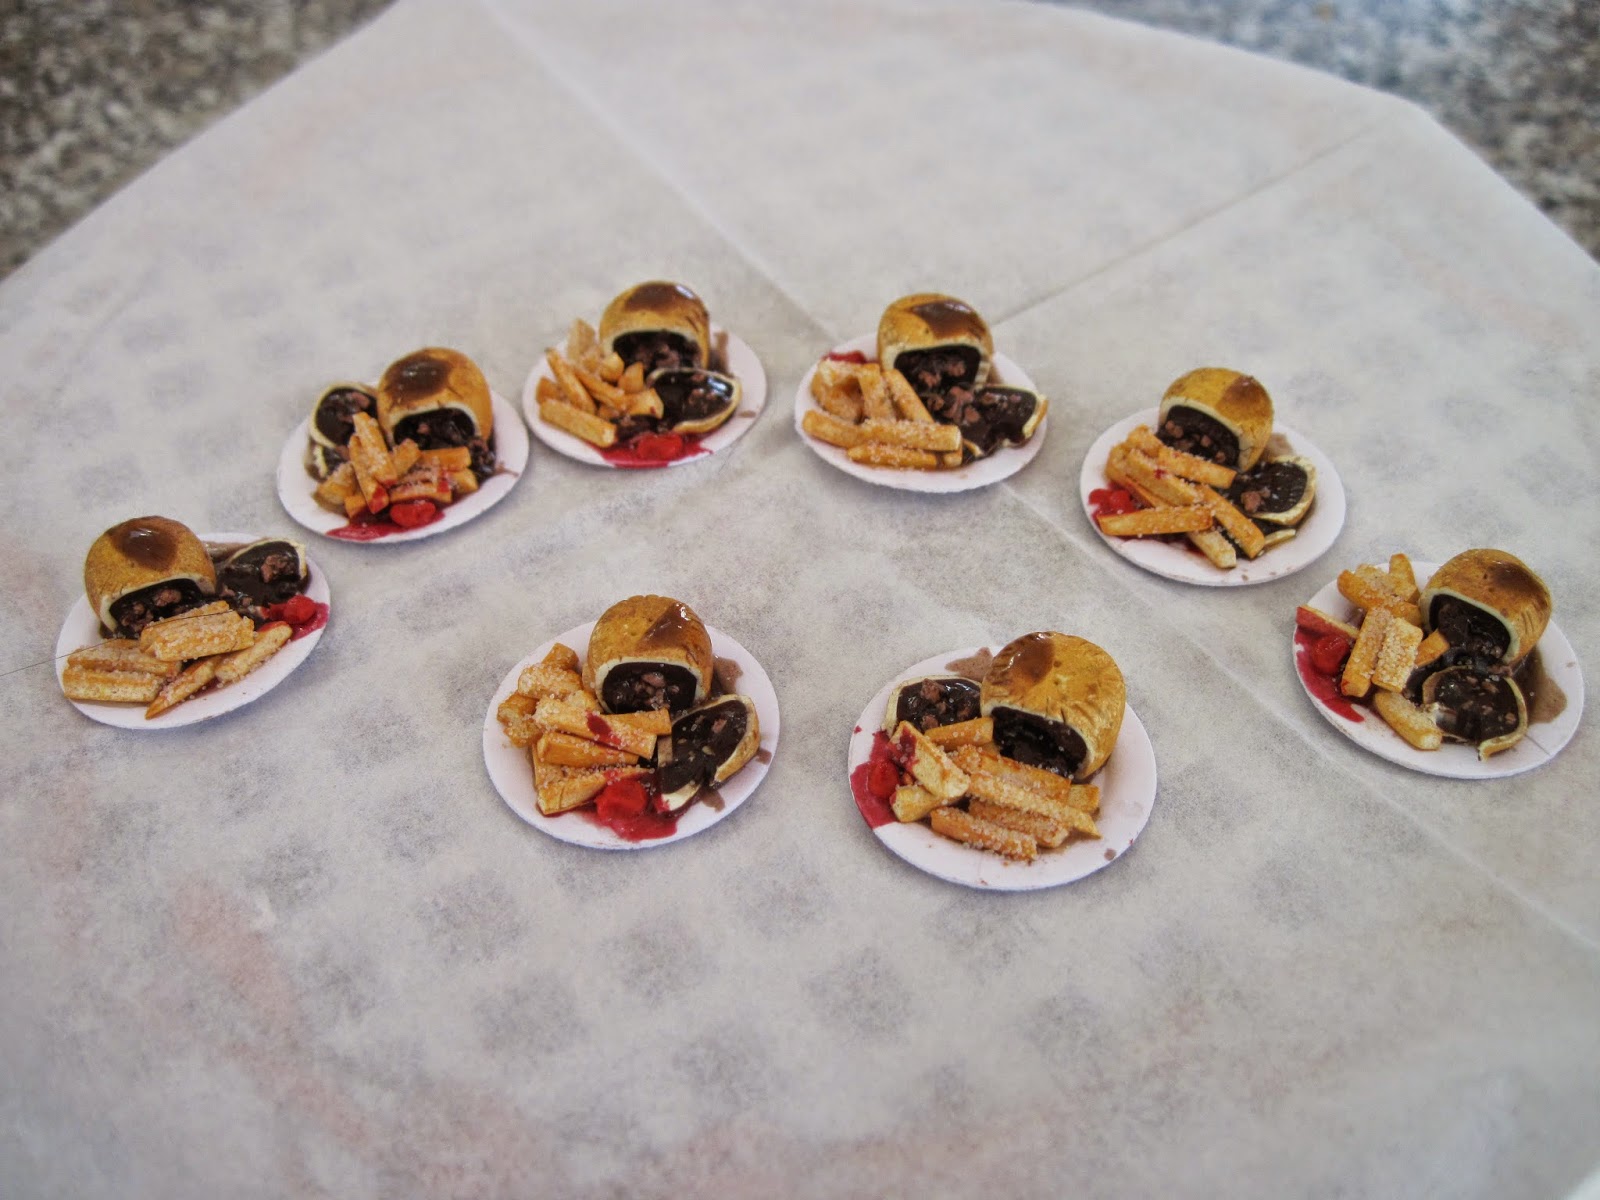
And then there are eight steak pie and chips plates, complete with gravy and smears of ketchup. The fries have salt, a.k.a. fine white decorator's sand, on them, although that doesn't show all that well in this small photo format. The white paper picnic plates were a purchase three years ago, at Birmingham Miniatura; I was able to get 3 different sizes at a very good price. Unfortunately, the dealer's name wasn't on the package, but I seem to remember it was Janet Brownhill who carried these at her table.

I did find a very good basket for the other fast foods; my husband reduced it down for me and then printed me a page of 49 of them, far more than I need for this project! Guess there'll be more cooking in my future. They are proving very fiddly to put together, but the effect is great. Those photos will be up tomorrow, as I am currently cooking some daubs of ketchup to go with the fish and chips baskets.

As well, today we booked our flight to London; I am really, truly getting to visit the Kensington Dolls House Festival in May! We also hope to visit the Weald and Downland Museum, where the full-size version of my Tudor market can be found, as well as a whole bunch of other Tudor buildings. And I am finally, finally getting to visit the British Museum; in the course of my life, I've been in London at least 8 or 9 times, and have yet to get to the museum. My husband and I both studied Art History with an excellent professor, and we are looking forward to seeing some of the things we studied in university at first hand, in the flesh, so to speak.

These wonderful miniature edibles were made following basic instructions in the February and March issues of Dollshouse and Miniature Scene magazine, and there are more food articles coming. I am looking forward to experimenting with some ethnic cuisines in miniature in the future. My tendency is to read and study the articles, look up similar ideas available on the internet, and then re-interpret them based on techniques I've used successfully in the past, but I always learn new techniques this way.


Monday, 5 May 2014

New Miniature Acquisition


The only thing I purchased at the Moncton Miniature and Doll Show was the lovely little iridescent purple-pink bottle on the right side of the table. It came from an estate, so I have no idea who made it, but it is very thin and the colour seems to change.

This should look very nice in the Apothecary Shop. There was very little that would work for medieval settings available, but there were some little artist's dolls with wonderful clothing that caught my eyes. However, they were 12" tall and wouldn't work in a 1/12 setting!

Thursday, 24 April 2014

More Things That Are Now Finished


If you are at all like me, you have a "safe" place where you put things you need to retrieve again; and like me, you probably forget where your safe place was. Well, these cushions and rugs turned up while I was looking for something totally different, so I decided to finish them and put them in my shop box which is truly a "safe" place. These are all 1/12 scale, the cushions and dog rug being done on 22 ct canvas, with the Navajo rugs done on 18 ct Aida - I love their colours, almost makes me wish I was younger and could allow myself to start a southwest project....


The plants are 1/6 scale; these were made specifically for the Moncton show. The fruit was made in both 1/12 and 1/6 scale, showing here is the larger size. I still have to stain the fruit bowls, but that will have to wait until next week as we are once again heading out for the Culloden Memorial in Knoidart, Nova Scotia. It has been snowing all day (that's right, snowing although it is the end of April!), so it will be a very cold ceremony, as it is held on a bleak spot on the Northumberland Strait shore. I feel sorry already for  the men in their kilts. Even people who generally love the winter season have had enough of this one!

My hands will not be idle; I have a larger scale wool rug that needs its background done in basket-weave stitch, that should keep my hands occupied while listening - indoors, thank goodness- to speakers, singers and musicians on Saturday. I am not a whiskey fan, like all those descendants of the Nova Scotia Scots!

Sunday, 13 April 2014

Getting Ready for Another Show


So that's four mince pies, five pumpkin pies, twelve butternut squash, eight sweet dumpling squash, six Jack-Be-Little squash and four buttercup squash; re-stocking for the Moncton Miniature and Doll Show has begun. My hands are undergoing constant attention with Badger Balm in an effort to soften up my fingertips; fingerprints and polymer clay work do not go well together. I am out of practice; it takes a lot of work to soften and mix clays that haven't been touched in nearly a year.

Three cushion tops have been worked, and I am now edging them prior to sewing them up. Four more interesting designs are waiting to be worked. My stock is so low I have to give some time to this project. As well, I've been requested to try some 1/6 or Fashion Doll scale items for this show.

We thought winter was over; however, it has been snowing lightly for the last couple of hours. The poor robins are back, and are probably wondering what happened. The only places for them to find worms is right on the edge of roads; gardens and fields are still under several feet of snow. Overnight, our compost bins were raided, with raccoons  being the likely suspects. Boy, did they leave a mess!

Right now I am kind of seeing double, with or without glasses, so I think I will have to take a little break. While visiting an antique show briefly this afternoon, I found a tiny blown glass jug with a cork in it, and a little yellowish handle; this will likely go into the Apothecary shop with some colourful liquid in it, if I can get the teeny broken cork out....

Thursday, 22 November 2012

Happy Thanksgiving America


This is a sort of modern cornucopia - I made half a dozen of these for Camp MiniHaHa '11 as an exchange gift.

The new computer has been installed, and my fingers are working again; not perfectly as yet, but I can drive short distances and hold things with my thumb and first two fingers. The ring and baby finger are quite sore and will take a while to heal. My right hand and arm have jaundice to the elbow... (I crushed my right hand between the two halves of a freight elevator door last week!)

Ideas for miniatures come from the strangest places. This little harvest setting grew out of a yellow zucchini I was given by one of my fellow volunteers last year, and I liked the colour so much that I made a bunch of them in miniature. The zucchini is peeking out from behind the pumpkin.

The pumpkin was simplicity itself; wrap a layer of Fimo around a large glass marble, mark in the divisions, making sure two are right across from each other (all of my divisions are, in this case), chalk a bit of green on the top and bottom, and blend in a brownish-green stem. Bake and allow to cool. Using a new Xacto-type blade, slice through the clay along two divisions right across from each other. Remove marble. Glue the two halves of the pumpkin back together. You can also cut a pumpkin face out before baking. One of the small flickering tea lights from the dollar store will supply the candle inside the pumpkin for a lit Jack o'Lantern, and can be hidden under a table or crate or something. As these harvest crates were meant to sit on top of a wall-hung vignette box, the whole is glued to a piece of thin acetate cut from a report cover or sturdy plastic blister packaging.

Happy American Thanksgiving!