Showing posts with label Tudor Market Hall. Show all posts

Monday, 3 September 2018

I Found a Box Full of Body Parts....

....and now I'm feeling very guilty. While attempting to sort our my work space, I discovered some little people I had  begun years ago, which I had completely forgotten about.


Some of these were made quite a few years ago, for the market scene and the first big project I began, the artist's studio. As well, there are two dolls intended for a park bench vignette; a pregnant mom and her toddler. There was also an elderly lady who was going to share the bench with them - they were supposed to be at a bus stop - but the old lady ended up as one of the shoppers in the market.

So now, aside from at least two more dolls for the Tudor market, I also have two or three left for the other market. The baby had movable arms, but I managed to break the shoulder joint. I guess I just put them out of sight, out of mind.

While trying to cut down on my enormous hobby stash, I also found two dolls I had forgotten about, larger size; one is a reproduction china head, the other a Chinese baby with a broken hand and in need of some new joint elastic. This is on top of a couple of practice restorations on two antiques, an Armand Marseille child and a china head Highland Mary, that I acquired very inexpensively a couple of weeks ago.

When I say to my friends that I need to live to be 150, in order to finish all my projects, I am now underestimating!

I will get back to minis soon....

Friday, 9 September 2016

Well, Three New People Are Done

The dress for my Tudor Merchant lady worked by backing the fabric with iron-on interfacing and then gluing the tiny top and bottom seams, but it took more time than planned. She is ready to go to the Leisure Expo on Saturday:


Her purse is being worn by the friar I dressed some time ago, so I will have to make her a new one. Just the top part of her outfit consisted of 10 separate pieces! Her teeny cap has a very tiny hand-sewn hem all around it. She looks a bit goggle-eyed in the photo, must be the angle at which I took the picture.


This is the Tudor labourer; he has a blond Dutch-boy haircut and a sweeping blond mustache. I quite like the way he turned out. His jerkin is fine brown glove leather (from a gauntlet glove that had lost its partner), as are his boots, which have a suede turn-up. He wears a raggedy red scarf and a light brown knit cap. Not so gormless now, thanks to the mustachios!

The dress for the Tudor lady has been cut out and fray-checked, but I am too tired to do any more this evening. The other Tudor merchant's wife has as many complicate pieces to her bodice as the lady above, so she will also have to wait a few weeks. Both ladies are now wearing shoes, though.

I've been using patterns provided by Dollshouse and Miniature Scene magazine, and the lady's dress I cut is from Sue Heaser's book on making polymer clay dolls. Patterns were made by Sue Harrington and Louise Goldsboro, I believe, although I have altered some of their ideas.

That's it: I am going to relax, pack up the rest of the Tudor Market (you wouldn't believe the amount of dust inside of that), and allow the TV to lull me to sleep.

Thursday, 8 September 2016

Progress on Market Hall People


Well, I had hoped for more progress, but we are getting there; from left to right, a Tudor Merchant's wife, she is in underwear, socks, and the modesty piece of her dress. Her dress has some complicated bits, and I am trying to simplify it a little. The original was wool, and she is just too small for a wool dress, so I have to find something that looks like wool but is quite thin. I think I may cheat a little and back the pieces for her bodice with iron-on interfacing, which will make it possible to glue the hems on her bodice rather than try to sew them.

 Next, a Tudor labourer, he is half dressed, waiting to have his sleeves sewn in, his jerkin and kerchief added, and then his boots and hat, once he has hair. I am kind of tempted to try a beard on this one, he looks quite gormless right now. Also, the poor dear lost the rim of his left ear when I put his shirt on, so I have to do some ear surgery - with super-glue!

Then we have the wealthy lady; she is the least dressed of the lot, only has socks and drawers at this point. She needs a rather more elaborate gown, so I have to come up with some fabric choices.

 The Tudor merchant lady is next, she  needs her over-bodice, sleeves, head-dress and hair and she is done. She will wear a belt and purse over her skirt and apron, and I have a lovely one that was a tidbit at Camp MiniHaHa the Year of the Castle.

Last is yesterday's lady, now complete. I wish her lovely skirt was more visible! Before I wear out completely, I will give the semi-dressed ones the uppers of their shoes and boots, and perhaps give the wealthy lady a petticoat so she won't have to be embarrassed.

They may  not all be ready for exhibition on Saturday, but I hope to have at least three of them ready to go, and I do have a sense of some progress!

Wednesday, 7 September 2016

One and a Half Dressed Ladies


They've been sitting in this box for quite a long time, waiting for me to dress and wig them. So long, in fact, that the elastic bands holding their labels in place rotted. I thought it was just 4 ladies, but there is also a sturdy young man among them.


So here is the first lady; she is a Tudor market woman from the country, so her dress is quite simple and made from homespun and home-dyed fabrics. She is auditioning wigging material, while she waits for her leather waistcoat side seams to dry. I decided the dark brown hair suited her best. 


All done; the most difficult part of her outfit was her hat, which required teeny seams all along the edges and then had to be tied on the top of her head! She has dark hair in a side part, with one side peeking out from beneath the head-dress; her skirt is madder red, her waistcoat is light brown leather laced in golden yellow, and she has brown stockings and shoes. Sorry for the rather dark exposure, I took the photo after the sun went down and the flash didn't do a very good job.


I only got half-way with the second lady; she has her undergarments, one of which is her rust petticoat, with her green skirt kilted up at the side to show off the petticoat. Her stockings are white, and her shoes are black. She needs her upper bodice and sleeves, apron, cap and wig. However, I am too tired to do more fiddly sewing today.

Don't they look weird without their wigs? The ladies don't have ears, unlike the men, as their ears don't show under their hair; besides, ears are also quite fiddly!

I hope to finish dressing her tomorrow and perhaps start on the stockings, shoes and underclothes of the next one tomorrow, with hopefully two more to be finished on Friday. That way there will be some ladies populating the Tudor Market and keeping an eye out on the children....

Friday, 18 December 2015

Back At It, In a Very Small Way


That's kind of a double joke, as these pieces are small and also miniature! We've had a bad week as far as weather is concerned, including a 24+ hr. power outage at the height of a severe snow and ice storm. However, we are back to abnormal, i.e., it is foggy and raining, definitely not Atlantic Canadian December weather.

So I decided to finish some of the many UnFinished Objects sitting about in various boxes, etc., and I managed to (almost) get 3 done; I say almost, as I still need to add knobs to the doors on the back of the painted Tudor commode, which will go into the Tudor house. The design on the front of the box is taken from medieval ceiling paintings which appeared when centuries of soot and grime were removed from a very old church (A.D. 1100) in my home town, Maastricht in The Netherlands, a couple of decades ago. The flowers are daisies, poppies, and cornflowers, which grow along all the corn fields (wheat fields for North Americans!) in that part of The Netherlands.

My grandmother, known as Bonma as she grew up in Belgium, used to have a commode on the landing of the house she shared with one of my aunts; only hers had a rug-hooked colourful cushion on the top. Well, she was over 80, and the bathroom was all the way downstairs and at the back of the house!

Also put the handle down on the leather tankard, and gave it a bottom; this will go to join the other leather jacks in the Tudor marketplace. And then there is the angel blowing a horn; I needed to develop the courage to drill into the narrow wood (1/8" or approx. 4 mm). It only took me several years ;o) 

There are many more bits waiting for a final step or two or three. It is so busy this time of year, that I am having to make time to do minis. However, I am hopeful that Santa may bring me the components for a Christmas Market stall - which is why I am finishing  some Christmas-themed minis!

Wednesday, 17 June 2015

Once Again, Catching Up

Well, at least I now know why my right shoulder was so sore; I have injured my rotator cuff, by overdoing things getting ready for shows in April and May. This has meant that a lot of the hobbies I enjoy have had to be set aside, as most of them will make the shoulder pain worse.

So no more embroidery for the next while; no more knitting; holding a  book is finally becoming less painful, as I am faithfully doing stretching exercises several times a day. And today, while I was using my sewing machine, one of the few options currently open to me, it jammed itself up completely....

My carpenter-in-chief has taken pity on me, and is assembling another market stall as I write; it was a bit of a chore finding enough 1/4" square wood for it, since even Michael's no longer had that size of basswood in stock. However, there is enough to build the stall, which leaves me to paint and decorate and fill it up with fishy things. We bought the last stick of the necessary wood that Michael's had, which means I will have to use spray paint, as their basswood is a close cousin to balsa, and "furs" up very badly when sanded. It'll likely take a whole can of spray paint, though!

There are quite a few fish items already in my stash to fill this stall with; my older daughter gave me some lovely handmade (by her) fish quite a few Christmases ago, and I've got more sea food items that I began to put together for the Tudor Market Hall.


And speaking of the Tudor Market Hall, here am I standing in the stairway corner of the real thing, while we were at Weald and Downland Museum in Sussex, UK last month. This is the actual hall that Brian Long used to design the one that I made in miniature, and it was one of the places I absolutely had to visit on our recent trip there.


Back of my head, writing up some notes on the hall; the miniature version is very similar, but there is a loft over the stair-well in the actual council chambers; the wall below this is white-washed. My model version has no loft (pity, wish I had known it was there, lots of great storage!), and I bricked that wall in my model. The end wall, which is removable in the model, was bricked in the real thing, while I white-washed this end. We took detail photos of how the jail door was locked, and of how the stair rail was attached, for me to add to the model. Also, I think the model version of the hall is somewhat larger overall than the original. But it was another mini dream come true, to walk around in the real version of this building.

If you ever have the chance to visit Weald and Downland, and are interested in Tudor and earlier architecture, this place is just wonderful. Out of sight behind the market hall photo above are a couple of Tudor shops, with shutters that become display tables. I picked up some ideas there to incorporate into the Tudor Apothecary Shop I've built, and which is now ready to fill up with stuff. There are also farms, yeoman's houses, barns and sheds, in short, anything you might like to study if you like to build Tudor structures in miniature.

We'll see how long this pesky shoulder problem will allow me to work on minis; otherwise, it is back to jigsaw puzzles (can be done left-handed) and short periods of reading my library books....

Wednesday, 28 January 2015

Introducing Big John


Big John is in his late teens. His parents run the inn (no, I am not likely to make an inn!), so Big John serves the fast food at the Tudor market; ale and meat pies. He is a little shy, because the girls tease him as he blushes so very easily. He is quite the catch, inns are always good for making money; however, his parents affianced him years ago to the second daughter of the innkeeper in the next village. She will be ready trained to work  the inn, will be able to brew a good ale, and be a good help-meet for Big John and his parents, as they get elderly. In between, she will cook, clean, have babies, weave, spin, sew - life for women in this period was no picnic!

Big John dearly wants to grow a beard and mustache, but his facial hair is so sparse that right now, it would be kind of a joke. He is big for his age, hence his name; if he lived in the 21st century, he would be a football halfback. In the Tudor era, however, his very size makes patrons of the inn most unlikely to get rowdy....

Big John's costume is a Sue Harrington design, from an old issue of the Dolls House Magazine; a mini friend sent me some photocopies of Tudor costuming to use for my Tudor dolls. His belt buckle is a doll's shoe buckle I purchased a dozen of many years ago; a bit big for a Tudor, but maybe he is very proud of the thing! He is holding a leather ale jack in one hand, and a pasty or meat pie in the other; whether it's for himself or for a customer, I really don't know....

Monday, 26 January 2015

Please Meet...Brother Theobald


Well, that went a little faster than expected. This is the Tudor monk, Brother Theobald. He is the infirmarian for the local monastery, and is going to the market to buy non-local herbs and imported medicinal plants for his work in the monastery sick-room. (I kind of ripped off Brother Cadfael!)

He is wearing a dark brown, homespun habit. The rope belt, with its three knots signifying the monk's promises of obedience, chastity and poverty, is new and white. He is wearing leather sandals with a chamois leather insole, brown garment leather straps, and a sole and heels of rough suede from an old elbow patch. You can get an awful lot of soles out of one single elbow patch! The suede helps the miniature monk to stand. He has his scrip over his shoulder, but has left his gathering basket with the inn keep, in order to have his hands free to check through the "foreign" medicaments.

Monastery infirmarians, besides looking after the health of the monks, were also used by the local people as physicians and apothecaries, especially the very poor who could not afford to purchase medicines or hire the services of a so-called doctor. Brother Theobald has a pudding bowl haircut, with a palm-sized tonsure on his crown. When I was a child in The Netherlands, priests still kept the tonsure, although they were no bigger than a silver dollar by that point. I don't believe religious orders use them any more, though.

His little suede shoulder bag was a Camp MiniHaHa tidbit in the Year of the Castle Room Box, finally put to good use! The monk's robe and cowl (which I lined for tidiness) were designed by Sue Harrington, for Dolls House World Magazine. As it was a photocopy from a friend, I don't know the date or issue number. His hair is silver grey viscose.

That leaves 2 additional men and 4 ladies....

Zombies No Longer

It is amazing what a little bit of paint will do, now they no longer look like zombies. I still have to adjust the whites of their eyes a little, once the current paint dries, and then add gloss varnish on the eyes and the mouths. Using gloss not only seals the paint, but makes the eyes "alive".


They are wearing their labels around their middles, so I can keep track of who is supposed to be what character. You may notice the 3 men all have ears, while the 4 ladies don't. Because the ladies will wear complete, Tudor-era head-coverings as well as lots of hair, ears would just get in the way. The men, however, will likely have their ears showing, so they get them applied.

Next up, drawers for the monk, and sandals on his bare feet. The ladies will get shoes, stockings and pantaloons (not in period, but people will turn dolls upside-down!) The other two men will get shoes or boots, stockings, and trunk hose. Those are the easy parts; the hard part will be the clothing itself; only the monk has "simple" clothing. The biggest of the men gets boots and a leather jerkin; that should be fun, as I haven't tried gluing tiny seams on leather. I may resort to sewing for that, if I can find my leather needle. If I get enough done, I will add another photo this evening; if not, you will have to wait until tomorrow.

I used paper clay to fill the crack in my monk's breastplate, and with a touch of paint that break is nicely masked. My fancy Tudor lady's neck break is near invisible; I stuck a portion of toothpick up into the head, and left some below the breast plate, for added strength. The protruding portion was then jammed into the felt body and glued into place. The broken ear is invisibly repaired, nicely hidden by hair.

As I was enjoying a sense of accomplishment last evening, my younger daughter deposited a bag of body parts on my lap: "Mom, I just don't have the time, would you like to assemble, wig and dress the people for my Darling family/Peter Pan house?" What can a retired mother do, except agree to try and find the time.....


My daughter used Sue Heaser's book, Making Miniature Dolls With Polymer Clay, to sculpt these figures, quite a few years ago. Some of these dolls, if not all, will have jointed legs that should be able to sit; so here are Wendy, Michael and John, Peter Pan and Mr. and Mrs. Darling. It was her first attempt at polymer clay sculpting, that book is very good for beginning dolls' house doll makers.
However, this lot are going at the end of the queue; I will share their house with you in another post, as it is under radical reconstruction currently. We are awaiting doors and windows for it right now.
This is not one of my projects; it is a joint project between my Carpenter-in-Chief and my younger daughter for which I am only required (yeah, sure!) for input from experience....


Sunday, 25 January 2015

Blank-Eyed Zombies or The People of the Tudor Market in Progress

Right now I am quite gluey, so I hope I won't get tacky glue all over the keyboard. The power stayed on, but we did get 10" or 25 cm of snow overnight; my poor Carpenter-in-Chief has partially cleared the driveway, enough so that our daughter could get out to work. Unfortunately, shops here have Sunday opening hours from 12 to 6 p.m.


An overview of my work area; four ladies' bodies, one set of recycled Tudor clothing, and three men with bodies, in a box. I am still not entirely satisfied with the lady body, my feeling is the torso is too long for the legs; perhaps I should make my next set of ladies' lower legs somewhat longer. To this point, the bodies have been sewn on the sewing machine, but from here it is glue and hand-sewing. I hope you are interested, a little at least, in the process.


To make sure that the legs are even and the body is balanced, I test it for stability. It is not stuffed at all at this point, just the pipe cleaner leg skeletons pushed into the felt body. If everything works, it's on to gluing the bottoms of the felt legs to the polymer clay legs, and sewing up the lower cm or so.
Then the legs are stuffed lightly, followed by the body; at this point, I hand-sew the centre back seams.


Here you can see the pipe cleaner arm armature being sewn and glued to the felt that goes across the shoulders. Her head and body stand ready for arms. More gluing and hand-sewing, then the arm piece is balanced across the body piece, and the shoulder seams are hand-sewn across. Following that, the head with the chest plate is glued onto the felt body, and held in place overnight with elastic to make sure everything holds together.


A box full of miniature zombies! The men are already glued up, while the ladies are elasticated until the morning. Then I get to paint faces. Right now, they are all rather creepy....

The pipe cleaner armature allows me to position the arms. The legs can't really bend enough to "sit" the miniature people properly; they can only sit with their legs straight out in front of them. In order for them to sit convincingly on a chair, you have to give them flattened polymer clay bottoms and shape the legs to whatever seat they will be placed on, i.e., the upper pipe cleaner legs would go to the edge of the seat, while the lower polymer clay legs would have to touch the floor. That means they can't do anything other than sit, of course, as there would be some distortion of the skeleton. (Can you see the snow outside the window?)

These bodies are from the Sue Atkinson book, Making and Dressing Dolls' House Dolls in 1/12 Scale, published by David & Charles. For clothing patterns, it is by far the best book on the market. Most of the garments are lined, meaning there are no raw edges. Where it isn't possible to make proper hems or line items, pieces are bonded with iron-on interfacing. Most of the dolls on this blog were dressed with patterns adapted from this book; the Tudors, however, are being dressed from a variety of sources, found in British miniature magazines, as the book starts with Georgian fashions, which is too late for my Tudor era people.

Once the faces are painted, the little zombies will look rather more human....

Welcome to the new people who chose to follow this blog in the last day or so. I hope you enjoy my miniature efforts. Please write or comment as you wish; I love to hear from people and always hope to learn something new as I muddle along with my miniature world.


Tuesday, 20 January 2015

The Tudor Merchant Is Ready to Leave the House


The Tudor Merchant is dressed and ready to go; he has borrowed a hat, as his own is not yet ready. His hair, beard and mustache are gray, with some darker strands in the beard, as beards usually stay darker than head hair.

His own hat will be similar, but a colour to match his clothing. He has male-pattern baldness; his temples have definitely receded!


My flash photos are all rather grainy, unfortunately. I am quite pleased with how he turned out. Now there are only 7 more Tudor era people to go, not to mention the others I haven't given bodies, faces, wigs and clothing yet....


Saturday, 10 January 2015

Interlude - Dressing the Tudor Merchant


"This is what I have been forced to look like for at least two years; it is high time my dignity was clothed appropriately, don't you think?


"Well, that is somewhat better; I now have some cuffs, a collar, and a pair of sleeves. Keep going, please!


"Now that's more like it, rather suits my obvious dignity . My doublet has skirts, I am wearing a belt, and my money pouch is present. I wish to go to the market, therefore I will need a gown, a hat, and a stick. Think you might be able to keep on going, mistress?"

Well, he had sat around for a very long time. He will get his other clothing soon, plus a head of hair and a beard. The patterns for this clothing have very little in the way of seam allowance, and the working order is very different from what I am used to. There are still 7 more adults to dress for the Tudor market scene, perhaps I will get nice and sticky and give those poor souls at least a body and face this weekend (lots of tacky glue involved in making bodies!). There is at least one woman's outfit ready to be fitted, as Margery from the between-the-wars market (see early posts) started out as a Tudor cook....

The Japanese vignette has to wait until Monday, as I need to go into town and a car is not always available. As I also need to visit the library and the bank, I'll do several things at once after the weekend. Perhaps I can get some adults into the Tudor market scene to control the children and the animals, in the meantime.


Sunday, 8 December 2013

How to Make Miniature Slate Roofs from Cardboard, Part 2

Between Friday evening and Saturday afternoon, I cut nearly 64 feet (more than 19 metres) of slate roof strips. My poor thumb was about to develop a blister when I decided I was done. I just hope it is enough to do the entire roof with! The poor roof has had to wait until the miter saw could be repaired, and despite two days of soaking with penetrating oil, we still haven't been able to remove all the bolts. Something in the saw is making it difficult, to say the least, to move it to cut the angles on the roof pieces. However, my carpenter-in-chief has decided to go ahead tomorrow, come what may, as the saw  will move with lots of muscle power.


As you can see, it is an awful lot of strips! (Note the dirty water at the right of the photo, this is what I used in step 6 below.)


Here is the painting process for the roof. All painting should be done from the uncut edge downwards, as the layers of paint will create interesting texture, when applied with a bristly or stiff brush. From left to right:

1. Paint all strips with a dark burnt umber, making sure you cover the sliver cuts, the long bottom edge and the two short edges. Allow to dry. (Wet painted cardboard can be fragile: handle with care!)

2. Paint all strips with charcoal gray, double-check your sliver cuts and edges. Allow to dry. You can now tell that painting the cardboard has strengthened it, as well.

3. Using a 1/2" (1.5 cm) bristle brush, and pewter gleam paint (or a similar paint), dry brush here and there along the strip. Slate has some reflective inclusions, and that is what this dully metallic gray-silver paint step imitates. Allow to dry.

4. Using sludge green, a.k.a. English ivy green, a fan brush if you have it, and a nearly dry brush, brush on here and there along the strip. You want a streaky effect, that almost disappears into the background. This imitates the algae/moss streaks stone roofs develop. Allow to dry.

5. Using terra cotta and the fan brush, again a nearly dry brush, brush here and there along the strip. This adds extra dimension to the slate strip, and should just skim the higher points of the cardboard.
Allow to dry.

6. Mix up a couple of drops of white with a spoonful of dirty water - I use the water I rinse the brush in. This is messy; dip an old toothbrush in the watery paint, then gently run your fingernail along it to drop little spatters of white here and there. As this watery mixture dries, it looks like little patches of gray lichen, grayish in the centre and lighter around the edges.

The last coat to go on is a coat of satin varnish if you want a little shine, or matte varnish if you want no shine. This seals the paint effects. Allow to dry. The roof strips can now be installed.

Part 3 will be applying the strips to the roof surfaces, but this will have to wait a couple of days if the saw won't cooperate. As well, I have to make half a dozen roof vents to be glued to the front roof before the slate goes on. I'm going to try adding "lead" flashing around the vents, under the roofing strips, using the silvered copper tape I had been using for window lead. It didn't work too well for that, so I'll see if it will make good flashing, so it isn't wasted.


Friday, 6 December 2013

How to Make Miniature Slate Roofs from Cardboard Part 1

As promised, here is a tutorial with photos on how I make my cardboard roofs, in which people have expressed quite a bit of interest.  Start with collecting lots of cardboard, the type that comes on the back of writing paper pads is great, but the best cardboard, because of its size, is the back of flip charts. I no longer have access to this, as neither of us are working in offices any more, so I zealously save any and all writing paper backs.


Two of the pieces are thicker than the others, so I have decided not to use those on this project; it is best to use card of equal thickness. You will also need knives, blades, a long ruler and a pencil. Cutting through cardboard is hard on Xacto-type knives. If you have access to an office paper cutter or  stationery guillotine, that cuts the work down tremendously. (Metric measurements are as close as I can approximate; you can work out your own proportions if you don't have access to a British Imperial ruler in inches.)


Start by slicing your cardboard into 3/4" (approx. 2 cm) strips. You will need lots, each strip will only be covering 1/2" (approx. 1.5 cm) of your roof surface. Mark a line 1/4" (.7cm) along one long edge; this is where the strips will eventually be glued. Divide your marked strips in two piles, and mark the other long edge at 1/2" - 1.5 cm intervals, on one pile. Start the other pile of your strips with a 1/4" - .7 cm line, then continue on with 1/2"-1.5 cm as before, as the slates will overlap like a brick course.
While you can cut the half slates as you glue the strips to the roof, I find I get a more accurate fit if I start half of my strips with a half slate, and I also don't have to repaint that cut edge later.

 One side of  these card strips is white, this is the wrong side as it will not accept paint the same way as the raw cardboard side. Below the two white strips along which I have started cutting, you can see two completely cut gray strips showing the eventual overlap. Now cut all your slate strips as marked, taking off a tiny sliver at each cut, stopping at the marked line at the top, and once in a while cutting off a corner to suggest the odd damaged slate. For this cutting I use scissors, but if you are good with a knife, you could  use that.

As this will take quite a bit of time, and your fingers will likely get sore, this is where I will leave it for today. Part 2 will be the painting of the slates.

Sunday, 4 November 2012

Miniature Embroidered Medieval-ish Tapestry


Miniature needlework is one of the things I really enjoy; if I see something that speaks to me, I do it, even if I don't actually have a use for it right away. This was one of those pieces. It came as a set of 3 graphs for a folding screen, in Pamela Warner's book, Miniature Embroidery for the Tudor and Stuart Dolls' House. I didn't particularly want a folding screen, but I did want a millefleur-type tapestry, so I decided to join the three graphs together to make a single hanging.

Unfortunately, I didn't realize that the right-hand graph with the pond had an extra row on it, not until I had begun on the other two parts in an attempt to get the thing to match....

Anyways, it completely threw off the other two graphs, so I had to fudge somewhat in the foliage of the tree. It worked out in the end, and I am quite pleased with. Originally, the thought was to hang it on the main bricked wall of the Tudor market hall council chamber; however, it may be too big for that. There is the castle we began at Camp MiniHaHa two years ago, it would fit well in that. However, that castle is far from complete, I still have to carve the wall blocks into it.

My December issue of Dolls House and Miniature Scene arrived this week, and it has a really good wizard costume in it. It is supposed to be Merlin, but it reminds me too much of Saruman from Lord of the Rings - the long, white square beard is too reminiscent of Sir Christopher Lee's characterization in that film. Next month we get a costume for Morgan Le Fay, another villain. But perhaps she could become Nimue, a sort of villain but also Merlin's protege for a while. Hmmm, perhaps the castle, if and when it is finished, will house a wizardly pair. That would allow me to use some of the wizardly gifties and tidbits from CMHH, as well as have a nice, big wall to hang the above tapestry on.

Back to this tapestry; it is likely the one and only large, fine-count piece I will ever do. I think it is 36 ct. linen, and every stitch of it had to be worked under a 3X magnifying lens, using a single strand of floss.
My family used to hide when I was working on it, it frustrated me that much at times.....

Wednesday, 24 October 2012

A Market Needs Foodstuffs to Sell


Markets aren't markets without things to sell. When the Olympic Torch came through CFB Gagetown on its way to Vancouver, I was asked to display my Tudor miniatures for the Cultural Expo being held at the base. Every school child in the district came through that show, and I had an absolute ball.


This is the equivalent of a fast food place. The customer can purchase ale and a main course of a pasty, easy to carry while doing the shopping. I found a wonderful resource on line, a Food Time Line which shows you exactly when people began eating certain foods. Another good resource for period food, especially the medieval period, is the Society for Creative Anachronism (SCA).


The vegetables include red, green and white cabbages, two types of beans, beets, turnips, onions, leeks, garlic and wild mushrooms. There wasn't really a very great variety to the medieval menu, so some very strange combinations were used to add some differences. As well, without refrigeration meat and other animal protein product tended to spoil. One of the pasties in the fast food place is a mix of fish and fruit -
so not appetizing to me!


Not too much fruit as yet: small pippin apples, green pears, regular apples and prune plums. I need to add some exotics like quince, some precious oranges, and pomegranates.


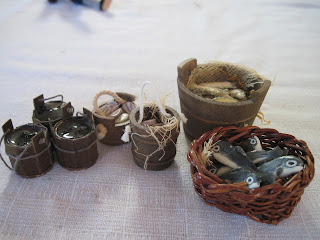
And then there's the seafood, a very important part of the medieval diet. The wooden tub contains rainbow trout, each painstakingly painted by hand, a design from Kiva Atkinson. The basket contains cod, the heavy buckets have oysters in them (designs by Angie Scarr)  and three buckets of eels which were a tidbit from Camp MiniHaHa. Most large homes had their own stew-ponds, where they raised fish for the table, as did large religious institutions like abbeys and convents. At least it was fresh! For religious reasons, everyone ate fish on Friday, and every day during the forty days of Lent leading up to Easter. People became quite sneaky, designating things like ducks and swans as seafood, in order to have meat on the table on fish days....


Sunday, 21 October 2012


We're back to the Tudor Market Hall. The design is by Brian Long, from a DHMS Projects Quarterly. Quite a bit of time was spent on the cobbles and kerb stones, each cobble being shaped by hand. I guess I'm just a bit obsessive! One of my favourite activities is ageing my structures; this corner, by the jail, shows the moss and weeds growing between the cobbles, and the rising damp from the ground. The stone and brick work is DAS/Prang air-dry clay, and is done inside the market as well as outside; the only place not bricked in are the three walls of the upstairs council chamber, they are painted to represent whitewash.

The market hall is a miniature version of a real one, currently in the Wealds and Downlands Museum.

This is a front view of the market; it is lop-sided because I held the camera at an angle, but someday I will learn.


The jail side of the market hall, with the stairs going up to the council chamber door.


The market view, with the removable wall to the council chamber removed to allow a view. The livestock will eventually find a place in the market, the horses just have to look less "plastic".

The council chamber has a series of settle benches with embroidered cushions; even the scribe's stool has a cushion. I still have to make him a lap desk to write on. At some point, when I figure out how, I intend to add sliding shutters over the windows, which are of the old style without glass.


The only people in the market at this point are the children; I still have to make the adults. The rich boy and the shepherd's son are on the balcony looking at something up in the sky...

One of the things I really like about English dolls' houses is that fact that they close; in this photo, the removable wall of the council chamber is in place. However, the front roof is not in place as yet, I ran out of card to make the slates.


And this is why I like dolls' houses that close. Cupcake can't get in to the council chambers, but she certainly has a very good time slinking in and out of the market area. Amazingly, she doesn't knock over all that much, which is a good thing, as I don't like glueing food into place. Upset an apple basket, and several dozen miniature apples are rolling about the ground!