Posting will be very light for the next while, as I am in the process of doing things for a family wedding this September. Things have to be gotten underway now, as others have to be involved in the finished products as well.
I'm going to try to fit in a day of minis every once in a while, just to keep my hand in....
Friday, 26 May 2017
Friday, 19 May 2017
I'm Working, I'm Working...
For some reason, perhaps to keep my brain working, I keep challenging myself. Last year, I purchased an old embroidery kit from an estate; the date on the instructions was 1980. The needle had become rusty. And the masking tape holding the silk 40 ct gauze had dried out.

So that's it; a CJ Originals kit for making a door stopper brick, in this case with a butterfly design. I've never done such a small count before. I had to wear my task glasses, and use the large magnifier lens to see what I was doing. I made a bit of a, hopefully, not too obvious mess when I missed one line of stitches in one of the bows, and I also went two rows in the same direction, creating a bit of a line that I hope won't be all that visible. Also, I suspect I made one short side larger than it should be. I started this Wednesday, worked Thursday, and finished the embroidery today.

And Blogger is being a real pain today, although the photo was taken horizontally, it insists on printing it vertically. I've rotated it twice, but it still prints the wrong way. This will go into last year's Camp MiniHaHa project, as it tones with the Steam Punk furniture upholstery and rug.
Now I have to take this out of the frame, then sew up the corners, and attached it to the brick. That's for tomorrow, I am cross-eyed....
Monday, 15 May 2017
Good Grief!
OK, so Tuesday evening I'm giving a talk on miniatures at a rural library not far from here, so instead of taking large pieces with me, which have to packed, unpacked and repacked, I thought a looped slide show of my miniatures, at least the finished ones, would be a good way around that. I will bring a couple of boxes and vignettes. I've been attempting to photograph everything for tomorrow. as I can't take any photos off the blog; the pictures are too small.
Why do I keep misplacing things? I think it is because I have too many things. While I try to store everything I have made sensibly, and display whatever I can, there is just too much. And there are way too many demands on my time for me to reorganize things for the foreseeable future.
Why do miniature electrics keep breaking? Why are battery packs constantly running on empty? And why, for that matter, do my miniatures themselves keep breaking? The fine wiring on LEDs running on coin batteries break every time I travel with them. Not everything can be hidden in false walls and the like, and those tiny wires are like hairs.
I need to cut down on my stuff; but I know the minute I get rid of something, the perfect purpose for that something will suddenly appear, and I will be back to having to order a replacement on-line, deal with foreign currency, and sky-high shipping and handling costs, not to mention import fees.
And why does the cat want my lap just as I am trying to drink a cup of tea and do a blog entry?
Monday, 8 May 2017
Moncton Show Report
As promised, I managed to get some photos of the FAME club projects, as they were exhibited, at the Moncton Miniature and Doll Show held last Saturday, here in our little corner of Canada.

This is Marilyn's entry, and that is Marilyn lurking in the background. She made a library, in honour of her father, whose name has been given to the library. There is a sign in the window to indicate that the library will be opening soon - it is still under construction. Marilyn designed and cut the projects that club members then purchased.

Louise's entry is a quilt shop, with a wonderful perspective photo enlarging the interior. It is going, I believe, to an aunt of hers who is a very keen quilter.

Sharon has been collecting blue and white china for quite a few years, and has turned her little building into a china shop. Everything is blue on white, very serene, and her china collection has a lovely showcase here. The shop is also lighted.

Garry made his shop deeper, and added a side building on to it; it is a Wild West bath house, with a 2-hole outhouse next to it. The bath house has two tubs, and lots and lots of accessories in it. He is our most experienced miniaturists, having spent around 3 or more decades on this hobby.
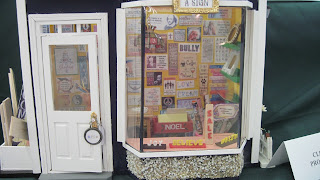
Krista is a collector of miniatures, but this shop is her first actual mini that she built herself. It is a sign shop, just full of signs of all kinds, including a bargain bin on the left. Pretty darn good for a newcomer, isn't it!

This is Louise's version of last year's Camp MiniHaHa project; a modern VIA railroad station, with a section of track, a bus shelter that is a faithful scale copy of our city's bus shelters, a newspaper vending maching, and although you can't see it, there is a Tim Horton's coffee shop on the mezzanine,
behind the graphic. If you would like to see more photos of this thoroughly modern mini, drop in at the Charminis blog which is shown to the right of this blog entry. We have decided Louise is our Queen of Modern Minis.

The Moncton Miniature and Doll Club always has a club competition table; this is an overview of the entries for this year. Unfortunately, I didn't hear which scene won the competition....
Hope you enjoyed this show report!
Wednesday, 3 May 2017
The Finish Is Getting Very Close
I woke up again around 3 a.m. and simply could not get back to sleep. What usually happens in these cases is that I think, and I think, and so on. Well, maybe something clicked subconsciously, because I went out to the patio at first light and found some really cool rocks.

Something was needed for that very dark, right back corner, and there are now 3 very interesting stones sitting in a bed of white gravel, flanked by a hosta and a grassy thing (made of plastic bits!). I also made an area of gravel from the veranda to the hosta plant. That done, I began to plant the hostas in front of the left hand wall, and they are now done. As you can perhaps see from this photo, another interesting rock will flank the gate, along with some mounds of "moss" and a Japanese variegated iris.
The sleeve fence next to the veranda is in place, and has been underplanted with a chunk of foliage and some pieces of another plastic plant. The Japanese maple will be in the space between the fence and the iris, once I get the hole drilled. I am almost done with the ground cover on the right, inside the gatehouse, and have begun with the "dirt" for the remaining hostas in front of the gate.

With the gate in place, you can see that I am very near the finish line. Tomorrow I work, but I may have a couple of hours in the early evening to "plant" the maple, and glue down the walls and gate.
Maybe my brain will allow me to sleep tonight....
Tuesday, 2 May 2017
How I Made the Hydrangea Bushes
This is a photo-heavy post, as it is a tutorial of sorts. The basic method of making the hydrangea bush is the same as for the geraniums, i.e. a dome of Crayola Model Magic on a stem, painted the colour of the flowers. (Click on the photos to enlarge them for better visibility.) You can go back to the geranium tutorial if you haven't seen it before.

I used a 3-leaf punch for the leaves, and hand-painted paper in a very lively light green; this is actually the back of the leaf paper, but hydrangea leaves are quite a bright green. The blossoms were punched with a custom punch from Hanky Panky Crafts, their tiniest 5-petal blossom, and a blue greeting card envelope with some variation in colour on the inside, which means more realistic flower colours.

The dome is a green-painted, halved styrofoam ball, the base for the hydrangea bush. The blossoms on the right are already covered, while those in front are the ones with "buds", very pale green-painted poppy seeds. The leaf wires were completed earlier; there are 5 with 5 sets of leaves, and 4 with 3 sets of leaves. Some additional leaves were cut and shaped ready to fill in gaps when the flowers were "planted".

I cut off a small portion of the plant base, as this plant like the other one, will sit up against one of the walls. Before planting, I add a pair of leaf sets below each blossom. (The pointy things on the right are the variegated leaves for the iris.)

This is just the flower heads glued into the foam base; start with the tallest at the back, gradually cutting them shorter down towards the front. Remember that the plants can still be shaped into pleasing curves, once the glue is completely dry.

This is the completed bush, with the leaf stems added and a few additional leaf sets added here and there to fill in empty spots.

And here they are, placed in their corner. The empty space behind them will, hopefully, be filled with a small, cloud-pruned pine; I still have to source the blue-green foam foliage for this, not to mention making the trunk. It will be done after the show this weekend, but perhaps in time for the miniature presentation I am doing for a rural library the middle of May. The grass has now been filled in over the green-painted area, and the left side of the garden courtyard is now DONE! Well, except for the hoped-for cloud pine.
Having two bushes in this area is much better than just the one, I think. The white strip on the base is where the large front gate will go.
It's Not Going To Be Finished, But
When I woke up very early Monday morning, I realized that I was starting to get anxious to finish the Japanese Courtyard completely, so I decided, for my own mental health, that I would do as much as I could and exhibit it as a Work in Progress.
That decision made, I was able to finish up two pieces to fill the empty wall spaces in the Shabby Chic flower shop.

The mirror-backed arched window flower box is a miniature of the one across from our bed at the Inn at Fisherman's Cove, in Eastern Passage, Nova Scotia, where the Carpenter-in-Chief and I stayed the night of the CFB Shearwater hobby show. I'd been trying to think of something to display hanging plants, and this one was just perfect to do in miniature. It still needs plants, though.
The arched-top shelf unit will hold plants and flower shop stuff; it was hand-painted and aged to look like an old piece reclaimed from granny's attic. The flower box is made entirely of mat board, with floral wire muntins and mirror card on the back. The shelf is a combination of mat board for the back and sides, with wood for the shelves.
Today I worked on the second hydrangea, and there is a variegated Japanese iris in the making for the corner by the longer fence, which is quite dark and needs lighter-coloured stuff. The spade-shaped things in the foreground of the photo is an attempt at a large blue hosta which may not be successful!
And the painted domes are, of course, bases for garden plants.
So I did a tutorial of sorts for the hydrangea, for which I'll do a second entry. At the moment, the "grass" in the hydrangea corner is drying, so I have a little bit of time.
Subscribe to:
Posts (Atom)