The Tudor Apothecary is off to one side for the next few days, while I hem rugs, sew and stuff cushions, and do a bit of rehabbing on my Christmas vignette. This will be on the Miniwiki Advent Calendar this year (come h**l or high water!) and needed some tiny items re-glued or re-waxed into place, as well as some lighting changes and the like. As I want to debut it on the Miniwiki, I'm holding off photographing it at the moment.
I'm in the mood to do a Christmas market stall, as I have quite a bit of Christmas stuff to go into it already, and it would be a great excuse to try some other small Christmas projects to fill it. A few years ago my husband and I spent Christmas in Bremen, Germany, where his sister and her husband live. While there, we visited the Christmas market, and what a feast for the eyes that was! Not to mention the scents, of gingerbread, hot cider, pancakes and gluhwein.
My stall would not be restricted to any one product, like gingerbread or straw ornaments or wooden decorations, but would sell a little bit of everything. This has led me to go back to my magazines to try and find a suitable stall; it needs to have a back with shelves, a roof and a front display area or counter. And it can't be too "different", as it will eventually have to share space with my between-the-wars market setting. I haven't been able to find a design, but will run a few photos by my builder-in-chief, aka my husband, to see if he could do it without a specific pattern. If I could fly to Europe right now, I have no doubt I would find the perfect little stall....
As well, I came across another perfect plant for my apothecary garden, pot marigold or calendula, and found a design for it in the recent AIM on-line magazine. The advent calendars created by various mini groups are also an incredible how-to resource, I intend to bookmark the lot so I can go back and visit regularly. And I need to make some polymer clay food items, both requests from others and commissions, as well as things I'd like to try, but my fingertips are very rough at the moment, from all the paper-clay work I've been doing.
So off to rub emollient into my fingertips! Hopefully, I'll have some photos for you soon. And I hope to spend a day with two mini-friends next week, weather permitting, as two of us will have to travel for nearly two hours by car - no snow allowed, please....
Friday, 15 November 2013

Monday, 11 November 2013
Tudor Apothecary Workroom Build - The Floor is Tiled and Grouted

The tiles are grouted, and the grout has been dirtied up a little with a paint wash. I staged the photo to show a small sample of the many objects I've collected over the past couple of years that will go into the apothecary workroom and its associated shop. The bench was borrowed from the Tudor Market Guild Hall, as I have made no furniture yet for the apothecary. I have to see how everything fits together before I decide on furnishings. There will definitely be a skeleton somewhere, and perhaps a "stuffed' crocodile, these shop-owners tended to enjoy injecting a little mystery into their profession.
You can see a couple of the tripods, mentioned in a previous post, on the brick stove, one of them is under the clay jar. I just love the tiny test tubes, I got those at Birmingham Miniatura last year, along with some of the wonderful pots and bottles. The mortar and pestle was acquired at NAME National in Nashua, New Hampshire quite a few years ago, just waiting for this to be built. I have also got a gorgeous wooden one, made by Pear Tree Miniatures, that will go into the shop half of this building.
Exterior matte varnish and satin varnish do not mix; you end up with something that looks like oil on water, so I'm glad I did a sample on a broken tile. Two applications of acrylic satin varnish were enough to waterproof the paper clay tiles, so the grout was easily applied with my fingers and then washed off the surface of the tiles with a small sponge. The grout will be dirtied up some more in areas of "wear" when I place the furniture.
Speaking of furniture, I think I have to go with a green shade, just to offset all the terra cotta. There's a lot of orange in the workroom right now. Normally I would just stain Tudor era furniture, but too much of a sameness in the colour makes everything become semi-visible. Green should complement things nicely.
Tomorrow I hope to make some bricks to edge the vault façade and to go above the window. Once the bricks are dry, I can do the beaming and plastering of the façade. So far, I've used a full 8 oz package of terra cotta DAS, and about 3/4 of a 16 oz. block of the white. And I've only just begun....
Welcome to my new followers, I'd love to know if you are as enamoured of Tudor as I am! Of course, I don't have to worry too much about straight lines and angles working in that period, which is my main reason for getting involved in it; I could probably not cut a straight line if my life depended on it!
Sunday, 10 November 2013
Tudor Apothecary Workroom Build in Progress - Plaster and Floor
The floor tiles took 4 days to dry completely, longer than I had expected. Until they were in, the building couldn't be put back together, so I am glad that it is now mostly done.

I had to decide whether to lay the tiles in rows, or staggered like bricks. They look better in more or less even rows - they aren't perfectly even, as there are minor variations in size and thickness. I cut them 1" (2.5 cm) square, then dabbed assorted colour washes on them for variety. The walls are plastered in paper clay, with a thin coat of diluted white acrylic to represent whitewash. Everything needs to be dirtied up and aged, of course, but that comes later. The chimney hood is in place, with its "marble" brackets, and the "marble" support brackets for the bricked vault.

The brick vault fits nicely on the support brackets. The arched front will be covered with a beam and plaster façade. The stove sits comfortably on the floor tiles - I had to leave an opening in the plaster of the back wall to keep it snug to that wall. I think these tiles would look good with a satin gloss, over which I will apply two coats of matte exterior varnish to waterproof them before doing the grouting. In order to make sure that will work, I have to varnish a sample tile first. It would be silly to do satin only to have it disappear when doing the matte over the top.

And a quick view of the plastered outside upper story, faux windows and all. These will be hidden behind shutters. The "stone" drip hood above the window will be placed once I have bricked the lower story. Again, no aging as yet, as I have to "plaster" the side of the box, around where the chimney will go, as well as brick the lower half of it. The window will be installed when the outside is bricked.
We had the first snow of the season today....

I had to decide whether to lay the tiles in rows, or staggered like bricks. They look better in more or less even rows - they aren't perfectly even, as there are minor variations in size and thickness. I cut them 1" (2.5 cm) square, then dabbed assorted colour washes on them for variety. The walls are plastered in paper clay, with a thin coat of diluted white acrylic to represent whitewash. Everything needs to be dirtied up and aged, of course, but that comes later. The chimney hood is in place, with its "marble" brackets, and the "marble" support brackets for the bricked vault.

The brick vault fits nicely on the support brackets. The arched front will be covered with a beam and plaster façade. The stove sits comfortably on the floor tiles - I had to leave an opening in the plaster of the back wall to keep it snug to that wall. I think these tiles would look good with a satin gloss, over which I will apply two coats of matte exterior varnish to waterproof them before doing the grouting. In order to make sure that will work, I have to varnish a sample tile first. It would be silly to do satin only to have it disappear when doing the matte over the top.

And a quick view of the plastered outside upper story, faux windows and all. These will be hidden behind shutters. The "stone" drip hood above the window will be placed once I have bricked the lower story. Again, no aging as yet, as I have to "plaster" the side of the box, around where the chimney will go, as well as brick the lower half of it. The window will be installed when the outside is bricked.
We had the first snow of the season today....
Thursday, 7 November 2013
Another Miniature Carpet - My Favourite Ever
We've just gotten the power back after a 90 min. outage, likely due to the mad rainstorm and wind that blew through around dinner time. As the floor tiles for the Apothecary Workshop haven't dried as yet, and I can't proceed until I tile the floor, I though I'd share my very favourite miniature rug ever with you.


I worked it quite a few years ago, it was then intended to go into the living quarters of my artist's studio. What I love about this little rug is the variation in the colours; the proper word for it is abrash, which is probably Farsi, the language of Persia. Abrash refers to the colour fading caused by the vegetable dyes traditionally used in Persian carpets, mimicked in this little rug by small variations in the red, blue and green colours. The thread used for this was Anchor, which I had to travel far and wide to find; one small general store on the French Shore in Digby County, NS was the only place then carrying it in the Canadian Maritimes. I photographed it against my Real Life hardwood floor, which complements the colours wonderfully; they glow like jewels.
Sadly, I can't remember where I found the chart for this rug, nor who the designer was; I should dearly love to see more of her work, and acquire more if it is anything like this little rug. I believe the chart was in one of the three UK miniature magazines, at least ten years ago.
This little carpet may be too grand for an artist's studio; that is why it is currently kind of homeless. I really need to make a setting for it to show off the wonderful colours. Perhaps once I finish up the many UFO's currently occupying space in my workroom it will finally find a home!
Tomorrow, hopefully, I can get back to the Apothecary Workroom; the back wall needs to be plastered, but it has to be done with space left for the brick stove and the stove hood, as well as the decorative "marble" moulding holding up the bricked vault. The stove hood and corbels for it also need to be placed, with screws and glue as they are quite heavy, before I brick the lower walls. And, of course, I have to place the chimney and decide on places for wiring to go. The brickwork will likely take a good stretch of time to sculpt, too. The particular brand of paper clay I use, DAS, has an alcohol-type smell, and it gets to me after I've been working with it for more than an hour or so.
Monday, 4 November 2013
No Photos Today, As Paper Clay Drying is Boring!
The inside walls of the Tudor Apothecary are drying, as I was able to skip the brick lines I thought I'd have to make. Apparently, and why didn't I realize this, the Romans plastered all their inside walls; then they painted them, either with gorgeous scenes or faux panelling and pillars. So, I went ahead and did two of the walls. Hopefully, they will be dry tomorrow, ready to sand, paint, and age.
The difficult wall to paper clay will be the one with the stove and hood on it; no paper clay where they will go, so things will stay in place. Also, I have to start drilling holes to take wiring; in all likelihood, I will use LED lighting on batteries, those have to be researched to see how many and so on, as I've only installed single LED's so far. I'd like to make a four-arm candelabra for the work room, as well as a fire in the hearth, and a wall sconce or two. Then all the wires will have to be hidden somehow, on the outside back wall most likely. Things to ponder....
The "marble" vault supports and hood brackets are painted and ready to install once the walls are done. The "stone" drip mould looks pretty good, so it is ready to place once the lower front wall is bricked. The beams on the upper front wall are in place, so as soon as the inside plastering is dry, I can tackle the outside plaster. Right now, all the walls are disassembled as they are so much easier to work on when they lie flat. And I have to put either stone or tile on the huge floor area, nearly144 square inches! Paper clay floor tiles have to dry under a weight, so they take several days to dry completely.
The new, thinner front arch has been cut, that will need bricks on the arch area, and timber supports with plaster on the rest of it. And I have to figure out a nice way to finish the front edges of the MDF carcass, usually we iron on veneer tape. In the case of this building, however, the edges would likely have to be painted. More decisions to make. And we need to cut the lower half of the outside chimney, as it will have to be considered in the outside brickwork.
The difficult wall to paper clay will be the one with the stove and hood on it; no paper clay where they will go, so things will stay in place. Also, I have to start drilling holes to take wiring; in all likelihood, I will use LED lighting on batteries, those have to be researched to see how many and so on, as I've only installed single LED's so far. I'd like to make a four-arm candelabra for the work room, as well as a fire in the hearth, and a wall sconce or two. Then all the wires will have to be hidden somehow, on the outside back wall most likely. Things to ponder....
The "marble" vault supports and hood brackets are painted and ready to install once the walls are done. The "stone" drip mould looks pretty good, so it is ready to place once the lower front wall is bricked. The beams on the upper front wall are in place, so as soon as the inside plastering is dry, I can tackle the outside plaster. Right now, all the walls are disassembled as they are so much easier to work on when they lie flat. And I have to put either stone or tile on the huge floor area, nearly144 square inches! Paper clay floor tiles have to dry under a weight, so they take several days to dry completely.
The new, thinner front arch has been cut, that will need bricks on the arch area, and timber supports with plaster on the rest of it. And I have to figure out a nice way to finish the front edges of the MDF carcass, usually we iron on veneer tape. In the case of this building, however, the edges would likely have to be painted. More decisions to make. And we need to cut the lower half of the outside chimney, as it will have to be considered in the outside brickwork.
Saturday, 2 November 2013
MiniatureTudor Apothecary and Workroom Buildings by Brian Long

This is the basic design of the next build, a Tudor Apothecary shop and attached workshop. The project is by Brian Long, for Dolls House and Miniature Scene, and ran over 4 months in 2007 and 2008. The carcase of this project was a gift - I can't remember if it was Mother's Day, birthday or Christmas - a couple of years ago, and it has been sitting and waiting for me to get back to it. Well, today I began again. The instructions are very sketchy, so I am having to extrapolate quite a bit from the photos.
It is hard for me to leave anything alone, and so it is with this one. The workshop, with the large arched opening, has a vaulted ceiling, nicely finished in the original with brick paper - I used paper clay. That part is long since done, and it was a job and a half. The base for the paper clay ceiling is part of a concrete footing tube.
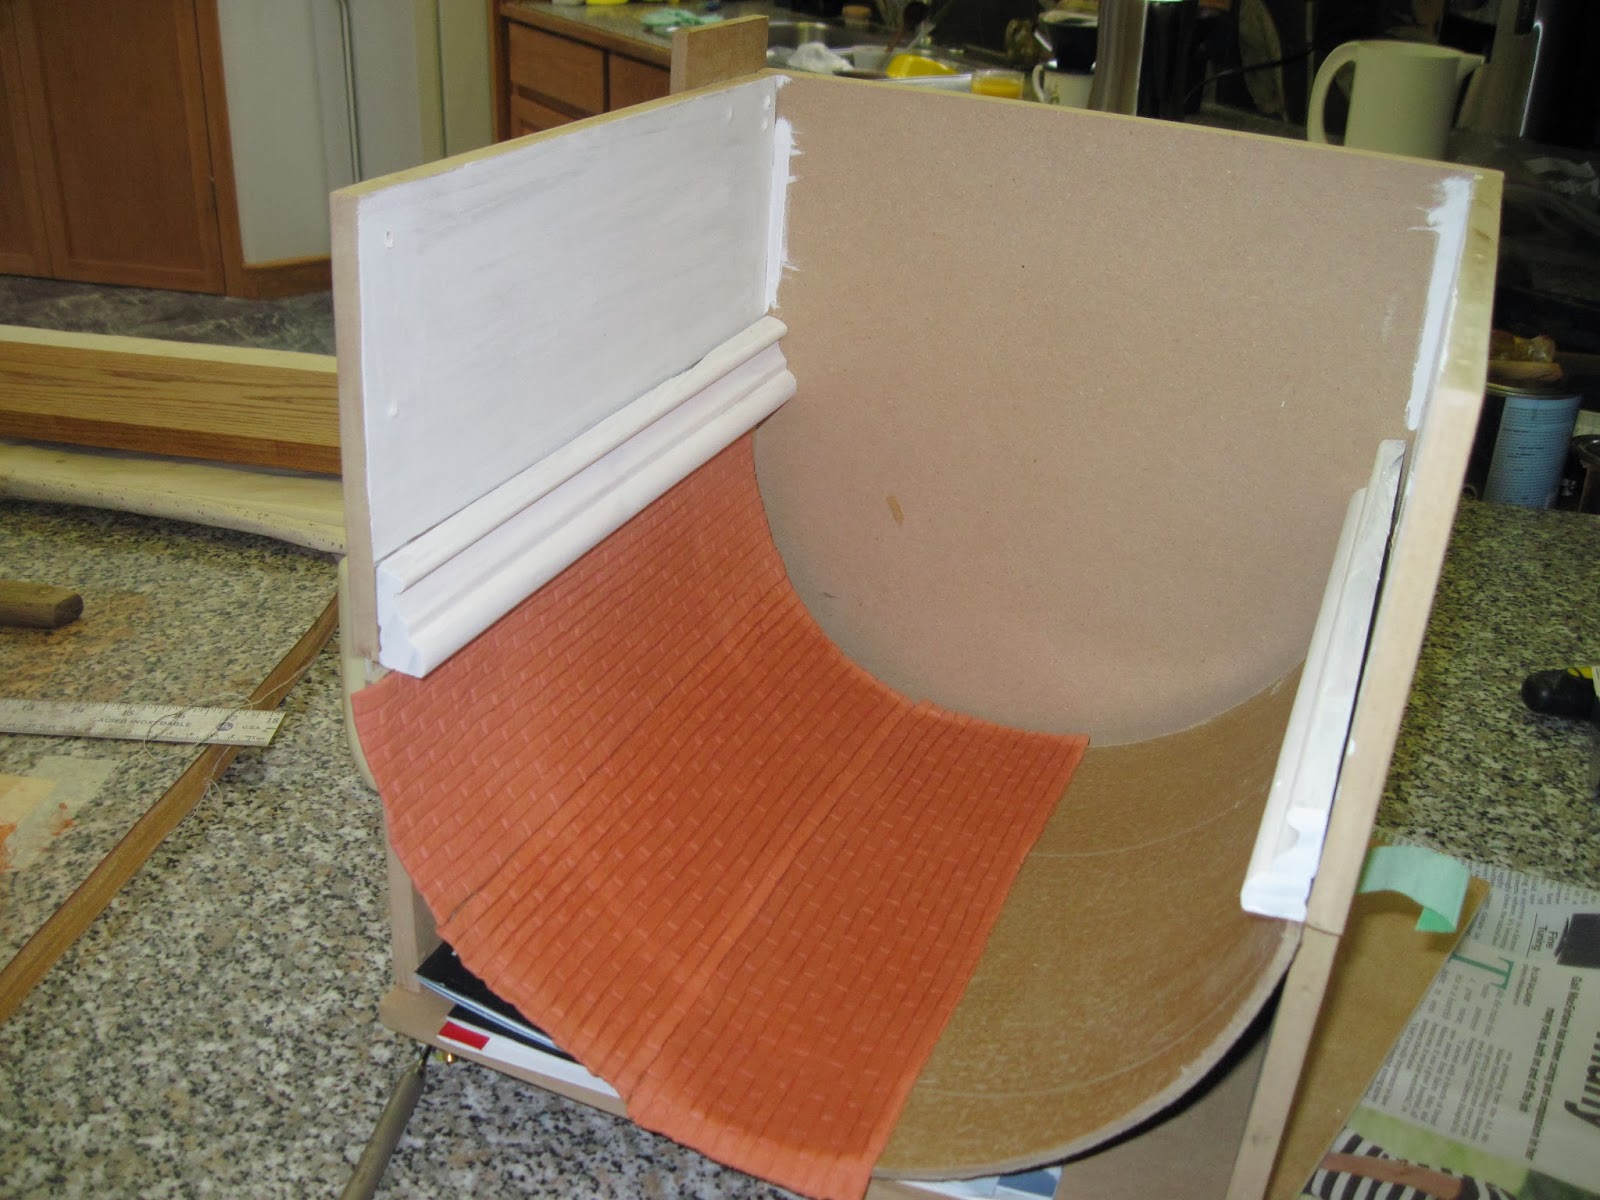
This is a photo I took of the process, two years ago. I made long slabs of brick and placed them side by side in the "vault" and once dry, added cement lines and colour-wash to the bricks. The cube for the workshop is about 12" (33 cm) to a side. The workshop is intended to be a re-purposed Roman vaulted room, so the bracket holding the ceiling needs to be faux finished to look like marble. Back then, I also made a Tudor brick cook stove and a hood, which will go against the back wall. All of this interior space needs to be bricked, and the bricks need to look as if they've had several centuries of whitewash, so the brick lines need to be rather faint.

Last year, I saw stoves just like this in Hampton Court Palace; Henry VIII had all his meals cooked on these stoves . I did learn that I'd need a metal tripod to place above the cook holes, and that the pots were primarily pottery, terra cotta with a green interior glaze, so I will have to take up potting with polymer clay one of these days. The stoves are almost identical to Chinese cooking stoves, which have a wok sitting over the hole, with steamers if you cook more than one thing at a time on top of the wok. And I picked up three tripods at Birmingham Miniatura, although one lost a leg and will have to be repaired.

This is the side of the workshop I am currently working on. The upper windows are false, as they sit above the arch inside, and will get shutters. The lower window will be glazed, I am currently ageing and staining the timbers for the window lining and the beams of the building. The lower half of this building will be bricked, the upper plastered between the timbers, and the drip mould will be faux finished to look like it was made of stone (I hope).
My work table is an unholy mess, so I have to tidy that up before continuing on. Another change that is coming is the façade with the arch; it is going to be thinner, to allow me to timber and stucco it. No allowance was made for that in the original design, and it has to be set back to allow the piano hinge that holds the two eventual buildings together to fit properly. The other façade was set back ready to receive timber and stucco, and I'd like the two to match better.
Check back regularly to see how this building progresses. It will, no doubt, be interrupted for other, more important things, but I'd like to have it done over the winter. Then I can go back and complete some of the other UFO's I have sitting around. Long post, but I wanted to give you an idea of what is involved in this particular miniature. My husband isn't too fond of British instructions, he finds them rather sketchy and of course, they use UK terms that we then have to translate. This is the fourth British project he has cut out for me; the others include the Tudor house, Tudor Market Hall, and the garden shed project. The Pawn Shop came from a Dutch publication.
Friday, 1 November 2013
The Shop and Garden Project - An Update

This piece came with me to Camp MiniHaHa '13 to go into the display room. Before heading off for camp, I made a few small additions to the outside. The door still needs hinges and a doorknob, I am looking for a way to make my own. The sun sculpture was a gift at CMHH '12 and is perfect for the side wall. There is a Bonnie Lavish dandelion growing up against the fence, another CMHH '12 gift. The weathered zinc planter with lavender plants is a design from 1 zu 12, the German magazine; the planter is the bottom of a tic-tac box, with a glued-on sequin flower, and a rim made from file folder cardboard. The whole thing is then painted. The crate with the shabby chic label, faded hydrangeas, Spanish lavender plant and gardening book is my gift exchange creation for this year's camp.

The only changes to the side wall include the robin shelter, complete with robin and nest inside with eggs, my CMHH '12 exchange gift creation, and the cat you can just barely see next to the blue fence; she is a repainted resin cat, to resemble our dark tabby cat. The cat is looking up at the robin, who is looking down, and the cat would really, really like to get closer to the bird....

The major changes are inside the shop; I was "auditioning" items to go into the shelves and other displays. Before camp I put together some kits and bits and pieces to make a number of bottles, jars and containers, added some exchange gifts from last year's and earlier camps, and put together a couple of plant kits. Some gifts from my older daughter, chosen to complement this vignette, are also in the display. The purple display rail will get bunches of "dried" lavender, and there will be bins of soaps, more jars and bottles and other pretty things on the empty shelves, and I have to hunt around and find the printies of those wonderful display boxes again - I forgot to bookmark them. Oh well, a good excuse to waste a few hours on the computer!
While sorting boxes the last couple of days, I found more items that will go very nicely into this shop, both in terms of colour and suitability, so more pretty things have been added to the box of things that I hope to fit into this shop.
The shop is intentionally a little shabby; the imaginary owners are using old and new items in the shop, and are doing a lot of refinishing themselves. However, further fixes will have to wait until they have a nice cash flow going. I kind of like the shabby chic shelves against the fancy wallpaper, but will admit there is a lot of colour going on at this point. I am not completely sure about the colour of the table, that may have to be replaced with a more imaginative display area. Something to think about while trying to fall asleep....
Subscribe to:
Posts (Atom)