Friday 15 December 2023

I'm Working on Christmas Gifts Right Now

Usually every year I attempt to make some home-made gifts for my family, and this year is no exception, except that I've gotten very behind at what I'm working on. It's mostly a question of supply availability, which means that I've got several things going on at the same time. I'm knitting, quilting, and there is some sewing and embroidery lurking about for my attention, as well as some knitted decorations that need stuffing.

We are still working on the Maple Sugaring diorama, but with the busyness at this time of year, things tend to sit around until there is a block of time to actually finish them. 

Stick with me, I promise there is more to come. 

Winter is here, we had snow and then loads of rain. As depressing as that was - there was some localised flooding of low road areas - I keep reminding myself what it would have meant if that rain had come down as snow! There have also been more than the usual number of get-togethers with friends and family this year, which is lovely, but has added to the time things on the go tend to sit unfinished. We have company staying with us for nearly a week over Christmas, which means the house needs some real attention. In my kitchen cupboard is a mug that has a slogan on it "What housework? I'm busy crafting." 

Yes, I am.

Tuesday 14 November 2023

...And a Few More Things


 Woodpile, chopping block, borrowed axe, stumps to to sit on, and finally, barely visible, a damper for the fireplace. Now for lids and spiles for the sap cans....

Wednesday 8 November 2023

Fatigue and a Carrying Chest


Yesterday, I had my Covid booster, and I'm feeling very tired, an expected side effect. However, I did manage to finish a six-board chest, painted in barn red, (still needs its rope handles, though!), for my maple sugar workers to carry their gear in. I managed to create a passable sieve, used to remove bark bits etc. from the raw sap, so that is two more items for the diorama.

 We've had two overcast days, with rain constantly - although I'm not complaining, as it could have been snow - which means I've not yet been out in the garden to retrieve some firewood branches and tree stumps. They'll be in scale, of course, one large stump for chopping the logs for the fire, and two small ones for the workers to sit on. They can use the chest as a table to hold their tea and meals, as it is several days' work to boil the sap down into syrup. I also need to make lids for the syrup buckets, and then I have to create spiles. 

As I don't work tomorrow, since my bosses at my volunteer job are at a three-day conference, and will try to make some items for the diorama then. Hopefully, I'll be less tired. My first attempt at a tea kettle didn't work out that well, so I'll try that again. The lid ended up being too small to stay on top of the kettle....

Saturday 4 November 2023

Maple Sugar Buckets, and....


 It took several days, and about 8 applications of sealer, paint coats, and varnish to produce these sap buckets. They are made of recipe card cardboard, and were finished to match the buckets on the trees in the background, which are rather more pale yellow-silvery than the paint job on the fireplace and the evaporating pans. The little scraper is also made of painted card, with a toothpick handle.

On the drawing board are a teakettle, a couple of mugs, and some more necessary tools, as well as a woodpile, among other things. At some point, I have to produce a  passable facsimile of a large copper cauldron. Along with the woodpile, the scene needs a couple of stumps, one being used as a chopping block for the wood that goes into the fireplace.

And the other thing? Well, the third attempt to acquire the 1/8" heart punch is now over; we received it late last week, and it was once again the wrong size, this time measuring 3/8". We've given up and asked for a refund of our purchase price. Now I have to see if any of the dealers I know carry this size of punch, or are able to source one for me. Sigh! I don't know right now if I'll ever be able to get back to the garden corner vignette. However, I haven't given up hope yet.

Monday 30 October 2023

It's Too Soon!


My Front Garden/Apple Orchard

This just plain isn't fair! It was 24 degrees Celsius on Saturday, but 5 degrees on Sunday, and this is what arrived in the course of today, Monday. Yes, those are nasturtiums under the snow at the right. There are also still sweet peas blooming, but likely not for much longer!

Fortunately, this was forecast, but we try to be hopeful; it didn't work this time. The snow tires went on my car yesterday, just in case, and the snow scraper/brush was already in my car. It'll be cold for the children tomorrow for Hallowe'en. Six months of this stuff is not something I look forward to....
 

Wednesday 25 October 2023

The Directions Aren't Always Correct!


 As I had mentioned earlier, when I started this project, we're working from a series of articles in Nutshell News published in 1992. I said in my previous post that I'd make another set of evaporating pans, as the first set didn't fit on the sugaring fireplace. Well, the second set was also too long....

Out came my ruler, and after measuring, two or three times, the drawings from which I was supposed to take measurements, the diagrams for the fireplace and the pans did not exactly work out size ways....

My resolution was to add a row of stones to the end of the fireplace, which made everything fit just right! A bucket is awaiting some more faux painting, and I did manage to make a scoop out of card and a decorative toothpick; all it needs is some painting. I've also got to make a sieve and a wooden paddle scoop, as well as a skimmer. I may have to use heavy aluminum foil for the latter, as it needs holes as well as a shallow, dished profile, but I'll experiment with card at first.

The sledge is stained, and the Medieval Market offered up one of its large barrels. I kind of want another barrel, though, as well as another pail. My first experiment for the sap bucket didn't work out as well as I'd hoped, so I'll try another approach on Friday. Tomorrow I work.


Saturday 21 October 2023

That Part is Done!


Today's work is the painting of the sugaring fireplace hood and chimney. It has been faux-painted to look like tin, complete with rivets along the hood seams. The photo can be enlarged by clicking on it.

Tomorrow the new evaporating pans, and the damper which goes behind the fireplace, to control the flow of air for the fire.

Friday 20 October 2023

Made Some Mistakes....


The handles on the evaporating pans are on the wrong side, which probably means making a couple of new pans. The backdrop is there to give you an idea of what this scene may look like, but keep in mind we're in the early stages yet. I bricked the fireplace on Wednesday, but decided to paint the bricks as I did not like their original colour. As the bricks are a plaster product, the paint had to dry thoroughly; also, I worked at my volunteer job Thursday.

The stuff on the back of the fireplace is the hood and chimney, made in cardboard, currently being held in place by a drinking straw, so that orange thing will go away! And of course, the whole fireplace hood needs to be painted to look like well-used metal. The sled too needs to be stained, as well as the one bucket, and they all need to be dirtied up, um, that is, aged.

Tonight I'll put a seal coat on the card, and then I can do the faux metal painting over the weekend. It's an interesting project, for sure, but so many small bits and pieces!


Among the smallest are the spiles, i.e. the taps, if you like, that are inserted into the tree to allow the sap to drain. The ones above are very old, made of wood, except for the one at the top, but as they are maybe 1 cm or so long in miniature, carving wood that way would be horrible.


These three are the basic spiles; I will use the type at lower right, more cardboard to paint to look like tin. The narrow end goes into the tree, and the hook is for the sap bucket to hang below. I also have to make quite a few of those, along with their hinged lids that prevent forest debris and perhaps bird droppings from getting into the precious maple sap. Fiddly work, but I'll work a way to do it quickly. I photographed the spiles at my volunteer job; we have a large number of them, so I had the real thing to study!


Monday 16 October 2023

I'm Back, But Still Waiting for the Punch....

We got back from our visit to western Canada for quick visits with our 3 children and their respective spouses/partners,  without getting sick from the rhinovirus hitting that province and the kids (1 just over it, 1 partly through, and 1 at the end of it) or catching Covid from airplanes, and wonder of wonders, no luggage was delayed or lost. We had a good time, and now that I've more or less adjusted to Atlantic time (3hrs earlier  than the mountain time we lived with on our vacation), I'm finally sleeping through the night again.

I achieved a goal from my bucket list; fifty years ago, I worked for the Western Regional Office of Parks Canada, and decided that I'd like to visit all the Rocky Mountain national parks. Well, I visited them many times, except for Waterton-Glacier Peace Park, which straddles the border between Canada and the United States. Usually, I don't post personal photos, but I finally, finally got there! We had traveled through the US portion years earlier, but never to the Canadian part.


It was cold and windy, so I'm huddled into my jacket. The park is within easy travelling distance of my youngest daughter's house, and she was kind enough to take us for a couple of walks there. Bear evidence was everywhere; the trail we'd intended to hike was closed due to a deer carcass
 - which means a very hungry bear is not far away - and there was a huge pile of bear scat full of berries on the sidewalk on the edge of the parking lot at Red Rock Canyon. This time of year, bears are bad-tempered and are everywhere, and we people have to give them space to fatten themselves up for winter. We passed a "bear jam"  - cars parked either side of a narrow access road to view a young black bear eating berries up the hill - and got the heck out of there before some silly stupid tourist got out to get up close for a photo.

As to the title of this post; we got a message via email that there had been an attempt to deliver the long-awaited punch "mid-month"  while we were away, of course, so we tried to track it. The Carpenter-in Chief headed to the post office to see if it was there, but they said the parcel had had a Montreal address. A message to the company with the tracking number informed us today that the package had been unsuccessfully delivered to an address in Montreal, Quebec (a day's drive away), so it seems we were given the wrong tracking number by the dealer. We have informed the dealer of their error, and are awaiting the response. Will I ever get that punch, I wonder?

Wednesday it's back to minis....

Thursday 21 September 2023

A Couple of Small Things....

 This week, I actually had some time to do some miniature crafting. The photo below is the start of a pair of evaporating pans, used in the maple sugaring industry prior to mechanization. As the diorama for which these items are being made is static, i.e., the items will be in a sealed room box and safely glued down, I'm using some simple materials and paint to mimic metal, etc.


The pans were made of cardboard from the back of a writing tablet, scored, folded, glued and reinforced with finer cardboard tabs. The handles for the pans were made from the wire end of a pair of eye pins, of which I have a lot, shaped around a thin piece of wood, held on with recipe card tabs. The edges of the pans were rounded with some crochet cotton.

And this is what they look like after many coats of paint, reinforced with sealer, and then varnished:


I sealed the cardboard first with a multipurpose sealer, then painted it in hippo grey. This was then dry-brushed with lighter grey, a bit of red iron oxide, pewter metallic, and the bases (which sit over the fire) darkened with black. Once all the paint is dry, the pans were given a coat of satin varnish. They now look convincingly like tin pans that have seen a lot of hard use! (I'm looking for amber acetate film, to mimic the maple sap in them.) Did you know it takes 40 gallons of sap to make 1 gallon of maple syrup? Hours and hours of evaporating slowly over a wood fire, while being stirred and skimmed....

The two small items in front are a hydrometer, made of an extra-long bugle bead with a blue glass bead glued and pinned into the end, and its case, made of an off-cut of brass tubing with a handle made from an earring back.

The pans are sitting on a sledge, which is glued, pinned and ready to paint and age. This would have been used by one or two men pulling it, to bring buckets of fresh maple sap from the trees to the maple syruping fireplace. As maple syrup is harvested in these northern climates around the end of March, the woods are usually still very much covered in snow. Larger sugar bush businesses would have used a dray horse to pull a much larger sled, but this operation is the kind a farmer and his family would likely have had, for producing syrup primarily for their own use.

I'm off for a visit to my children out west. Marilyn hopes to have the diorama room box done by the time I get back the first week in October, and has found the perfect photo of a maple sugar forest, complete with snow, for the backdrop to our joint diorama project. There are lots more tiny items to be made....

Now, if I can only figure out how to create a new label for this project, to make the process easier to find! 

Friday 15 September 2023

New Group (just 2 of us) Project

 The proper size heart punch has not as yet arrived, and we'll be heading off for a short vacation shortly, so Marilyn and I decided to get started on our joint winter project, a maple sugaring diorama which we will donate to our local living history museum, Kings Landing Historical Settlement, for use during their Maple Sugaring Weekends end March of each year.

Marilyn and her chief carpenter are starting on the actual diorama (roombox), while I'm beginning the many pieces needed to flesh out this scene. I've begun with a pair of evaporating pans, and hope to have a photo in the next day or so. We are working with instructions by Ruth Armstrong, published in 3 parts in the summer 1992 issues of Nutshell News. Mrs. Armstrong specialised in metal miniatures, but we are not metal-workers, so we'll be using card, matte board, wood and the like to create our sugaring equipment. 

We are awaiting the landfall of Hurricane Lee, which we all fervently hope will be downgraded to a tropical storm when it hits our shores; however, we are moving everything that could be picked up by heavy winds to a safe, roofed place. We'll likely take the clothesline down too, as the last time we had a really bad storm, a tree came down on it and tore off part of corner cedar siding on our house.


Thursday 24 August 2023

Going Ahead....


I've begun putting the leaves on the wild rose bush in my garden vignette, starting with the baby leaves on the tips of the branches. Yesterday, we got together for a mini meeting, and that's where this process was started. It's going to take a lot of leaves, and a lot of time, to get it looking full and bushy! 

The punch company is sending me a replacement, so I'm keeping my fingers crossed that it won't be too many weeks to get here, as I think I may have to place some of the flowers, buds, rose hips etc. before all the leaves go on.

An exercise in patience, for sure, and I'm doing my best....

Friday 18 August 2023

On-Line Shopping is the Pits!

 Well, the long-awaited heart punch for the garden corner vignette arrived yesterday, but I need an 1/8" (4 mm) punch, and what arrived was a 5/8" (16 mm) punch. We are now having to arrange the return of that one, and the acquisition of the proper one, but I think we're dealing with another country, and another language, which means it may be weeks and many more dollars before the small punch arrives, if ever....

Another long wait, therefore, before I can get back to that project. Perhaps I should dig out another unfinished one, and see if I have enough of whatever on hand to complete that instead. However, I will stay hopeful that I will, one day, finish all my unfinished projects!

It's almost enough to make me give up my hobbies; however, I'd probably lose my mind in that case....

Tuesday 15 August 2023

I Didn't Know I Had That Many Beads....

 It is taking longer than expected to sort and decide what to keep and what to give away of my bead and jewelry findings stash! This afternoon I thought I was nearly done, but then I discovered three more boxes of findings and beads, along with a couple of tins of broken jewelry waiting to be fixed. Most of the findings and a fair number of beads will go, with a few kept for cosmetic pots, jars, bottles and vases. It'll be another day or two at least, as sitting hunched over my work table with my magnifying glasses slipping off my nose, tweezers in hand, is very wearing....


This is an overview of the two tables in use for this sorting project. There are beads, boxes and baggies literally everywhere. Believe it or not, I've already emptied five plastic boxes, one of them very large indeed. One of my bead sorting containers is full of jewelry findings and a large assortment of beads, ready for delivery to our local hospice shop.


The two shallow plastic boxes at left are among the ones now empty, having been sorted into one of (currently) 3 boxes; one holds nothing but small beads, while the larger holds various sizes of "useful" beads and a smaller one is currently holding baggies of seed beads I hope will find space of the larger box. While I was at this job, I decided to pull various other boxes and trays of things set aside for mini use. With luck there will be no more than two boxes of these little but useful items at the end of this exercise. 

I want to do some real minis now.....


Wednesday 2 August 2023

Still Here, and Waiting....

It has been a while since I posted. In the meantime, we went on a short holiday, worked on the Provincial Highland Games, traveled a bit locally with a friend, and tried to bring the household under control. We are about to have another short trip soon, then a visit with our children in late September, and if all goes well, we are having a serious holiday next March/April.

My garden corner is still waiting for an affordable 1/8" (3 mm) heart punch for the roses, and this is proving to be a very elusive quest indeed! No one in town sells punches any more except for our local Michaels, and they only seem to carry huge ones. There are scrap-booking places, but they don't carry punches. (I guess that hobby is dying out somewhat!), and I don't have any mini friends who do have the size I need.Yesterday I did find one on-line, for $15.98 Cdn, but with shipping and handling it came to close to $40 - I refuse to give in to the new commerce! I will keep looking. I'd even be happy to rent one for an hour or so, if I could find someone who had one....

There has been some good come of this, though, as I've tidied up a lot of my hobby supplies, and now I need to sort and get rid of any beads I'll never use.

Hope the sun is shining for you and that it is not too hot.


Monday 10 July 2023

Two Plants for the Garden Corner


 There are two finished plants for the garden corner, both of which in Real Life grow in my garden; the dianthus and the hydrangea. The former is meant to create a pop of colour in what will otherwise be a very "faded" garden....

It took 3 different plant pots before I was happy with the pot the dianthus are now in; the first was too big, the second still too big, and the third one was just right! These little flowers were made following a tutorial by Michaela of Michaela's Miniatures, a German blog. I coloured white paper with alcohol markers, dotted on a centre of white paint, and when that was dry, added a tiny pink dot with a fine marker pen. 


Close-up you can perhaps see the detail in these flowers; there are tiny sprigs of real greenery between the paper flowerets, which are fixed to two cupped snowflake punchies glued back to back. The hydrangea buds are painted seeds of some kind I found in my spice cupboard; as the label had come off the container, I can't tell you what they are, but they are red-brown and about the same size as poppy seeds.

As I'm going away for a few days, there will be no blogging for a week or so, but I hope to be able to get to work on the roses very soon.

Monday 3 July 2023

Well, It Seemed Like a Good Idea!

 The lavender plant has been planted, but it is not going into the garden corner!


I had long wanted to make the rooster plant sticker (1 zu 12 Magazine), so I decided to plant the lavender in a weathered, painted basket and stick the rooster in with it. However, it seemed out of scale with the rather small garden corner vignette. It is now living in the Provencal scent shop setting - roosters are, after all, a symbol used in France! It works much better here.


The weathered zinc planter which used to live in the Provencal scent shop setting is now going to live in the garden corner, as this size planter is much more in scale. Oddly, the flower soft-like material I used to make the lavender blossoms had turned a sort of rusty maroon colour in the past 10 years; I imagine it interacted with the glue somehow. A fine paint brush and some lavender paint restored the colour, and it looks good now.

On to planting the hydrangea; however, I may wait a bit with that and put together a dianthus plant instead, as I've long wanted to try the tutorial on one of the German miniatures blogs....


Thursday 29 June 2023

Got Some Things Done Wednesday

 We had a mini get-together Wednesday, and I did manage to get some things done.    


And now I have to start tidying away all my paint bottles, flower-making supplies, find a jar to put the purple flower stuff in, finish the hydrangeas, finish the lavender, make space on my worktable, etc., etc.
I'd better get to work! 

The heart punch I need makes a 1/8" (4 mm) flower petal, and I have found one on-line; now I just have to figure out how best to acquire it, in order to make the actual roses, and then the little garden corner can continue on....

Wednesday 21 June 2023

Rose Hips, Rosebuds, Leaves and a Rosebush Skeleton


Before I began making flowers etc., I thought I'd better make a skeleton for the rose bush for the corner garden vignette. This is just a beginning, smaller side branches have to be added, But it was necessary to get an idea of how many (too many!) flowers and leaves, etc., would be needed.

The lovely wooden barrel the bush is growing out of is an old English Leather after-shave bottle top, that my father saved for me and which has been around for probably around 20 years or so! I think if some hoops are added, it will look more like a barrel.


Kind of a bird's eye view, but what you see here is a beginning on the leaves for the rosebush, along with the start of rosebuds and rose hips - these are the green ones, the bodies of the orange ones, made of layers of glue on wire, are still drying. It is a lot of work, but I hope it will look like the original vision I had of this little project.

Now I have to research where I can order a tiny heart punch to make the leaves for the roses....


Monday 19 June 2023

The Long Hard Journey to a Rosebush....


It certainly doesn't look like much as yet, but those little pieces of wire sticking out of the foam will become  Dog Rose (Rosa canis) buds and rose hips; they're made of glue on wire, and the thick, tacky glue takes time to dry, especially as we are experiencing a recurrence of April weather here; endless rain or dripping mist, grey skies, no sun, and despite it being near the end of June, the down duvet is back on our bed, I wore my winter coat again this weekend, and we actually had the heat pump give us heat instead of air cooling!

We enjoyed our company, and with various festivals happening around here, even if the weather is pretty bad, we are out quite a bit. The rose bush is going to take lots of time, especially if I have to order a small heart punch for the petals; I have mislaid my heart punches, or perhaps I wore them out....

The rose bush is from an old issue of 1 zu 12, sent to me many years ago by the late Dutch miniaturist, Elly de Kraker. We had corresponded via email on a miniaturist website which I can no longer access, and met up at a Dutch miniature fair one year. I have a lot of very good tutorials that she sent to me. Unfortunately I don't have the date of that tutorial, otherwise I would share it with you.

By my estimate, to create a good-sized climbing rose bush for my garden corner vignette, I'll need hundreds of buds, blooms, rose hips in various stages of ripeness, and many more sets of leaves. The paper for the leaves is being painted, layers of leaf green with a sprinkle of rusty brown to represent the inevitable spots I get on rose leaves....

Hopefully you'll come back to check on my progress!

Monday 5 June 2023

The Stage is Set....


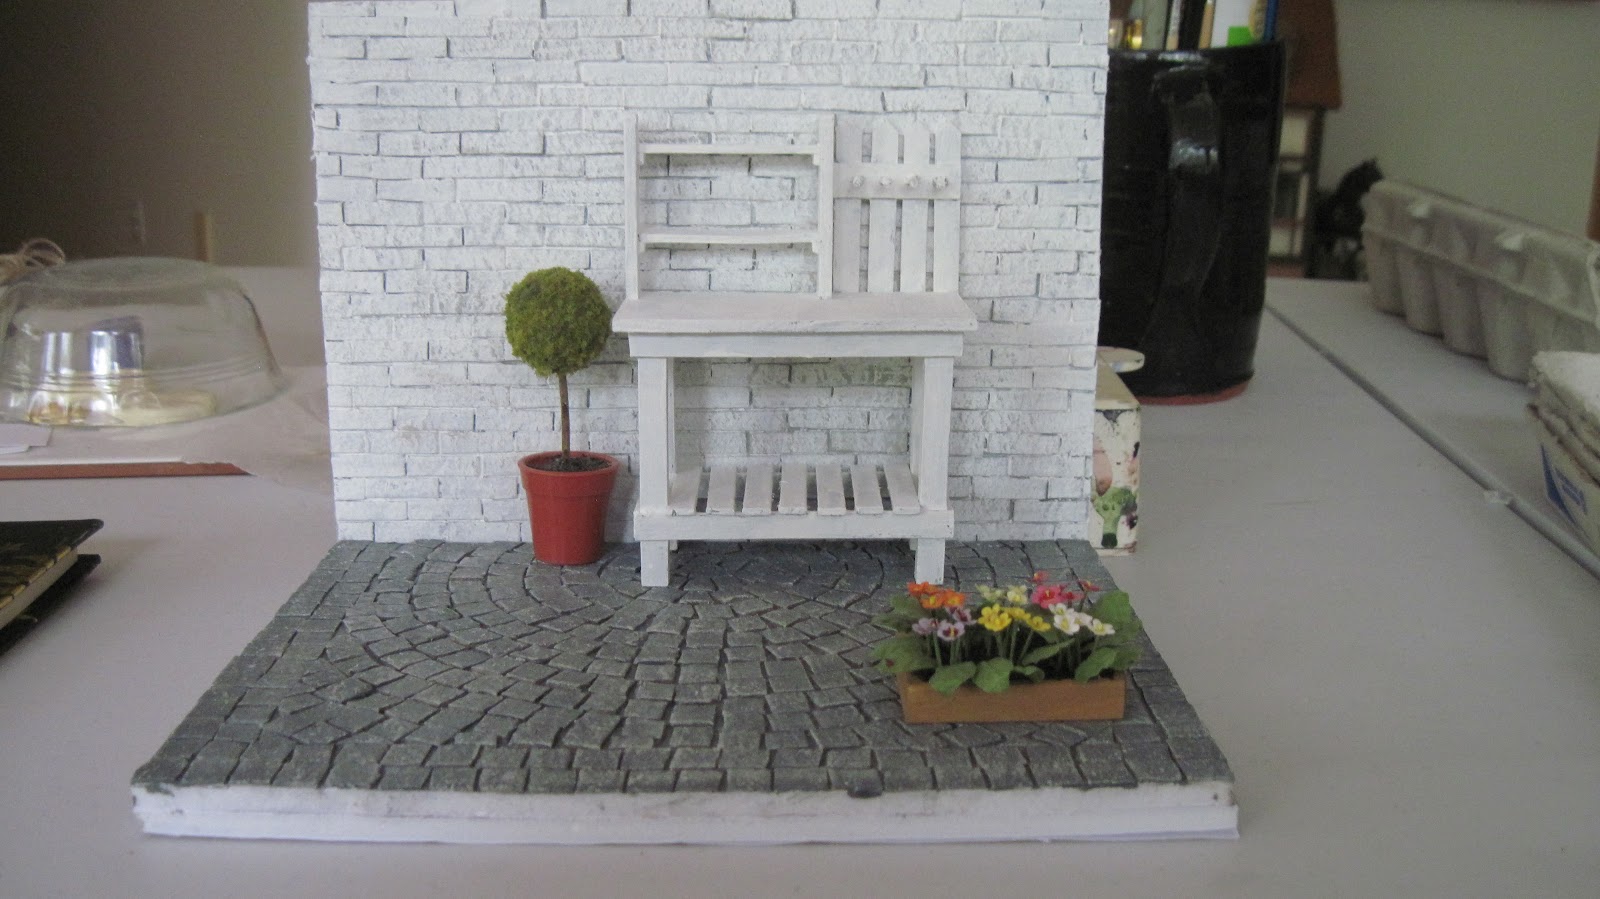
The Garden Corner is now constructed, and the next step will be to "dress" the stage; I have a bit of theatre experience, and if you've been following this blog for a while, you will already know that I operate on the belief that, if it looks like what it is supposed to be, I've succeeded.

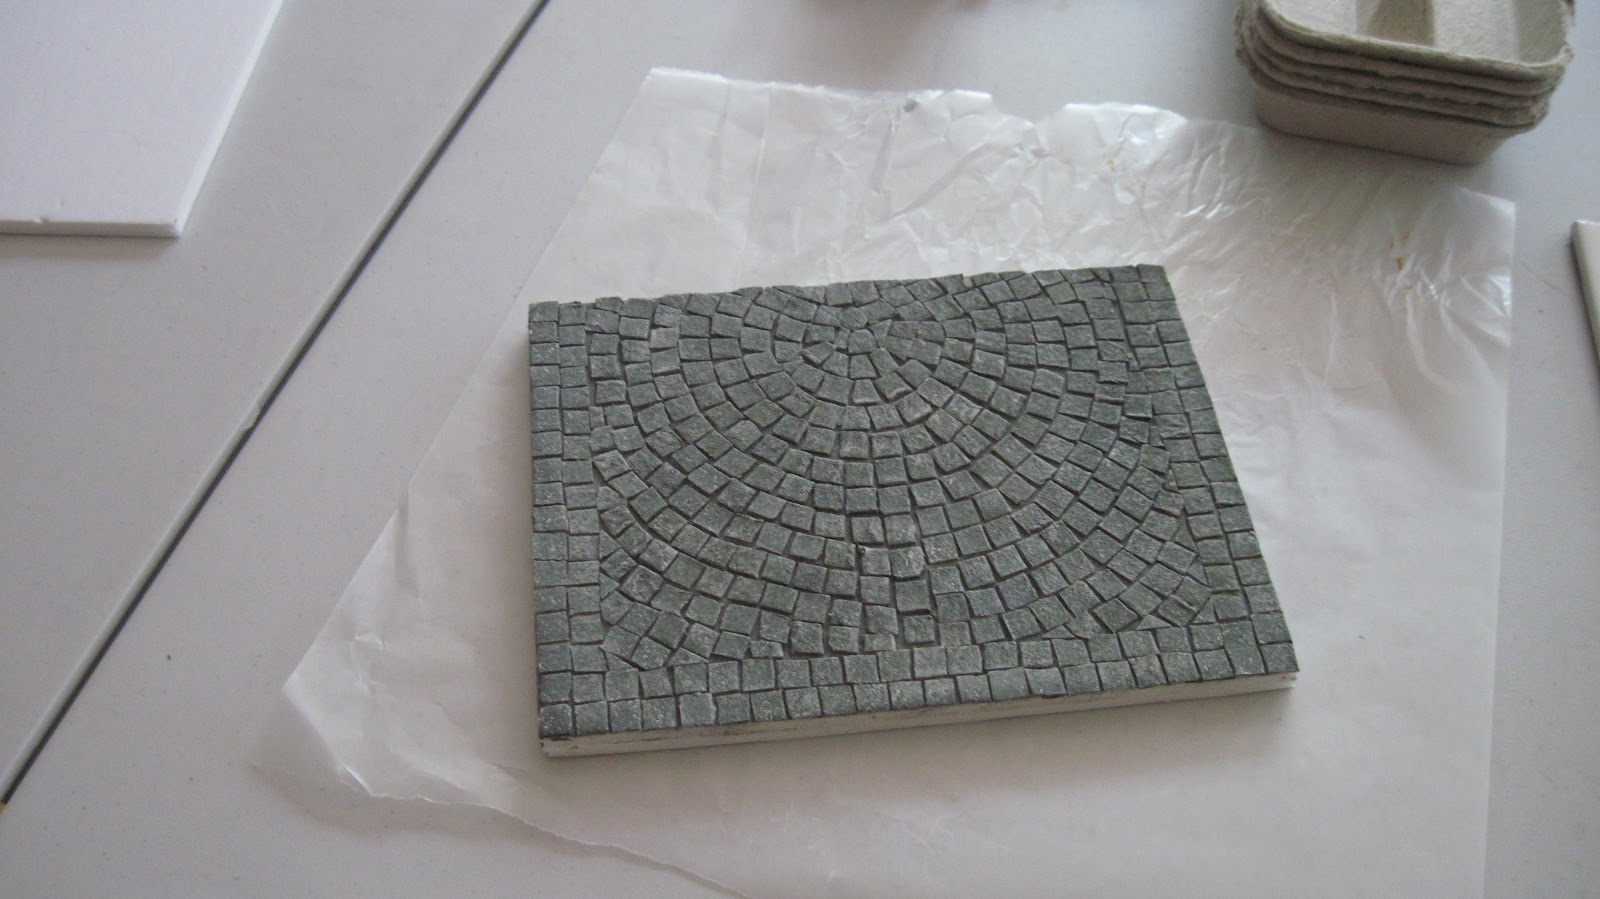
The basic L-shape is made of off-cuts of inexpensive foam core board, mostly from the $ stores, a double layer for the base and a single layer for the back wall. The pavement and brickwork is made of egg carton bits and pieces, painted and with a little green "algal growth" around the edges. The fence is made of coffee stir sticks, and there is a bit of a story.

Dear Readers, there is a world-wide shortage of skinny coffee stir sticks. I had 5 1/2 left over from the Covid era, and went shopping for more. Three $ stores and a large supermarket later, I'd been informed that they just couldn't get them any more, supply issues, most likely. Hmmmm, the world supply of  non-hardwood trees is that scarce? The stir stick factory closed? I suppose it is possible. I did find a very small package for a very large price, and Sunday one of my knitting group friends let me know that they are once again available at that supermarket (unlike last week), at 100 sticks for $4.50 - they used to be sold in $ stores for 100 sticks for $1.25; that's more than three times the previous price.  
 Fortunately, my knitting group friend is one of two ladies who do a lot of volunteer work for my church, and they said they thought there were some skinny stir sticks left over in the basement kitchen. I found just 21 of them, and combined with the 5 I had, was able to construct the fence. Now I wonder if I should go and buy the much more expensive ones, before they too disappear. Be warned, Dear Readers....

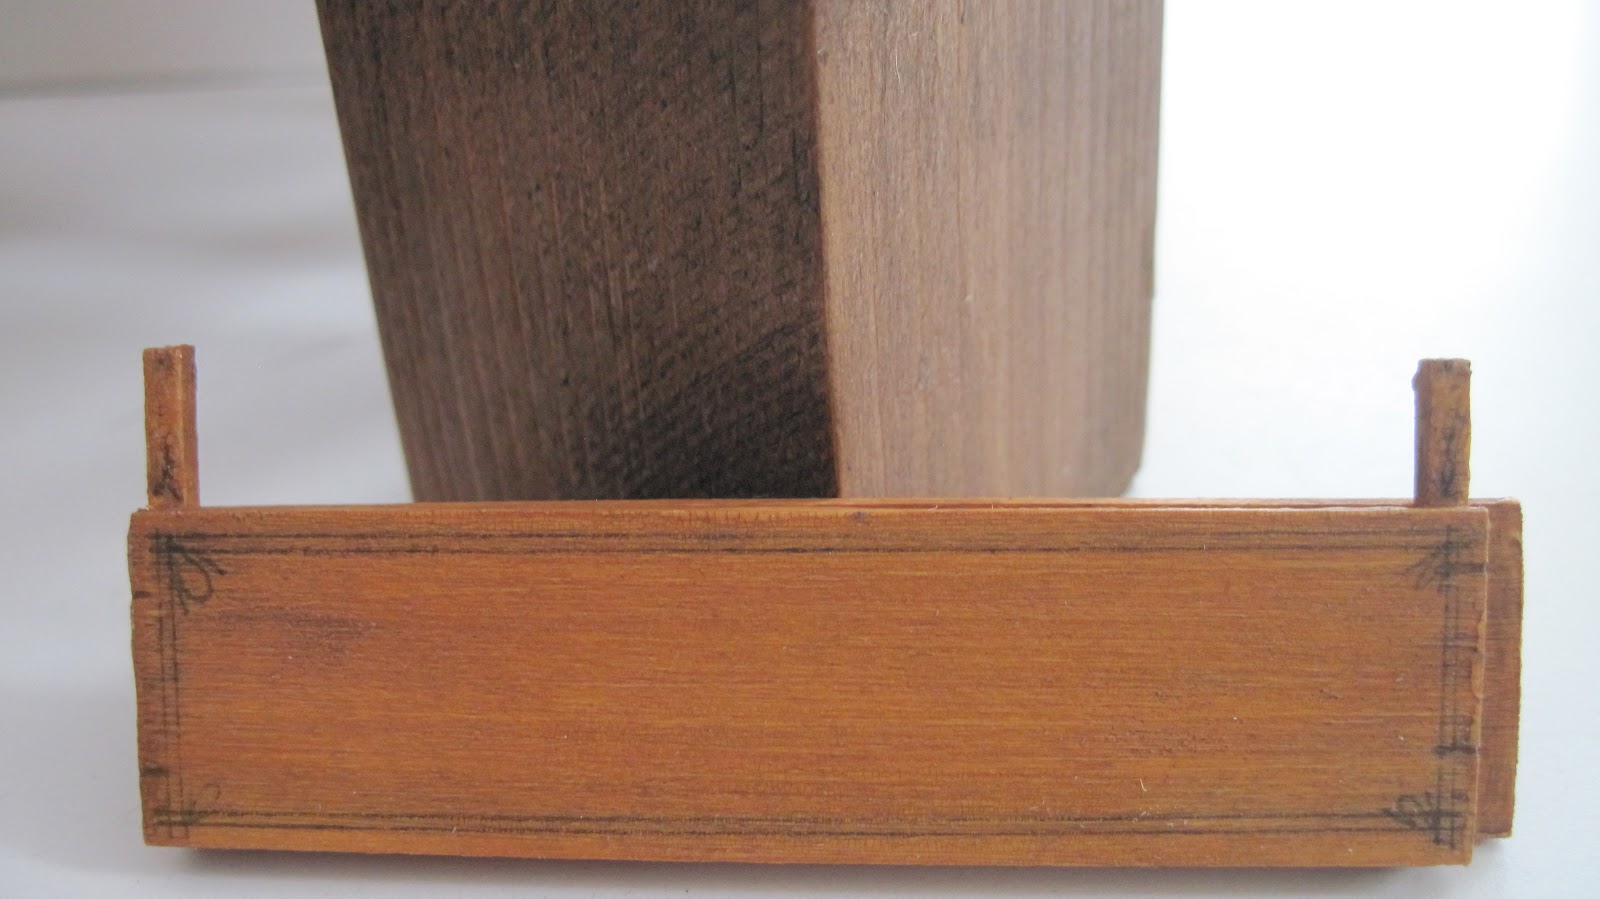
Once again, I used my $ store white paint, and got a wonderful distressed, shabby chic finish on the wall and the fence. The faucet is a white metal miniature, painted to look like tarnished brass and with a worn green handle; the pipe is a painted tooth pick section, and the brackets holding the pipe in place on the wooden pillar are painted card, with pin heads for nails. To mimic metal, I painted the surfaces with dark gray paint, then dry brushed them with terra cotta, with another dry brushing of pewter for the iron and gold for the brass.

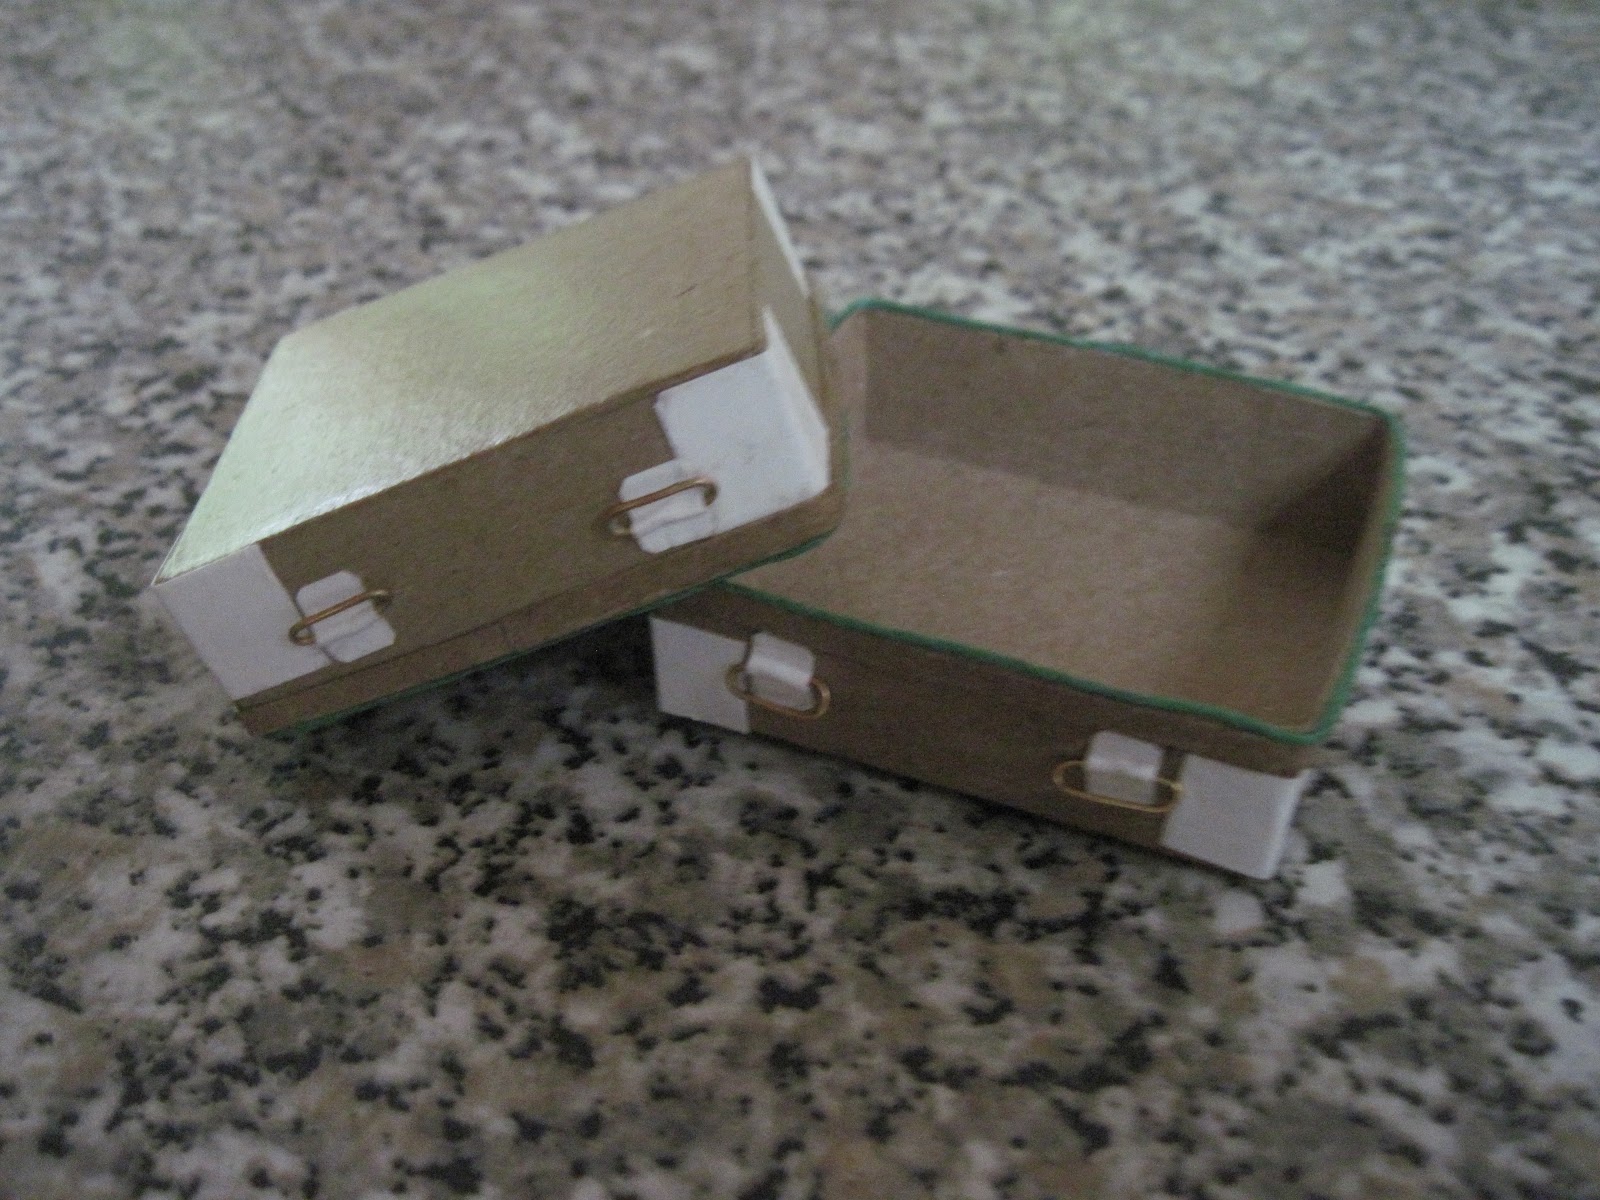
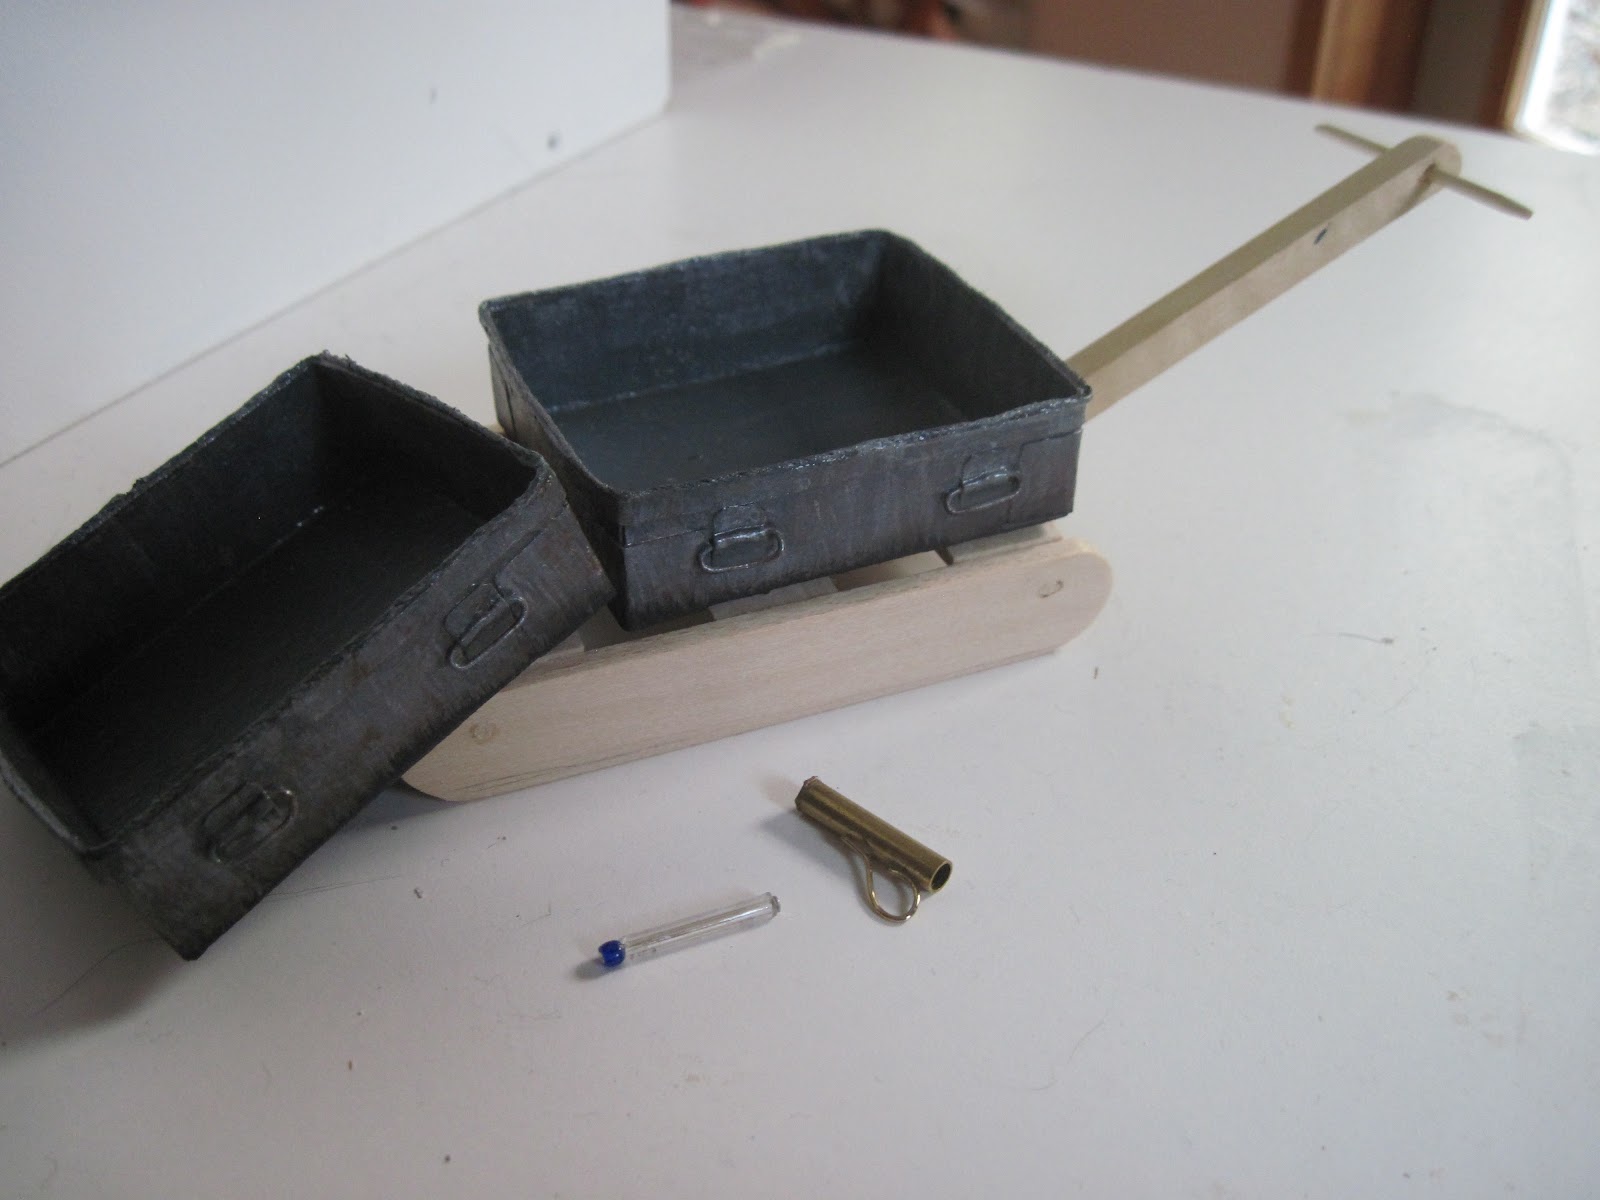
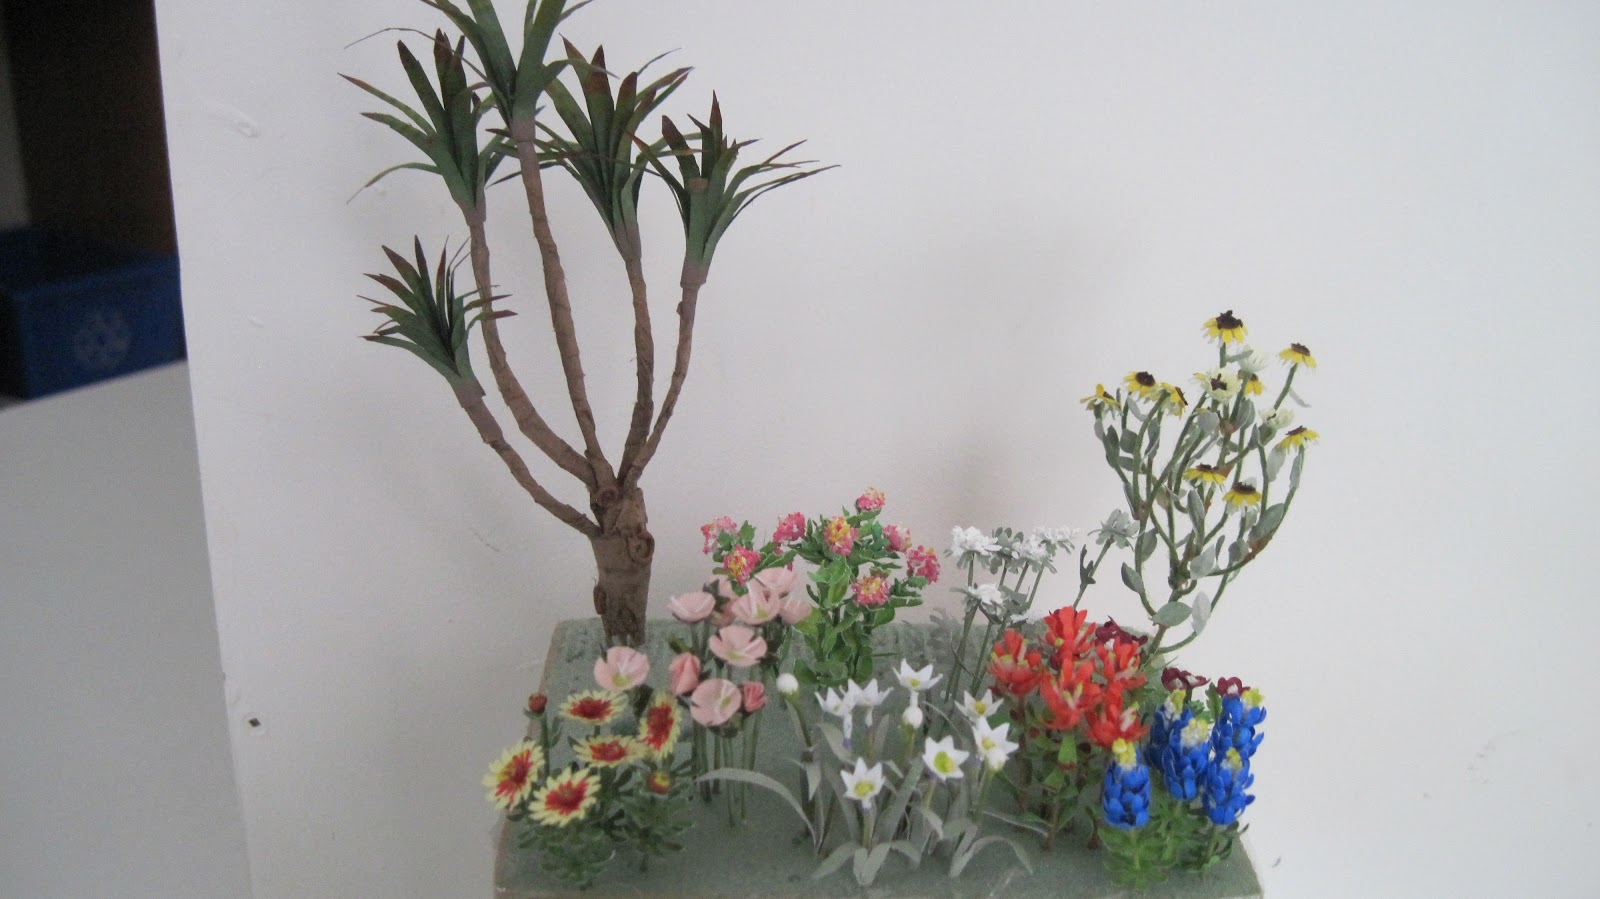
A bird house has been cut, and many flowers have to be made, along with assorted shabby chic garden accessories; I'd like to see if I can make an aged bistro chair, and if I can't, I still have several unfinished  bench kits from years ago. The colour scheme will be distressed white, pink, blue and assorted colours in the purple range, with apple green accents. And the potting bench I made during Covid, from stir sticks, toothpicks and scrap wood, will be a permanent part of the vignette.

My youngest daughter and her husband arrive for a week this Wednesday, so I may not have too much time to devote to minis for the next week. However, I'll be back!


Friday 26 May 2023

Working Away....


 The garden corner has a floor and a back wall, as well as a dedicated potting bench. The topiary and flat of primroses are there to give a touch of colour....

Next up is the right side fence wall, which I intend to build out of skinny coffee stir sticks; I have quite a few of those, and they are the right size for the fence design I have in mind. Remember, the design which inspired me, used foam core strips for the fence; however, I'm changing some things out to suit my personal design vision.

So far, three pieces of foam core (the base is double) and several egg carton tops have been worked into the corner vignette, now comes a bit of wood. I'm trying once again to use odds and ends around the house for this scene; I used the Trash to Treasure vignette to show people at the recent miniature show that you don't need to spend loads of cash to make an appealing miniature; you do use quite a bit of paint, however! And glue. And time. But it's worth it, so far! And very affordable for doing minis with children, too.

While painting the back wall, I squeezed one of my paint bottles a little too vigorously; out plopped a clot of dried paint (it was chalk paint, it really doesn't store well, I've found), followed by a biggish blob of actual liquid paint. Let's just say it was quite a mess....


Tuesday 23 May 2023

Garden Items Seem to Appeal to Me

While whiling away a coffee break recently, I came across a small scene that really appealed to me. As I have a number of garden-y items sitting around that would work well in such a scene, I gave myself permission to start on it. 

The idea came from a photo labelled "Garten Ecke", and in checking it out further, I discovered there was a tutorial for it, in German, which I can follow with the odd reference to a dictionary. The designer has a blog, https://www.lilliput-homes.de if you would like to check this out. However, as this has not become a blue address, you will have to input it -sigh!


I began on the base over the weekend, which mimics a cobblestone courtyard corner. There will be a distressed/painted back wall, and a fence on the right side. The footprint of this project is 20 x 15 cm for the base (8 x 6"), so it quite small. The cobbles were made with egg carton bits, 5/16" square, roughly (about 8 mm square), with a double cobble border and a concentric but offset centre. This is pretty much what the original designer has done. I will also copy the back wall, but intend to modify the fence, as I want to use skinny wooden coffee stir sticks to make that. The original is all foam core.


Two possible candidates for this garden corner are the potting bench and the trellis planter I made during the early months of Covid. My hope is that the colour scheme will be gray and white, with pink, blue and mauve accents in the flowers and accessories. I am very eager to try another German tutorial, for Sweet William (Dianthus) flowers, which would work in terms of the colour scheme. Over the back wall, I'd like to drape a flowering vine of some sort; it's a toss-up right now with clematis somewhat ahead of climbing roses. And of course, my favourite apple green will make appearances, in moss between some of the cobbles, and in at least one or two accessories.

As I like to put mammalian life in my scenes, this one might get a lazy cat....

By the way, the Mestreechter dialect I spoke as a child in The Netherlands called cobblestones "kinder kopjes", which translates to "children's heads". I hope that refers to the size of the cobbles....

And, get ready, I will try to sell the finished product rather than keep it for myself, as I am trying (and failing, sadly!) to down-size. Now I really have to hope that there will be another miniature show!


Wednesday 3 May 2023

Well, At Least the Desert Garden is Done


 I'm very happy with the way this little dry garden turned out; all the plants in it are the kind that require only minimal water, so they are ideal for dry conditions. The colours work well together, and if I have the energy I may add a little morning glory to one of the fence posts once the show is over.

The display I tried to make for the wooden furnishings fell to pieces, because I was using cheap dollar store foam core; I'm not sure of the best way to display the almost weightless pieces, but perhaps a glass base will be the best one. And the niches in my wonderful printer's tray are too narrow for most of the plants I'd hoped to display and exhibit. I've literally run out of time. You can perhaps tell  that I'm not too happy with myself right now.

Pricing and packaging will take me much of tomorrow afternoon; in the morning I'm expected at two back-to-back work meetings. I will have a little time Friday morning, but I have to pick up my passenger in time for the two of us to get to the show location by 3 p.m. - the drive is about 2 hours. Friday afternoon and evening will be occupied with setting up for the show. I'm hoping to borrow some boxes from work to carry the display pieces we're supposed to bring.

We'll see. 

Monday 1 May 2023

The Little Desert Garden in Progress


It's not quite 7:30 a.m. on a very gloomy and windy day, Hello First of May!  I woke up early and decided I might as well use the extra hours, as I've got my knitting group this morning to attend. I hope to finish a lavender, purple and black hat I started with odds and ends of left-over donated yarns.

The space on my work tables is getting to be less and less, with all kinds of projects to be done for this weekend; the Moncton Miniature and Doll Show on May 6. The photo above is of the desert garden being "auditioned" with  placement of the plants. Two of the four fence posts are in place, there is a piece of wire ready to become the rusty fence wire, and desert-y rocks are being pushed around to see where they would best fit. I will probably have to make some more flowers to fill this small space (3 1/2 x 3 3/4" or 9 x 10 cm). Three of the edges will have wood trim, while the fourth will be an open edge. The foundation for the creeping phlox is already in place.

Although it may not be complete for the show, it will be very close to it; I'd like to run a piece of bougainvillea vine along the fence wire, and perhaps some deep purple-blue morning glories along one of the posts. However, they will likely have to be done once the show is over. 

Now, if only I could find a tiny scale lizard or perhaps a longhorn skull; maybe at the show? And can I turn styrofoam bubbles into a convincing cactus? Stay tuned!


Friday 21 April 2023

Getting Ready for the Show

 On May 6, the last ever Moncton Miniature and Doll Show is being held, and I am in the process of finishing up some things I began during the last three years of Covid. Recently, I was gifted with a genuine printer's drawer, lots of tiny niches, and it is being prepared for me to use as a display at this show. I doubt i"ll be able to fill all the niches with sales stock, but it is worth trying.


As Spring has finally sprung here, the Carpenter-in-Chief is busily pruning apple trees and getting some seedlings started for his vegetable garden, but he thinks he can figure out a way to have this stand up on my sales table. This drawer is quite heavy, understandably so since old moveable type was usually cast in lead, which means the support has to be really, really good. Lots of spaces for tiny items in this thing!

We had our mini meeting via Skype again, as Louise's husband developed Covid, and she herself wasn't feeling all that well either; however, both Marilyn and I worked away, and I potted up some small yucca plants and echeveria. The String of Pearls plant is for my flower shop, I'm keeping that one, although it won't work in the little wall planter.


Geraniums are being prepared as well, as I have quite a few of the tiny blossoms ready to be glued onto their ball heads. Somehow, I have no more geraniums in stock; before Covid, I had about a dozen in assorted colours. I have about 2 weeks to make and sort things to take to this show, which is sadly the last miniature show in the Canadian Maritimes; the ladies who have organised this for the past 35 or so years are all more than ready to retire, and unfortunately, there are no new younger miniaturists who have the time to take it on. It will be missed. The nearest show to us here is the Montreal show, the next nearest are in southern Ontario, and there is at least one still in Alberta, but those are long distances to travel!

As well as making some items for the show, I need to go through all my piles of works in progress, as I can't quite remember what I had prepared in the past 2-3 years for sales purposes, and there is literally stuff all over the place!


Thursday 30 March 2023

One More for the Desert Garden


 Yesterday we were able to have a mini meeting, and I decided to add something small to my deserted desert garden, a small group of echeveria/hens and chickens/house leeks. They turned out very much as I'd hoped, and will add a bit of darkness at the front of the garden.

They were made of olive green card stock, tips coloured with purple colouring pencil, using a couple of sizes of the same punch shape. I'd made these before, and really like the way they turn out. Making a large plant, a very small plant and several medium size ones makes them look more like the real thing....

I need to haul out my polymer clay and make a couple of cactus plants, too. An aloe vera would work, as well as an opuntia, perhaps with a single blossom. We'll see!


Wednesday 22 March 2023

Finally, Working Again!

 It has been a very dry period of getting any minis done, as we have had to cancel our weekly get-togethers for a month or so. Marilyn of Charminis was suffering from mini withdrawal, so although our other co-mini-ist Louise was unavailable, we just had to get together.

I had the good luck over the weekend of finding a bag of small plastic Easter eggs in a charity shop, an item I'd been looking for for a while, as I needed them to make lampshades for my wooden shoe factory.


I used the rounder end of the plastic eggs, but as they had a thin rim on them, I cut narrow strips of cardboard (found in between layers of cat food tins), to fill the gaps. The centre was then drilled with my pin vise to create an opening for the wired bulbs, and the hole enlarged a bit with a round rat-tail file. (The upper, more pointy end of the eggs might make good bee-hives, with the addition of rope or raffia to mimic the straw old skeps were usually made of.)


Three eggs have their strips, glued on the plastic with Aleene's Jewel Glue, held by tiny copper clamps. I pre-bend the strips by rolling over them, on my thigh, with the round handle of my Xacto knife.


The egg halves had small air holes in them, which I plugged with toothpick bits or the ends of bamboo skewers; then I sanded them flush to the surface of the eggs with an emery board. The yellow half shows the hole, the green one a plugged hole.  They were then lightly sanded with a sandpaper sponge, and given a coat of multi-purpose sealer. This was then allowed to dry while I had some lunch and awaited Marilyn's arrival.


I stuck toothpicks in the eggs to use as handles while painting them. First, I lightly sanded the surface to provide something for the paint to grab on to. The first paint was a gel one, which did not adhere at all on the plastic surface. However, plain black paint covered with no problem. When I first used an Easter egg half to make a lamp shade, we used nail polish to colour them, but I wanted worn, slightly dusty and rusty metal shades, as my wooden shoe workshop is set in the last decade of the 19th century.


Multiple coats of dry-brushed gray, terra cotta, burnt umber and pewter paint resulted in just what I had envisioned when I started the project. The little brass bell will become the top of the shade, just as soon as I found where I "hid" the others....

The last stage will be to paint the insides a dirty white - well, the workshop produces lots of sawdust, coal dust, and so on, so the inside would not be pristine. I intend to use LED lights already on their wires as the light bulbs, threading them first through the plastic shade, then through the aged little bells, and finally through a length of fine brass tube. The wires will then have to go over the top of the workshop and down again to under the stairs, where the batteries will hide. One section of stairs will be removable so allow access to the batteries - I hope!

Now to let everything dry, then I will finish the insides of the lampshades.


Thursday 23 February 2023

Two More Desert Plants


At the right back, we have a Black-Eyed Susan  plant, complete with seed heads and opening buds; this one took 3 days to glue the wires in shape; if I ever do it again, I'll use fuse wire and treat it like a very miniature tree! At its foot is a Queen Anne's Lace plant; it is a bit hard to see, as it is white and like a lot of desert plants, has gray-ish foliage. It might be more apparent if you enlarge the photo.

For the next couple of days, I'm pulling out a crochet piece for a friend who wants to turn it into a scarf; as there is alpaca in the yarn, it tends to get itself stuck, requiring the use of a fine pair of scissors to cut the one tiny offending fibre. One ball down, two or three more to go. I also did a little embroidery on a table centre I started about 2 years ago, which I want to finish in time for Easter. Both those tasks are a little kinder on my newly operated eye than minis....

Friday 17 February 2023

More South-Western Miniature Botany

 It took quite a few days, but I managed to make a passing lantana plant; it began with squashing styrofoam balls to make my own floral foam, progressed to paint-mixing that foam, then when it was dry, carefully chopping it into tiny, tiny bits with a tissue blade. I am happy with the results, which involved a fair bit of additional painting.


The other time-consuming item is a yucca tree; my deserted desert garden needed some height, as most of the plants made for it so far are quite low. The yucca will fill that need quite nicely. The tutorial is available on-line, if you google "miniature yucca trees", and is in YouTube format.


The yucca tree is about 10 cm tall, made of paper on a wire armature, with rings of  floral wire (which I had in brown) for the knotholes. I am very pleased with this little tree. The last cluster of leaves still needs to be bent into shape, as you can see; I just finished dry-brushing in the join of the leaf cluster to the stem.

 The instructor sells kits to make these flowers, but I kind of made up my own kit in order to get closer to finishing this little garden.


She uses a circular array of yucca leaves, but I used strips of white copy paper left over from some other project. Five colours of felt-tip pen were used, two of the pens were alcohol-based artists inks, but the other three were inexpensive Crayola water-based markers. You can see the results above. This technique of blending markers is kind of intriguing, and I may explore it further.

I am coming up in a few days to my second cataract surgery, so the next week may be rather quiet here on the blog. However, I will be back, as next up I have to design the actual little garden base; there are a number of possibilities for the materials, likely a combination of card, builder's foam and paint will be the best way to go. There will be old fence posts, and perhaps miniature barbed wire, but I need both
eyes working to be able to do that!


Tuesday 7 February 2023

Winter Makes Me Want to Make Flowers

It seems that when it is cold and snowy outside, I decide I have to make flowers. The YouTube videos by Cathy Brickner are calling out to me, so today I made some more of them.


I had made the Indian Paintbush yesterday, and begun the pieces for the Indian Blanket Flower and the Texas Bluebonnets. Today I finished them, and I am quite pleased with them. It seems to me that the technique Cathy B. uses to make her bluebonnets can also be used very effectively for hyacinths, so I plan to try those once I finish the desert flowers. As you can see, the Rain Lilies made previously have now got their leaves, using the same painted paper I also use for Dusty Miller plants.


The Blanket Flower is a bit pale for my taste; we have these growing in our Eastern Woodlands garden under the name Gaillardia, and the yellow is rather brigher, I think. In the background are the Wine Cup Poppy Mallows (I probably remembered that wrong!), waiting for their centres; I'm trying out another idea as I didn't have all that much luck painting fake snow....


A closer look at the Indian Paintbrush, Rain Lilies and Pink Evening Primrose; all of these have been made with stuff I had on hand, but I do need to acquire a large snowflake and a large daisy punch, as they are frequently used to create the foliage.

I'm (mostly) having fun....


Friday 3 February 2023

We Got Cut Off for a Few Days

 We've had no contact with the outside world for a couple of days, as a cable was crushed somewhere and interrupted the telephone, internet and television connections to our house. Combined with cold winter weather and now, strong winds, I wish once again that people could just hibernate like the animals do! The temperature is going to -30C tonight.

I did some work, however, slowly and carefully as my new eye gets used to its lens; I had my first cataract surgery nearly two weeks ago, and am now driving without glasses for the first time in well over half a century....


Two glue pots, a right angle, and two glue brushes awaiting their bristles are ready for the bookbinder's shop. The front facade has been cut, as well as the two side walls, but I have to be patient (sigh!) for the other walls needed. As I do not have a miniature lathe, I cheated and cut apart a wooded goblet for the pot holding the brush, with a base of a small wood circle added. The other glue pot had much of its tapered base cut away, and because it was solid wood it didn't affect the pot shape. That uses up some of my far too large stash.... The right angle is painted cardboard.


Book production has also gone ahead. Some of the spines didn't bend nicely and tore a bit, but that's fine as those will become the books waiting to be re-bound! The nicer books will be the finished product for the shop.


And I recently stumbled over a series of YouTube videos by Cathy Brickner, in which she makes more than a dozen southern prairie wild flowers. Today I found a stash of a material very like Flower Soft at a local second-hand store, and I can use that to make some of the other flowers in her series. The videos are short, which means you have to pause while you work on the flowers, but that gets me up out of my chair and makes me walk over to the computer on a regular basis. (Well, I have to look for the silver lining, don't I?) The white flowers are rain lilies, awaiting their grey-green leaves, while the pink ones are evening primroses. The stems have their leaves, but I won't plant them until I've made a whole garden of near-desert flower varieties, as they are all different heights..

I'm thinking of a small flower-bed that has been allowed to go wild, with perhaps a cactus or two in it now, and a tumble-down fence - which will likely mean back to barbed wire manufacture - and if I can find one, a scale Texas longhorn skull. We'll see! And yes, we do have cactus in Canada; in Alberta you will find prickly pear growing quite happily!


Friday 20 January 2023

Book Binders Need Books


 And that means I'm back, for a little while, in the book-making business, This kit came to me from the things we helped sort and tidy last fall, and as I had no purpose for it at that time, I filed it away. Fortunately, I filed it in a place where I could easily find it. 

These are all non-opening books, as they will be shelved ready for parceling up or for repair work. The covers of this kit are lovely and subtle , just right for the period I'm working in; moreover, they have lovely worked spines, and that is more or less what will be visible of them when they are placed in the book-binder's workshop. There are 124 covers in the kit, and I'm not sure I'll be needing all of them; however, we'll see! 

For the "pages", I'm using scraps of mat board and foam core; in some cases, one of each, in others the books are thin enough that only a piece of mat board is needed. The rest of the supplies I need, like thin packaging cardboard, are in good supply in most homes. I've found the card from tissue boxes are the best weight, and they bend nicely and don't warp when the glue is applied.

One of the really nice things about this kit is that there are a wide variety of book heights and thickness, which makes them look more "real". 


Tuesday 10 January 2023

At Least Five Days' Work....

 The amount of time involved in making minis is directly related to how much time is spent waiting for glue and paint to dry. And the other thing is, how many times something has to be redone!


This is a gilder's cushion, with a tiny drawer underneath to hold the gold leaf bits that are applied to the more expensive books the bookbinder is working on. It measures 42 mm (1 3/16") wide, 21.5 mm (7/8")deep, and 1 cm (3/8") high at the side, has a padded suede leather top, and has brass "nails" (sequin centres or glitter!) along the edge of the cushion. It took 4 tries before the drawer stopped imploding; the fifth time it actually held. That took at least 3 days....


This peculiar item is called a "persknecht" in the Dutch instructions, which I think would translate to press aid in English; it appears to have something to do with the book press. There is another photo of this item below, it is actually 2 layers separated by square wooden pieces, which gives it a certain amount of springiness, or give. I used a #2.5 permanent black marker to draw the late Victorian/Early Edwardian decorative elements on it. I tried to research the press aid, without much luck, and if anyone knows what it is meant to be, please do let me know!


The work table has sturdy legs, and a fine beeswax finish. The block, most likely used for stamping designs into the leather book covers, has a veneer top, and like the table, a beeswax finish. I need to visit a bookbinder's shop to learn about the various tools used, so will do a little research to see if there is one in the area. With a couple of universities, there should be someone still re-building old and out-of-print books, and there are lots of artists in the area, as well.

Two of the walls for the bookbinder's shop have been cut, and I hope the others will soon appear on my work table. I'm thinking about how to decorate the interior; I rather like the idea of a late 19th or early 20th century scheme, lots of dark wood, anaglypta wallpaper, dark stairs with, perhaps, coconut matting, and imposing stair spindles and newel posts. I'll have to check scrapbooking shops to see if there is a good embossed paper to represent the anaglypta. We rented a house in Edmonton, AB for several years in the second half of the 70's, which dated from about 1910 (very, very old for Alberta!), which had olive-green anaglypta paper half-way up the hall and stair walls, my inspiration for this treatment for this little shop. We'll see!