Showing posts with label Woodworking. Show all posts

Monday, 8 August 2022

What I'm - Very Slowly - Working On

 My camera has been fixed, and I can use it again. It was actually fixed for me by a very nice young lady in, of all things, a record store! The mall directory implied they also dealt with cameras, but I was informed that the mall lumps records, videos and cameras together, for some reason.


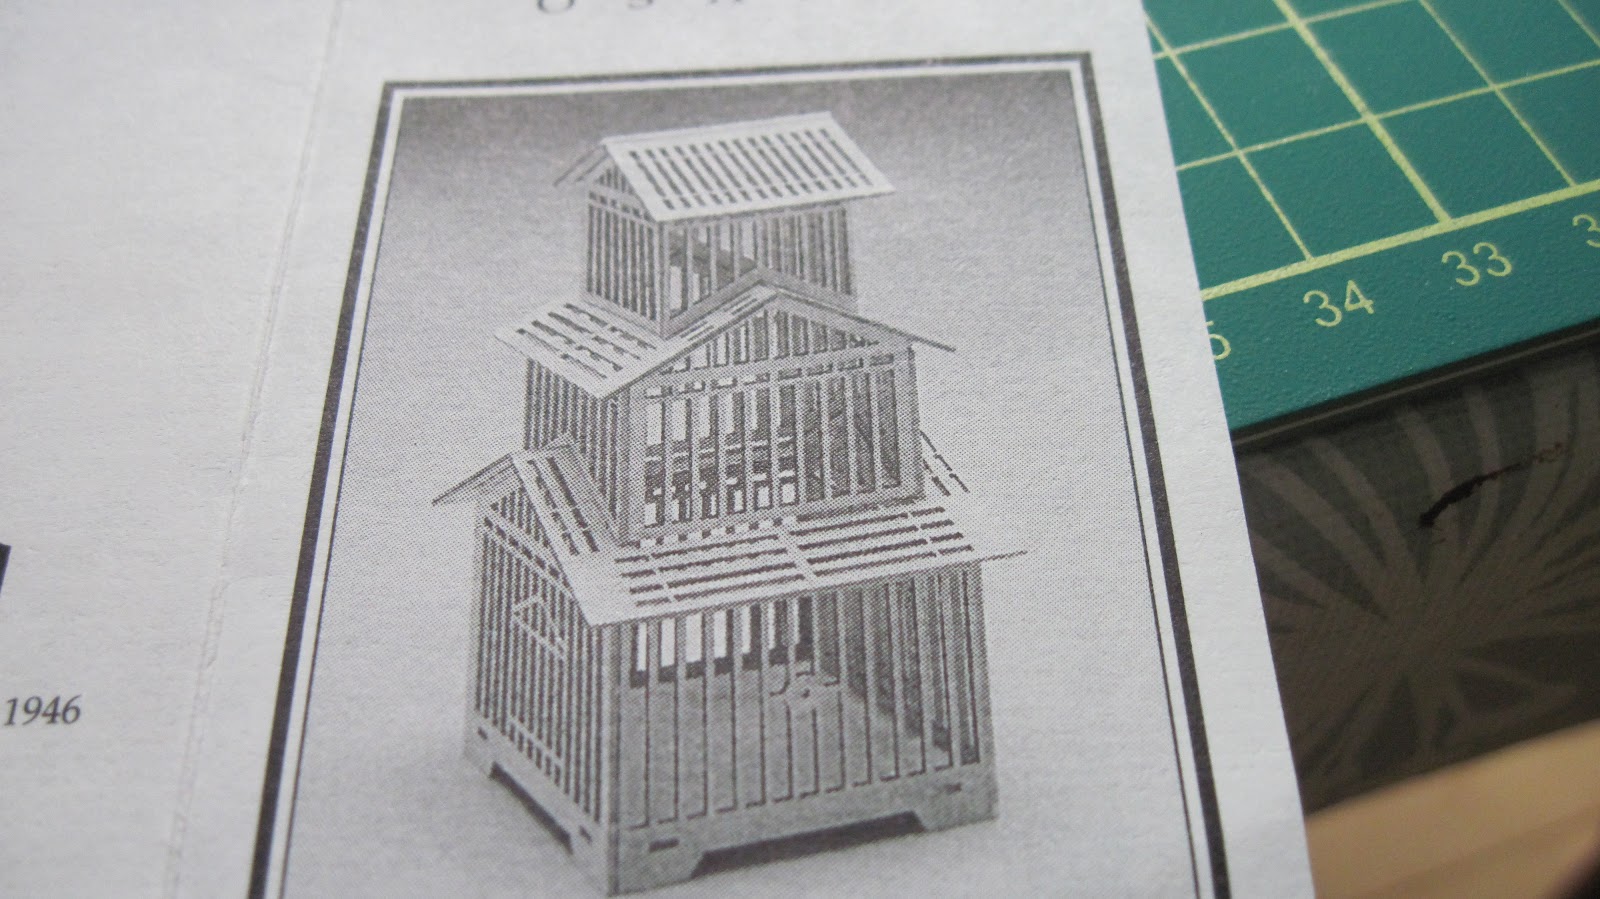
This is a very old, laser-cut kit that was won as a door prize at either the Camden or the Boothbay Harbor, both in Maine, miniature shows, at least twenty or more years ago. It has taken me a while to get up the courage to assemble it, and at this point, I'm not sure who in the family actually won it. Anyway, I hope I can use it in my Japanese Garden room box once it is done.


This is as far as I have gotten; the instructions tell me I must be sure things are dry before I go on to the next step, and with our busy summer so far, I've got half the roof on the first level. I need to decide if I am going to put old newspaper and gravel in the bottom, and that has to be done before the next level goes on. I'd also like to put a bird on the perch, which goes right across the cage, and I'd like both the bird and the newspaper to be Japanese, to fit with the room box's theme.


There are a lot of very fragile pieces in this fabulous kit, and I have to fight the cat constantly to protect the bits that I've already glued! Another (one-day) trip is supposed to happen mid-week, so I hope to do the newspaper and gravel by the weekend, leaving me time to make the bird before our next very welcome visitor arrives, next weekend, for a 3-week visit. Stay tuned!


Sunday, 12 September 2021

Ideas and a Progress Report

 Yes, I am still working on the little oriental carpet, in fact, I worked on it Wednesday afternoon while enjoying the company of my fellow miniaturists, Louise and Marilyn. The outer narrow border and its counterpart around the central portion only need the little crosses filled in, and the deep red centre is also all but filled in.

I was able to get out for a trip to the sea on Tuesday, as well as get a behind-the-scenes look at a small, local, very well done, museum. To get behind the barriers and be allowed to open the storage areas is definitely a big plus of my volunteer job.

As my eyes are still in the troublesome stage (doctor's visit in 10 days), I'm not able to do a great deal of close-up work. However, I did pull out two FAME kits, prepared by Marilyn, and did a dry-fit.


This is the carcass of a market stall, minus some details, which I hope to turn into a decorative Christmas market stall. We still hope to have an opportunity to display our creations in early December, but don't as yet know that it will actually happen. All three of us who meet up have Christmas minis, so the suggestion was we would do a display of seasonal items. This is, to me, a good excuse to give some time to this project, for which I've accumulated items for some years. Of course, there is always room for more, and I hope to be able to get some of the marvelous wooden minis being produced in Europe these days.


This is a mirror image of my flower shop, Floriana. The intention is to make this one a small pastry and coffee shop, with perhaps a couple of 2-person cafe tables outside it. As this project needs more time, (I haven't actually made any of the items I want to put in it!), it will have to go on the wait list for now, but dry-fitting it like this is intended to get my imagination working. I can take mental and written notes, and check out useful tutorials on-line and in magazines, which will speed up the actual building process when that time comes.

The trees are definitely turning orange and red, earlier than usual, probably due to the inordinate amount of rain we've had here this year. If only we could have shipped some it out west; my children and their spouses have been living in smoky forest fire conditions for weeks. There is a serious drought out there, which is very odd as usually, British Columbia was our wettest province! Every plant in our garden is much taller than in previous years, and most of the apples on our front-garden orchard are dropping well before they're truly ripe. As a result, dishes made with apples have featured regularly in our menu. For the two of us, we have half a dozen jars of apple butter....But, we've discovered that warmed apple butter is very good on vanilla ice cream!


Saturday, 15 May 2021

A Repair I Would Not Have Attempted Until Now....


This is the head of a wood chopper's ax I picked up many years ago, at a Craft Fair in Duncan, B.C., where I was visiting my father and my younger sister and her family. I don't know who made this ax, and I don't actually know what the axe head is made of - possibly polymer clay - but the haft of the ax went right through the blade. Naturally, it broke while this little scene was at a show. 

I am proud of myself; I drilled out the stub of the haft, carefully made the pin in the haft a tiny bit longer with sandpaper in order to give it a bigger holding point, and glued it in place. Into the other end of the ax head I inserted a tiny peg sanded down from a wood toothpick (not a bamboo one!), to look as if the haft goes right through the ax head.


Where, why and when this little scene was made has escaped me; I think it may have been at Camp MiniHaHa, or perhaps at a miniaturists' get-together. The lichen and moss on the stump are real; the turkey-tail fungus on the side are made of pine cone scales. The logs are scattered about, some quartered or halved, others whole. The landscaping includes mosses, grasses and tiny yellow flowers, as well as sawdust. I just love this tiny vignette! A miniature doesn't have to be BIG to be good! I do, however, still have to find a permanent home for it, to prevent further ax handle disasters.

Making the tiny tools for the wooden shoe factory has made me more confident in how I use my pin vise drill. I am now comfortable changing drill bits as I go along, to enlarge a hole if needed, and miraculously for someone who is straight-line challenged, I can drill straight!


Thursday, 8 October 2020

This Week's Mini Creation


When I looked at the date of this project, I gasped; it was published in the January 1998 Nutshell News/Dollhouse Miniatures, to which I subscribed at the time, and I had wanted to do it since first seeing it. It took me 22 years!

The lattice planter is a David Krupick tutorial. As I was using what I had in my scrap pile, the wood doesn't exactly match (witness the gap in the top of the diamond!), so rather than varnish it and leaving it natural wood, I'll stain and paint it, then add some age.

The leaves are printies that came with the article back then, which I will make up and plant in the planter. As yet, there is no specific place for this piece, so we'll have to see if I keep it or sell it.


Wednesday, 19 August 2020

Yes. Still Plugging Away

I have to admit, I am having difficulty sticking with my self-imposed task of finishing some of those things that have been lying around forever, but boy, is it slow going! The constant bad news takes some dealing with, and with the library open again with limited hours, I am doing far too much reading, I'm afraid.


After looking through all my stuff, I was unable to find the lantern part of my street lamp, and I am blaming the cat. She definitely swiped the peak of the street lamp! So I decided, now or never, and went on-line to find the original tutorial; well, here we go again! The photo is there, with the diagram for the lantern portion, and a sample shown on the background of a cutting mat, but guess what? The site has apparently been hijacked by a Real Life lighting company, because when you click on it, you get normal size, manufactured, fluorescent lighting offered to you. Are you as ticked off by all those wonderful tutorials and DIY's that are no longer available as I am? There are a lot of pirates on that internet! I spent the morning re-designing the lantern based on the base and the peak measurements, which I probably should have done in the first place.


This needs staining and a coat of paint; it is a colonial cutlery caddy. Chances are this will end up in my pioneer room, lamp base vignette; I do have some pewter cutlery, and that vignette is where I display my pewter miniatures.


This is a lovely little dolls' bed being woven, from an old kit; I am almost done with it. I will admit that I am finding it difficult to distinguish between the wires I am weaving through, and those on the other side; my eyes are definitely changing, and not for the better. This will be done soon, I am determined! It was missing the rockers, so I have to design those. (The base is 2.5 cm or 1" wide.)

I also  finished the rest of the groceries I was working on; they will go into my kitchen stash for eventual use in something or other.  As well, I'm cutting out and finishing a La Casa Miniatures vintage Valentine card kit. And reading good books. And continuously looking for things that I put in a "safe" place....


That's it for now!

Wednesday, 5 August 2020

Okay, Things Are Changing - Again!

My effort to post here this evening resulted in the new blogger which everyone is apparently very unhappy about! With Marilyn's advice, I have reverted to Legacy Blogger, in the hope that they can fix the glitch that doesn't allow me to post photos.

With summer in full swing, and things opening up a bit, we haven't worked as often on minis; however, we did get a face-to-face last Wednesday, as our wood shipment had arrived. That means that I can soon (I hope!) get to work on the staircase for the Klompenfabriek.

In the meantime, I did sort out the books in the Book Shop in Altered Books, a CMHH project. It involved gluing books together....


Except for two shelves, they are are more or less permanently stuck. The ones that aren't are "real", i.e. opening books with text and illustrations in them. At some point, these will be replaced by other faux books. As this is a book store, the books are now in groups, like they would be in a real bookstore. Now all I have left to do is re-make the lantern for the street lamp, check out the wiring, and then this project is - mostly - finished.

In the meantime, I am working on some semi-finished projects. "Semi-finished" sounds better than UFO's! Among them is this little bench cupboard, a FAME project that Marilyn taught. I am changing it somewhat, to make it fit with some of my other furnishing items.


I also made up a puzzle box, which has a real puzzle in it; it was a "Bits 'n Bobs" project from Ann B., a British camper who came to our mini camp for a couple of years. Another SFP (that's semi-finished project!) being worked on is a lovely upholstered easy chair, for which I used the last bits of one of my favourite fabrics. This one is also a CMHH project, from Janet H. of Maggie Melinda, another former camper. I'd like to finish both the bench and the chair by next week. We'll see!

Saturday, 27 June 2020

One Toaster and One Coffee Grinder Later

That kitchen scale is still giving me all kinds of grief, primarily because I can't find a dial for it that fits. Our computer will not scale photos down far enough, and my efforts, twice, to draw my own have resulted in ink that refuses to dry and smears. I will find a way!


The coffee grinder is done! What caused the most trouble, at the end, was not the teeny scale of the things, but finding a way to fix the crank handle and the coffee receptacle in place on the wood. And I still need to find my tiny silver stickers, to make a label for it. Yes, the drawer does open....

I ended up using a piece of thickish card for the crank handle, with a tiny bit of decorative toothpick for the knob. Those were then threaded on to a small piece of brass tubing, and a pin run through the lot and glued in with tacky glue and super glue. I hope it holds!

The toaster looks good! But it still wants a label. The cord is buttonhole thread, though I may eventually change that to cordonnee embroidery cotton - it looks a little delicate right now. The feet are seed beads, the groove was filed into the side of the wooden toaster block, and the handles are half circles of manila file folder glued onto cut-off pins that are glued into the body of the toaster.


The toaster was based on a tutorial on-line, but I changed quite a bit of it. The body was a sandwich of a slab of wood, with thin pieces on the edges, another slab, and another slab with thin pieces on the edges. I painted the inside black before assembling, except for the top edges. Once the pieces were glued together and thoroughly dry, I sanded the corners and added a base with rounded corners.There are at least 3 coats of pink paint, with sanding in between coats, and then a coat of gloss varnish.

I'm happy! The coffee grinder with the movable drawer is by far the smallest piece I've ever done. And I discovered that there are grinders with domed tops; those tops, however, have a little sliding door into which the beans are put - far too complex for miniatures!

Thursday, 25 June 2020

I'm Going Cross-Eyed

The last several days have been packed with non-mini things, which means I am not much further along with making accessories to fill the blue shelf unit - which, by the way, I am unable to find. I seem to have put it somewhere so safe that I have no memory of it....


The Lego block is there to give an idea of the scale at which I'm working. The vintage toaster probably has enough paint that I can continue to finish the details of it, like the handles, lever, feet and cord and plug. The coffee grinder is giving me grief; I fear the wood I used for it is the crappy stuff from Michael's. The drawer has been rebuilt three times and the knob will not glue in place, so I am going to stain it and then super-glue that knob! (And hope that staining it will not cause it to swell and reject that darn little drawer!)

The design for the coffee mill is from a Dutch mini magazine, and I kept thinking there was something wrong with it. I finally figured out what that was this morning; the construction has the dome on top with the flat side down! In a real coffee grinder, the domed part is where the grinder 's crank handle is, and it is open to allow one to put in the coffee beans. The ground beans are then accessed through the little drawer. Hah! It was designed by a man....

The metal part is part of a cheap earring, with a hole punched through the bottom. I'll glue a spacer bead under it, and then string the crank handle and shaft on a head pin through the hole and the spacer. As the wood is so thin, I think I'll make the crank handle from sturdy cardboard, the kind you find on the backs of notepads. Painted it should look like metal - I hope!

I also hope to make a vintage breadbox from the tutorial in 1" Minis by Kris. It is made of mat board and cardboard, and should be another interesting challenge.

Wednesday, 17 June 2020

Vintage Kitchen Items Are Done


And as you can see, I gave in and did them in apple green. If you enlarge the photo, you will see a small border and design on just about every piece; this was done using an artist's India ink pen in dark brown, after painting and before the crackle finish. Once everything was dry, I used antiquing gel to highlight the crackles in the pieces.

From left to right, top: plate rack, drawer shelf, which needs drawer knobs, (I think I might put some cup hooks on the upper bar), and the soap/sand/soda rack. On the floor, the bottle rack and the fly safe, with the egg holder on top. The fly safe door needs to be hinged and to have a  knob (I ran out!)

They give off an Edwardian era air, when everything greenery-yallery was very popular....

I am happy with them!

Friday, 12 June 2020

Old-Fashioned Kitchen No. 6


I had cut the pieces for this on Thursday, and assembled the drawers - well, no knobs, I have to buy some! I left this one to the last as I had to free-hand the shapes of the sides of the drawer shelf, and to estimate where all the various pieces fit together. As mentioned before, the full-scale diagrams do not print out at the proper scale, they are much larger. And I still worry about drawers; these went through a lot of sanding to fit properly! But this drawer/shelf unit was put together during our Friday mini session on-line. The other pieces all have their base coat of stain, this one will get done this evening.

Now I have to make the final decision re colour of this six-piece, old-fashioned kitchen set. My heart is still set on leaf green, but it is not an easy colour for most interiors!

I have also begun a vintage toaster, and a vintage kitchen scale. For the latter, I need to find a printie of a kitchen scale dial, if anyone has any good ideas in that area! Lots of clock faces, but no scale dials were to be found. The lure of the internet is great, but I can only give it so much time....

Thursday, 11 June 2020

The Cupboard is Done...

...except for a coat of beeswax. I chose a light grey chalk paint, over the distressed finish, then sanded in wear. Once the wear was good - I didn't want to overdo it - I used artist's pastels to darken all those areas that see lots of use, or perhaps are difficult to reach into to clean properly.


I am very pleased with this look; it will set off pastel shabby chic, natural wood and vintage accessories quite nicely! Now I get to play with tiny things to give the cupboard a lived-in look.

The three drawers for the last part of the old kitchen pieces are made, and all the other pieces are cut. I am still wobbling about the colour for that, especially as it's supposed to get painted decorations.

Today was a pajama day for me; I woke up several times overnight, then slept way past my usual getting-up time. That sort of threw off the whole day. It didn't help that it is dark and overcast again. However, hope is there as I have Siberian iris in deep purple with splashes of white, as well as pale lavender German Iris, happily growing in my garden. It is so nice to see some colour!

Wednesday, 10 June 2020

Item 5, I Think, of the Old-fashioned Kitchen


The plate rack was made during our virtual mini meeting this afternoon; there is only one more item in this collection, a shelf unit with some drawers. I am still deciding what colour to paint this grouping; apple green is very inviting, but sadly not very sale-able! It needs some hand-painted designs on it. This grouping was made to match the little robin's egg blue bench in the scent shop, with a naive design in cinnamon and cream, vining stylized flowers. We'll see!

Saturday, 6 June 2020

Learned Something from a Mess

I put together a cupboard, meant to hang on the wall, that I think of as Grandma's Cupboard. As it was meant to look old, I varnished the whole thing in oak, and then mixed up some white, antique gold and a speck of red to create a warm, eggshell colour to paint it with. It was an unmitigated disaster!

Last evening, we had an absolutely mad thunder, hail, wind and rain-storm; the power, of course, went out. So while trying to fall asleep, I was thinking of what I might be able to do to save this little cupboard. Okay, I thought, it is acrylic paint, cheap $ store stuff, and thus not waterproof. What if I wet it down? Would the ugly paint job come off?


Tepid water, paper towels, Q-tips and what I think is a lobster-pick of some sort, helped to get rid of that awful paint job. In case you ever find yourself in the same boat, here is what I did.

With a barely damp cotton swab for the narrow spaces, and a barely damp paper towel for the larger, I rubbed each area individually; you can see that the side closest to the bowl is free of paint, and that there is an area of scratched paint in the centre. The rubbing seemed to soften and dissolve the paint a little, and I used the ends of the lobster pick - one is spatula-shaped, the other has a tapered and rounded point - to carefully scrape/lift off the cream paint. It had to be done a little at a time, as the dampish paint soon dried out again. It took a couple of hours, all told....


Interestingly, the finish looks kind of pickled now! Up close, it looks like an old piece of furniture that has been thoroughly scraped prior to repainting. I'll run some very fine sandpaper along the components, to settle the grain down a bit, and then I will try to paint again, with pale grey chalk paint. If that works, I'll rub back the edges for wear, and I'll have a usable piece of furniture.

The power didn't come on again until around 10 a.m. today. Fortunately, we have a generator. The Carpenter-in-Chief has gone out for wood to make the staircase for the Klompenfabriek; I thought I'd like to get back to that.

Thursday, 4 June 2020

Baskets Are Done (Except for Filling!)


An even dozen of tiny carry baskets in 6 colours; red, two shades of green, two shades of brown and golden yellow, with varnished interiors and handles.

Today, I started making the shabby chic grandmother's wall shelf unit; some pieces needed to be re-made, so I have some staining to do before sanding the whole thing and then painting it and aging it.
That's for tomorrow, probably.

Tuesday, 2 June 2020

Well, That Took Longer Than Expected!


There are an even dozen of these tiny carry baskets; now they will all need to be painted, and then filled. They measure 3.2 x 2.4 cm each (1 1/4 x 7/8" ). I thought this would go quickly, but....

I cut out the handle supports, sides and ends in stacks, and of course, the stacks shifted as I cut them. All the original short sides (24 of them!) had to be discarded; I followed instructions, but they were .3 cm too short.

Drilling the holes for the crosspiece was also interesting; my pin vise does not take large drill bits, so I drilled first with a thin bit, then with my largest bit. That was followed with my 5/64th bit, which doesn't fit into the pin vise; I had to twirl that one by hand. And after that, I needed to use a needle file to ream the holes out some more. And of course, several cracked as I assembled the handles, as I was using stir sticks. Did I mention my wood supply is emptying fast?

The handles had to be shaped; I used an emery board for that, and now my arm hurts. I'm going away and eat tacos!

Monday, 1 June 2020

Weekend Results


This weekend, I made another item just from a photo; I made a quick sketch of something that caught my attention, and decided to go for it. It is another mostly craft sticks project, with the exception of a couple of pieces of wider flat wood from the scrap pile for the bottom shelf and drawer of the display.


It is unpainted as yet, as I am not sure where it will go. As you can see, the drawer works, the whole thing stands up, but I wouldn't want to drop it as it is all glued butt joints. My first thought was another item for Boutique Pulchinella, a display for garden items like gloves, pots, seed packets, vases, and the like, but there may be another purpose for it too.

Now I am going to try to make an antique Dutch wall cupboard; shabby chic in Dutch - as well as in a number of other European languages - is "brocante" and I intend to age and paint this item to fit that adjective. It has two drawers, a good test of my ability to, perhaps, cut straight lines!

Friday, 29 May 2020

Potting Bench Progress


During our virtual mini meeting this afternoon, I painted and aged the dirty potting bench. Neither of my mini friends had ever seen a potting bench like this one, but I had seen one, some years ago, at a plant nursery here in town. That nursery expanded too quickly and went bankrupt, and the building now is a place for people to get help with groceries and to learn to grow their own fruit and vegetables. However, my friends reminded me that the owners of the nursery were Dutch, so perhaps this is a Dutch potting table.

The table still needs dirt in its main bin; this will be made with some Model Magic air-dry stuff, paint and glue and tea dust.


A bird's-eye view shows the double walls, which form the slots the tray slides in from side to side, depending I suppose on where the dirt is deepest! I rubbed the runners of the tray with bees' wax to make sure they would slide with a minimum of friction; the whole thing, after all, is made mostly of craft sticks with glued butt joints, and can't cope with too much twisting.

This afternoon I also started shaping the supports for the shelves of a shabby chic kitchen cabinet, intended to be hung on a wall, based on an old Dutch design. I now have to ask the Carpenter-in-Chief to cut down some wood for the back and shelves of this cupboard; however, I hope that I have enough decent wood in my scrap pile to build the drawers and dividers for it.

Thursday, 28 May 2020

Actual Potting Table, Down and Dirty


I saw this potting table in an old Dutch magazine, and decided Boutique Pulchinella needed one of these. This is not your elegant table, with flowerpots, books, gloves and such pretty things, but a rough wooden bin with double walls. In the bin you put the potting soil; the tray slides back and forth in the grooves, and can be lifted out to dump spilled soil back in the bin.

This is the sort of potting table you would find in a plant nursery setting, or on an estate that could afford to hire a team of gardeners. As wood is in short supply here, the whole thing was made of craft sticks from the $ store, with some scraps from the scrap pile.

I have to do some sanding, and then I will stain the whole thing, prior to painting the outside of it with cheap white paint, rubbed back to suggest use and wear. The inner section and the tray will be dirtied up, and I have to make a pile of soil to go into the bin. I also have to dig out a trowel to stick in the dirt.

We had another virtual mini meeting yesterday, with another one planned for tomorrow. That means I need to come up with another stimulating mini to create; perhaps I'll go back to making the fittings for the klompenfabriek for a change of pace. The carcass of the workshop has been taking up space on my kitchen counter for a couple of weeks, as I finished window and door fittings.

Summer arrived almost overnight here; from one day to the next, plants suddenly showed up in my garden. Last night, the hummingbirds returned to the feeder; we were afraid we might not see them this year, as the weather pattern has been so strange. A couple of apple trees have opened their blossoms, and the remainder can't be far behind. Overnight we had a nice soaking rain, which made the Carpenter in Chief very happy, as he had sowed grass seed under our small orchard (6 trees) in the bare patches we always have at the end of the year. There are robins nesting outside our bathroom window in one of the honeysuckle trellises.

We really had no Spring at all this year!

Tuesday, 19 May 2020

It Doesn't Always Work Out


In between leafing the weeping willow tree, I decided to play in my scrap pile again. The first two pieces came out fairly well - they will be painted - but the food safe didn't! I worked with measurements rather than "full-size" diagrams, as I knew the copies of the working drawings would be too big.

The little door is supposed to sit inside the food safe, against the shelves; unfortunately, I made the shelves as specified, with the result that the door doesn't have enough space to fit into. That means I can't pin-hinge it. The only choices I have, I think, are to toss it in the garbage or to take it apart, cut down the shelves, make a new door, and re-assemble the whole thing. I don't know if it will be worth it, though, except that I hate to waste decent microwood, given the lack of access to decent supplies.

And I still have to put another 110 leaves on the tree.

The small item on the plinth is an egg shelf, supposed to hold a dozen eggs; I think they would have to be bantam eggs! The other item is something I remember from my childhood; over the sink in our kitchen hung an enameled shelf, green and blue in colour, with matching labelled tins to hold soft green soap, sand and soda. These were the go-to items for washing and scrubbing your pots and pans. I know we had soft soap in one of them, so we likely used that for the dishes. However, we definitely did not use sand on things, but  one of those brutal round wire scrubbing pads that you had to use to get cooked-on food out of your pots. Maybe we kept the bristle dish-washing brush in the soda can, because it did not hold soda. We used Vim scouring powder, which came in its own shaker box, rather than soda, although baking soda is still recommended today, for households that are trying to be green.

There are three more pieces to go with the kitchen pieces, but I am now wondering if they will present similar problems as the food safe. Some days turn out somewhat disappointing!

Monday, 11 May 2020

Continuing On (Galloping Madly Off in All Directions)


Two old wooden buckets have been repurposed for the wooden shoe factory, known from now on as the "Klompenmakerij". They have split willow banding, rather than metal hoops; this was commonly used by people with very little spending cash. The effect is painted, of course. The table and bench are done now, they are stained and antiqued. When it comes to painting some of the wooden shoes - however long these projects are going to take - I'll do it on this little table to get some good paint splashes.

The bench was from a series of kits I made up some years ago, when I taught a senior's mixed media group; it is identical to the little blue bench with cream flowers, without the front aprons. OK, I'll admit it; I sanded the edges to look worn, before testing it with the aprons. It looks more like a quick factory bench now. Somewhere, I have a pre-stained, aged piece of bench top, about twice as long, that I'll give legs and braces to. It will also go into the wooden shoe factory.

On the table is a heavy maul - a wooden hammer, kind of like Thor's Hammer. Next to it is one of the specialized knives used in wooden shoe making. The blade was cut from thin sheet aluminum and then nailed (and super-glued!) to the wooden handle. (Two tiny nails went flying before one stayed put; they are still missing.) On the bench is another specialized tool, also made of aluminum sheet, with the blade set into the handle. And in the buckets are two wooden knife handles, and some more specialized blades for tools; however, I was supposed to make these from wire beaten into shape. Guess I'll try that tomorrow, if it warm and dry outside.

I found the very tiny knob for the bow saw, while on the floor on my knees looking for a 3 mm high and 3 mm diameter brass tube (part of the propane tank I have to make). I wrecked a knife blade cutting that thing, so I think I need to invest in a tiny hacksaw. Maybe I'll find that bit of brass tube when the next teeny thing goes flying off my work surface!


The barrow for Boutique Pulchinella is now done (although I still have to give the "iron" tire a coat of satin varnish), ready to haul stuff around the boutique. Considering I had no instructions, only a photo, I think it came out quite well! These days, we would call this a dolly and it would have a rather different shape....