Showing posts with label Flower Tutorials. Show all posts

Thursday, 19 May 2022

Now Where Did I Put My Heart Punches?


I actually started this physalis or Chinese Lantern plant a week or more ago, but have somehow managed to lose all of my heart punches in some weird place. However, during our sorting process of a friend's stash, there was a triple heart punch the right size. Just one small problem, the actual die-cast punch part is in the plastic housing the wrong way around. This means punches have to be extracted from the works with tweezers. Things can get a little complicated, sometimes....

However, yesterday our meeting did not happen due to other things, so I decided to work on the plant. It is in a pot because, although very decorative, it is also very invasive! The original instructions came from a Jicolin Advent Calender in 2011, by Minipat, a French blogger. She used tissue paper for her flowers, which I usually replace with coffee filter paper. The backwards punch would not punch this light paper, so I decided to use computer-weight coloured paper instead. The flowers are made of a seed bead in the colour of the flower, glued to a stem. Two hearts are applied points up, and when they are dry, two half hearts are glued over the sides of the "heart sandwich".  

As my paper was stiffer, I creased each heart down the centre and then rounded out the lobes of each heart. The half hearts are also rounded out before being applied. Although not entirely successful - the seed bead shows in some places - I am pretty happy with this version of a Chinese Lantern in miniature. It would look good in miniature "dried" flower arrangements. along with lotus and milkweed pods, which I have made in polymer clay in miniature....

We miniaturists are sort of crazy....


Wednesday, 20 May 2020

Virtual Mini Meeting


Marilyn and I managed a virtual mini meeting today, but unfortunately Louise couldn't get herself connected. I worked on under-planting the morning glory trellis, and am quite pleased with the finished product.

If you enlarge the photo, you will see a few tiny wire tendrils here and there on the vine. The under-planting consists of preserved reindeer moss and paper leaves and flowers. The colours are meant to underscore the morning glory's colours; tiny purple lobelia, delicate green ivy leaves, and pink and white flowers.


I also finished leafing the weeping willow sapling; it still needs to be planted, root-ball and all, in a burlap bag. It took 330 leaves to finish the tree. I like it; the leaves themselves were cut from a punched piece of hand-painted paper, and the the 11 tiny leaves were each separated from their main stem, individually creased, and then applied one by one to the tree skeleton. You can enlarge this one too, for a closer look.

And that is NOT snow outside; spring has finally come, and what you are seeing is sunlight on grey gravel, somewhat over-exposed. Overnight, the birches leafed out and showed their catkins, and the apple trees are showing tiny leaves and may blossom later this week. In the flowerbeds, two different types of primulas have opened; the original, yellow-white ones and tiny vivid pink ones. The larger cultivars - primroses - have grown up and are showing their buds; other years these have bloomed under the snow, but I guess this Spring was just too much for them, as well as for us!

Sunday, 5 April 2020

and Another Interlude....


As it was 14 Celsius at noon today, we decided to take a walk around our country block. This is a definite sign of spring! At the bottom corner of our property, we have a culvert that mostly just has a trickle of water in it, except in spring when it can become wild enough to drown small animals. Today, it had melted enough that there was actual water flowing out of the pipe.


A few days ago, when my daughter and I went for a walk, we saw a sort of inchworm caterpillar; today, there was an actual woolly bear, so it must be spring, right?

Inspired by nature, I took another day off from the Book Nook, and created a floral arrangement that is destined for my flower shop's autumn window.


This is based on a Pepperwood Miniatures arrangement in an old issue of Dollhouse Miniatures, from Sept.-Oct. '09. I used model railroad oranges for my bittersweet berries, and used Copic markers on a piece of computer paper for the maple leaves. The veins on the leaves were drawn in with an extremely fine artist's dip pen - one I use at work for putting numbers on museum artifacts - and white acrylic ink. The stem of the berries is left over from yesterday's silver dollars, while the stem of the leaves is brown floral wire, painted and with tea dust bark sprinkled on.

I'm happy! There was an eagle or osprey circling above us as we were walking today, and in a patch of woods down the road ther must have been a million twittering birds, likely sparrows or finches.

A Short Interlude


As I was trawling though the internet yesterday, I came across a tutorial - via Jicolin to Mamiblue - for a money plant (lunaria).  The supplies I needed were all at hand, so I tried it.

I am not altogether happy with it, as the money plant I have next to the television is much more golden beige in colour. But I persevered, and it is pretty good. Do click on it for more detail.

The tutorial suggest the glassine windows of business envelopes, or baking parchment; I had the latter. I used a brown felt-tip pen to (attempt to!) go around the edges of each seed head, and then added a few tiny strokes with a brown fine-tip pen. The little tip of the plant is brown sewing thread, the stem beige basting cotton which I painted to match the wire plant stems.

The challenge for me in this was the tiny size; vase and all, this bunch of flowers measures 1.5" or approx. 3.5 cm in height. The seed heads were cut from a small, 4-petal blossom. And I used a mix of tacky glue and superglue gel to attach the thread stems to the main stem. I managed not to stick any of the bits to my fingers!

Somewhere I have a tutorial for assorted winter berry plants....

This was a short interlude, now I have to go back to panels for the Book Nook insert.

Wednesday, 22 January 2020

Well, This Took Some Time...

...and generated a fair bit of waste paper and painted paper. My friend Louise had asked me to make a companion dracaena tree, in half scale, for her camp project. She had one, but wanted another to make a balanced composition.

Half scale is new to me; I dreamed about how to tackle this project, before Christmas and after the holidays while I was working away on quilted Christmas and birthday gifts for my family members.
Finally, I decided to cut to the chase.

I must have tried half a dozen or more separate ways to do this; you can see some of the waste generated below. Last night I figured it out, the prototype worked, and today the tree is done, just in time for our mini get-together.


The original is to the left of the photo, my version is on the right. (You can see the various attempts at prototypes in the foreground.) Still a bit too bushy for a proper match, so out came the scissors, and hoping I wasn't going to mess it up, the dracena got a haircut.


Better, but too many clumped leaves, so out came the scissors again, and the plant got a trim around the edges. Original on the left, my version on the right. Photos really help to point out where corrections are needed!


OK, now we're cooking! This was my final attempt, as I was happy with the appearance of the plant. The stems were heavy gauge floral wire, wrapped in strips of paper, and then painted. Over that went a coat of matte varnish. The leaves are made of painted computer paper, a piece about 2 x 2" (5 x 5 cm), cut in a gentle curve at the top edge to vary the lengths of the leaves. The paper is then fringed every 1/16th of an inch (about 1 mm), leaving 3/8" (1 cm) uncut at the base.

Then each narrow leaf is tapered to a point (I nearly went cross-eyed). I used my pointed tweezers to roll up the fringed, trimmed strip, stuck in a tiny clamp, and allowed things to dry. Once dry, I curled each individual leaf over my scissors blade, trimming where I felt too many were the same size. When the leaves were all curled, I pulled the tiny clamp out and cut half of the rolled base off. Then I used my pointed tweezers to open the hole somewhat, and stuck in the stems with tacky glue on their ends.

I will give it to Louise at the meeting. Now I have to create a couple of white amaryllis plants. That will take a few days, as I work tomorrow and have appointments on Friday. But I will get to them soon!

Thursday, 26 December 2019

Merry Christmas!


It has been my intention to post a tutorial for this little arrangement in the days leading up to Christmas, but the camera was mislaid until it just turned up - hiding on a chair under the table in the dining room. As there are only two of us and the cat here, we had no reason to pull that chair out....

However, better late than never, so here goes: the arrangement above was gifted to Marilyn D. of Charminis, at our group's holiday potluck. I have another version of it, and will put that photo up later!


I began with a woodsy round and a small wooden plate. You can, of course, substitute a ready-made tray or plate, or make a base of cardboard and beads. I drilled a hole in the centre of the plate, and in the centre of the wooden round, in order to insert a cut-down pin to make the whole sturdier. Glue the disc to the plate, and when the glue is dry, paint in the colour of your choice, or use stain. As Marilyn had mentioned she was considering a white Christmas setting, I went with white.


The second step required some evergreen foliage, glue, and some sparkly stuff; I have some very fine glitter that I used for this. Make a ring of greenery to fit the edge of the plate, and glue it in place. you will have to hold it until the glue grabs hold. Once the greenery on the disc is glued in place, gently brush on some white paint, and immediately sprinkle some of your chosen glitter over the wet paint. It will dry onto the paint.


Now comes the fun part, decorating! Going with the white theme, I made a white poinsettia flower, substituting gold micro beads for the railroad apples I used in my poinsettia tutorial; you can find that tutorial by going to the side bar on the blog. I used a cream-coloured pencil to draw in some veins on the poinsettia petals; once the poinsettia was dry, I used a very fine paintbrush and some half-and-half white glue and water to draw a glue line over the veins of the flower; as with the wreath, sprinkle on some of the fine glitter over the glue. Continuing with the white theme, I made six Christmas roses or hellebores, from a five- or six-petal small punch, using the palest green paper I have in my stash. A dab of yellow paint on the end of a stem, on top of which you glue a bit of yellow flower soft or similar material, makes the fluffy stamens. Slide the blossom up to the paint blob, and secure with a dab of glue.


The candles are cylinders of half transparent and half white Fimo, with a tiny bit of fuse wire (you could also use glue-stiffened thread) in the centre to represent the wicks. Make a hole and insert the wire with some liquid polymer clay before baking, or with a little bit of glue after baking. The candles vary in height, so position them as you like.

White was my choice; you could go with a red theme, a blue theme, a multi-colour theme, whatever your dollhouse vision. You can vary the number of candles, add candy canes or mints, gingerbread men or dried fruit slices. Make your own personal statement with your arrangement.


Here is the arrangement for my flower shop display; as the wreath material was a little thinner, I used tiny tufts of model railroad clump foliage to make a "moss" bed for my candles to sit in.


Tuesday, 2 May 2017

How I Made the Hydrangea Bushes

This is a photo-heavy post, as it is a tutorial of sorts. The basic method of making the hydrangea bush is the same as for the geraniums, i.e. a dome of Crayola Model Magic on a stem, painted the colour of the flowers. (Click on the photos to enlarge them for better visibility.) You can go back to the geranium tutorial if you haven't seen it before.


I used a 3-leaf punch for the leaves, and hand-painted paper in a very lively light green; this is actually the back of the leaf paper, but hydrangea leaves are quite a bright green. The blossoms were punched with a custom punch from Hanky Panky Crafts, their tiniest 5-petal blossom, and a blue greeting card envelope with some variation in colour on the inside, which means more realistic flower colours.


The dome is a green-painted, halved styrofoam ball, the base for the hydrangea bush. The blossoms on the right are already covered, while those in front are the ones with "buds", very pale green-painted poppy seeds. The leaf wires were completed earlier; there are 5 with 5 sets of leaves, and 4 with 3 sets of leaves. Some additional leaves were cut and shaped ready to fill in gaps when the flowers were "planted".


I cut off a small portion of the plant base, as this plant like the other one, will sit up against one of the walls. Before planting, I add a pair of leaf sets below each blossom. (The pointy things on the right are the variegated leaves for the iris.)


This is just the flower heads glued into the foam base; start with the tallest at the back, gradually cutting them shorter down towards the front. Remember that the plants can still be shaped into pleasing curves, once the glue is completely dry.


This is the completed bush, with the leaf stems added and a few additional leaf sets added here and there to fill in empty spots.


And here they are, placed in their corner. The empty space behind them will, hopefully, be filled with a small, cloud-pruned pine; I still have to source the blue-green foam foliage for this, not to mention making the trunk. It will be done after the show this weekend, but perhaps in time for the miniature presentation I am doing for a rural library the middle of May. The grass has now been filled in over the green-painted area, and the left side of the garden courtyard is now DONE! Well, except for the hoped-for cloud pine.

Having two bushes in this area is much better than just the one, I think. The white strip on the base is where the large front gate will go.


Sunday, 26 March 2017

I've Finally Gone Round the Bend....

For those of you using Google translate, that means I've really gone crazy today! I decided to try a new way of making actual, fuzzy pussy willow buds. About.com carries a tutorial, which involved bits of thread, drops of glue, and flocking.

You start by making little "shelves" of glue, rather like thorns on a rose, along a piece of floral wire, and allowing those to dry. Then you paint wire and thorns reddish brown (I used brown iron oxide), and let that dry. While that is doing what it is supposed to do, you make tiny fuzzy buds on teeny pieces of brown sewing thread;


You stick those into foam (I used a grocery store foam tray) to dry thoroughly. Once dry, you cut the little fuzzy ball off just underneath the flocking, and glue those onto the "thorn" shelves on your floral wire. The result is really nice,


especially with the sun shining through, but it is a lot of work! When I first made miniature pussy willows, early in my attempts at flower making, I used tiny birch twigs from the garden, dotted glue here and there, and sprinkled very fine white decorator's sand over them. Years later, they still look pretty good. This new method may well be a once-off, but I'm glad I tried it!

The forsythia branches have now got tiny pale green leaves here and there, and the cherry blossoms are glued to their branches. The next step is assembling the floral arrangements,,,,,

Sunday, 8 January 2017

Bamboo!


This turned out just as I had hoped! It still needs a proper, edged flower-bed, but it fits very nicely in that corner of the Japanese vignette. Two days' work, I must be crazy....

I started by stiffening a piece of coarse cotton thread with glue, and allowing that to dry. Once it was dry, I wound it two to three times around portions of my stems, actually bamboo skewers, and glued it down. I did this by eye, so it would be irregular. Tomorrow, I'll post a close-up, as I hope to have the flower-bed done then, so you can see the nice little joints in the bamboo.

Once that was dry, I painted the thread-wrapped skewers with green paint. The joints are highlighted with a dry brushing of lighter green paint, which adds dimension to the rings of thread. Then I started on the leaves.

I have a punch with three sizes of sword-shaped leaves on it, so I punched about a hundred or so of those in three shades of green-painted paper, to add variety. The leaves were creased down the centre to give them dimension, and I began gluing them on to very thin strips of curved, green paper stems. The top of each bamboo stem has three sets of three small leaves, pointing upwards. Then I did a couple of rows of the medium-size leaves, transitioning from 3 to 5 per stem. At the base, I used the larger size of leaves, sometimes mixed in with the odd medium-size one. The lower end of the stems will be left bare. Tomorrow, once they are thoroughly dry and planted in their bed, I'll spray them with a clear satin spray.

I need to paint paper for Japanese maple leaves, and then punch myself into a stupor as I'll likely need hundreds, to fill in my Japanese maple tree, which will go on the other side of the doorway. I've saved a very nicely-shaped branched twig from the garden for that.

Tuesday, 3 January 2017

Playing With A New Plant

Happy New Year! We saw the New Year in with a case of the flu here, but we are just about over it now. While waiting, I did keep busy, checking out all the December 2016 Advent Calendar pages I could find. The French one had a wonderful new plant on it, so I decided to give it a go.

Did you pop the berries of the snowberry bush when you were a child? The scientific name is Symphorina, Symphorine in French. The lovely detail in the miniature is what caught my eye. I loved popping those berries when I was a child in The Netherlands, they grew all over the nearest city park. My Carpenter-in-Chief, as a child in Nova Scotia, also popped those berries, on the way to and from school. So the berries are also a bit of a nostalgia for childhood.

There may be a small Shabby Chic vignette in my future this year, and this is one of those plants that would tone beautifully in such a setting. You can find it at the blog jicolin, calendrier d'avant 2016, Dec. 16 - I really don't know why the blog won't let me add in a proper link, but just google jicolin and you will get there.


The maker used small styrofoam balls from Pascale Garnier, which were then baked to reduce the size; I prefer to use household items, so I used some model railroad scale apples for the tiny berries at the top of the branch. When I discovered these were much the same size as the poppy seeds in my pantry, I decided to use those for the second batch of baby berries I made.


When the tiny "berries" had dried thoroughly, I put more glue on the stems and added mustard seeds, shaping them a bit with my fingers. Once these larger "berries" were dry, I glued some extra seeds in the odd gap that appeared here and there.


Once the glue was dry, I painted the whole thing white for an undercoat, using a dry brush to remove excess paint from between the seeds, as it could hide detail. Once that was dry,  the tiny seeds are painted a very pale green, and the larger seeds pink in one batch and white in the second, again dry brushing to clean up detail. I found a tiny bit of cream added to the white paint toned down the starkness a little. (I was taught that one should avoid stark white and stark black in miniatures as a rule.) I used a brown micro-tip permanent pen to make the tiny dot on the ends of the berries, that represent the bottom blossom. (I used a Faber-Castell PITT artist pen - you have to use a permanent pen, or paint, to prevent smearing when varnishing.)  I had to touch up the green stems, then used satin varnish on the berries. For the leaves, I followed the tutorial on the advent calendar, as I had one of the suggested punches.


I tried to add a close-up of the berries, but the photo comes out sideways, although I rotated it previously; however, the computer won't let us - three of us have tried!

Then I spent a fair bit of the day figuring out how other miniaturists create those wonderfully shabby and chalky interiors, and making copious notes....


Wednesday, 24 August 2016

How to Make Paper Geraniums


The kit contains: 2 pre-made flower domes, coloured to match your flowerets, 50-60 tiny blossoms, 12 geranium leaves, and 9 short wires. (You may not need to use all the tiny blossoms.)

You will need: tacky-type glue, ball stylus, foam pad, tweezers, and planting medium, either a pot, window box or garden plot. Optional supplies include green colouring pencil, white or yellow gel pen (if you are putting centres in coloured geraniums).

Leaves:


1. Bend top 1/8" (3 mm) of your short wires at a right angle: I use the tip of my tweezers to create this bend.
2. Optional: With your green colouring pencil, draw a dark partial circle on the upper side of each leaf, as for zonal pelargoniums.
3. Shape leaf  by running your ball stylus around the underside edge of each leaf. Turn over, and gently push the centre with you ball stylus to indent. Fold the little leaf stem downwards. Set aside 3 of the leaves.
4. Dip the narrow bent end of the stem wire in tacky glue, then touch to underside of leaf with the small bend facing in to the leaf centre and the bent stem over the angle. Set aside to dry,

Flower Assembly:


You may find it easier to use the thumb nail of the hand holding the flower head, as a glue palette, as above.

1. Use your ball stylus to round up each tiny floweret.
2. Put a drop of glue handy, and use the tweezers to pick up a blossom, dip in glue, and place on flower dome. How you proceed is up to you; over the top in a row, then fill in the halves, whatever suits you. Set aside to dry. Repeat for the second blossom head. Do NOT cover the base of the dome.
3. Add a reserved leaf to each flower stem.


Planting:

1. Whether you plant in a pot, window box or garden, the method is the same. Trim your flower head stems to fit and plant in the centre of your planting area.
2. Plant stemmed leaves around the flower stems, cutting to suit your planting area.
3. Glue the last reserved leaf on any obvious bare spot.
4. When thoroughly dry, bend flower heads and leaf stems gently to make plant come alive.

That's it for the how to. It appears that I quite forgot to bend my wires before taking the first of the photos! I used white blossoms and added a coloured centre with a marker pen. You can also make a tiny white or yellow centre for your coloured blossoms. Geraniums come in so many colours that you could plant a whole, colourful garden just with them!

My flower domes are made of Crayola Model Magic, into which are glued paper-covered flower stems. The domes are painted to match the blossom colour chosen.

Now I am going to eat, and then I will experiment a little more with paper petunia plants. I am trying to see how dampening the flowers interacts with water-soluble marker ink....

There is another tutorial for paper geraniums in August of 2015, with more photos, that you might want to take a look at. There are some slight differences in the number of leaves and petal used on the older tutorial, however.


Monday, 15 August 2016

How to Make Miniature Cattails or Bullrushes


Above are the contents of this very limited edition kit: 3 polymer clay cattail heads, 3 stems, and 5 paper twist ties. The kit will be available at Camp MiniHaHa, by request. (It is quite inexpensive!)

You will need to supply: tacky-type glue; green and/or yellow/tan paint (I used blended shades of Ceramcoat Leaf Green and Americana Wasabi Green); scissors; paint brush; matte or satin varnish; vase, tub or landscape to plant the cattails in.

Step 1: Glue polymer clay heads to stems, leaving a 3 mm/3/32" piece of wire sticking out at the top. The stems are already cut at different heights for variation, but feel free to trim some more if you want.

Step 2: Cut a small piece (different sizes) off each twist tie (twist ties are thin wires sandwiched between paper, and are becoming difficult to find; most of them are plastic these days).


Step 3: Shape the twist ties using scissors; cut a "planting" point on one end, taper to the other end of the twist tie, as above. Garbage and small offcuts included for clarity.


Step 4: Paint leaves on both sides; I put a dab of two colours on a paint tray, and mix them to create colour variations for each leaf - subtle but realistic. If your cattails will be planted, they should be more green in colour; if they will be displayed in a vase, the leaves should be yellow/tan to appear dried. Allow paint to dry.

Step 5: Paint both sides of leaves with matte or satin varnish, and allow to dry.


Step 6: Planted version - place 3 cattails in centre, and place leaves around them. The wires in the leaves allow them to be gently bent to look more realistic.
             Cattails in vase - you may have to trim the leaves and stems to fit into your vase.

There it is. Does it make sense? The instructions for the kits will be printed only, with a single photo of the finished cattails as above. People will be able to access the blog to look at the "in progress" photos.

These cattails can be used in gardens, water gardens or ponds, or as dried cattails in a floor vase in room settings.

The polymer clay cattail heads are made by pushing a stem through a 1/4" or 6 mm ball of dark brown. Shape gently by rolling between your fingers. I rolled them with a woodworking file to get a little bit of texture on them. Bake on the stems at the temperature specified by the clay manufacturer for 20 mins (I used Fimo Classic Terra Cotta.) The heads will slide off the stems and will need to be glued on.

I have misplaced a small landscape using cattails, but as soon as I find it, I'll re-post it. I think I may have posted it sometime in the past.


Monday, 2 May 2016

Miniature Grape Hyacinths - Secrets Revealed

As I will be busy this week getting ready for the Moncton Miniature and Doll Show on Saturday, I thought I'd just write a quick how-to - but without pictures - for the grape hyacinths, as they are very, very simple.


The buds are poppy seeds, glued onto flower wire stems; dip about 3 to 5 mm of the tips in glue, roll in poppy seeds, and shape to a cone shape. This can be fiddly, especially when your poppy seeds seem to be a little bit moist, as mine were, but if you have a problem, pull off your mistake, and start over again. Please compost any gluey poppy seeds....


When they are dry, paint them white. This is the real trick, one I found in a Dutch mini magazine. Let them dry thoroughly. Then I brushed the white poppy seed heads with a half and half mix of satin varnish and Ultra Blue paint; the thinned paint pools between the tiny seeds and really makes the flowers come alive. The original instructions suggested dipping in blue ink, but I don't have any of that in my house any more, so I reached for the next best thing.


The leaves are made with 2.5 cm long, 1 cm wide strips of green paper. Draw thin white lines (colouring pencil) closely spaced all along the strip. Spray with gloss or satin varnish (optional, but strengthens the paper). Cut into a narrow fringed strip, and trim the tips to points. This is a little time-consuming.Then curl the tops of the leaves over gently with a scissors blade. Now grip the end of the strip in your pointy tweezers, roll the strip up and glue the end. I use a small clip to hold the glued end until it dries, but I suspect a hair pin (bobby pin) would also work as a tiny clamp. The curled-over leaves will fan out a little, but when the glue is dry, fan out the tiny leaves some more.


You can now plant the rosette of leaves in your chosen container, with a bit of glue to hold it in place. For "dirt" I tend to use oasis foam, with tea leaves for the dirt glued on top. Then just glue 3 to 5 little grape hyacinth blossoms in the little hole in the leaf rosette. All done!

Friday, 1 April 2016

Beginning the Belladonna Plant

This one has had me thinking; the blossoms are bell-shaped, so how to make that happen with paper? I decided to use coffee filter paper, and coloured it a dark purply-red with a Copic market. Once the ink was dry, I dumped the punched flowers into warm water, pulled them out, and pushed them down quite firmly into the bottom of a Styrofoam meat tray. Although they aren't perfect, I think this may be the best I can do with this plant.


For the blossoms, I used the six-petal punch, and for the sepals, which show on both the blossoms and the berries, I used a small five-pointed star punch. The marker I used to colour the filter paper is shown below. If I were to do these flowers again, I would likely use a pinker colour of marker, but on checking out images of this plant I find a large variety in the colours.


Right now, they're all standing up, but the flowers actually hang downwards; the stems will be trimmed and I will use the same method of applying flowers and berries that I used with the St. Johnswort, short stems tucked into the leaves' attachment points.


That will be the next task, making and shaping the leaves. It's not easy to determine the exact shape of the leaves, all I know at this point is that there is usually a large leaf opposite a small leaf. I think I need to head to books for better images!


Sunday, 31 January 2016

Making Dollhouse Pansies From Paper

This is a tutorial that I have been promising for quite a while, so here it is, finally. It is a difficult one to do a tutorial on, as the components are so very tiny. So you will have to pay attention to the steps of the process. If I am unclear, please contact me....


This is the type of pansy I will try to make. It is the old-fashioned variety, which is bigger than the ones most of us are used to today. The finished pansy is approx. 1/4" (4 mm) across, which translates in Real Life to 3" (7.5 cm). However, it would be next to impossible to make them any smaller, and it is kind of "set dressing" anyways; if it is recognizable and more or less in scale, it works.


You will need: 4, 1/8" (2mm) paper circles, and 1 heart in a similar size, in your choice of colour (the wee pink things just below the leaves); a tiny green circle or star; a stem wire tipped with yellow paint; small oak leaf punch-outs; fine-tip pen or colouring pencil in a darker colour than your flower colour; and the usual like glue, needle for shaping and piercing, tweezers, shaping mat and the like. I use a brick of oasis to hold my flower parts as I "build" them.


This is where you need to pay attention to the steps, as my camera couldn't photograph them clearly, due to the tiny size. CAUTION: This is fiddly!


1. Pierce hole in green centre, thread onto tipped stem but DO NOT glue.
2. Colour tip of heart and sides of 2 circles.
3. Shape by drawing a V with a line up the middle, using the edge of a needle, on all 5 flower petal parts.
4. Glue 2 plain discs to the star or green disc, at approximately the 11 and 1 o'clock positions; another way to look at it is a pair of mouse ears, edges barely touching.
5. Glue 2 coloured discs, coloured edge in, at the 9 and 3 o'clock positions.
6. Glue heart, point in, at the 6 o'clock position.
7. Carefully push up this assemblage to just touch the coloured tip of your stem. Allow to dry. When dry, bend stem 90 degrees, just behind flower head. (There is usually enough glue residue to grab the stem, but if you wish, you can always add a tiny bit more.)
8. Vein the leaf shapes. Glue onto stems. NOTE: If you "plant" your pansies, place the leaves very close to the "ground" at the base of your pansy plant; if you are putting them into a vase, glue leaves but leave enough stem below them to sit above the edge of the container.
9. You can add a bud; just bend it down at quite a sharp angle.


Here is a photo of the finished product; as I said, it is very difficult to get these tiny flowers into decent focus with my inexpensive camera, and they would insist on swivelling around in the oasis block. Remember, the finished flower is only 1/4" or 4 mm across! I hope this gives you the idea.


Look up pansies in Google images; there is such a wonderful, incredibly wide variety of colours and colour combinations to choose from. Hopefully, this set of instructions will work for you....

Sunday, 23 August 2015

How to Make a Miniature Delphinium Plant

As promised, here is the delphinium tutorial. I chose to go with a particular variety, a purple one with a dark purple heart and lighter areas on the petals, called "Michael Ayres"; this variety can grow up to 6 ft or nearly 2 metres tall. The open book is my sample picture.

Below is what you will need:


I used a corner punch with 3 different sizes of 5-petal flowers, and 3 sizes of maple leaves, made with painted paper. Punch out 5 each of the flowers and leaves; you may not need them all, but you can save them for use in another project.You will also need painted mustard seeds (or poppy seeds) for your buds, wire, glue, colouring materials, a ball stylus with a small ball, and tweezers and a foam pad.

The variety I decided to make has a deep purple centre; to do this, I made a dot with the Copic pen. Then I used a white pencil (the gel pen in the photo made too obvious a white line) to make the five tiny white lines that go upwards on each blossom. You can simply do a coloured centre and not do the lines.

My apologies for the lack of  progress photos for this tutorial, but I can't get the photo function to work for me today.( Please scroll down to the photo of the finished plant for a picture of the next step.) Put glue on about 3/8" (1 cm) of the top of the flower stem, and glue on your painted seeds for buds. Set aside to dry. In the meantime, shape your flowers by cupping them using a ball stylus and a soft foam mat. Optionally, you can push them into a foam tray from the grocery store; they will cup more deeply, but may have to be pushed out through the bottom of the tray!

Shape your leaves by "drawing" a line using a ball stylus, blunt tapestry needle, or corsage pin down the centre; on the larger leaves, add 2 V-lines, but on the small leaf you can likely only draw 1 V-line.
Dip the back of your small blossoms in glue, and place below the painted seed buds; then do the same with your medium blossoms, and finally with your large ones. I used 8 of the small and medium, and 5 of the large sizes. Now do the same with your leaves; I used 3-5 of each of the sizes, again starting with the smallest, then the medium, and then the largest.


Here is the finished purple delphinium, next to the blue one I made as a demonstration flower for last Tuesday's class. You can see that adding the dark centres and white lines adds definition to the flowers. The blue ones here were made with paper coloured with marker pens. The blossoms were then punched out, moistened by laying them on a damp paper towel, and then pressed into a foam supermarket tray, and allowed to dry. The moistening made the marker ink "run" in interesting ways, deepening it in places and making it look lighter in others. The very top blossom in the purple delphinium was coloured with the white gel pen; you can see that the lines are too noticeable, unlike the pencil lines in the remaining flowers, which are more subtle. Flower making is really a matter of trial and error!

Delphiniums are coloured from white through blue, pink, and mauve, with a variety of centre colours. The leaves tend to be a bright, light green. The book I used is a garden flowers book I borrowed from the library; seed and flower catalogues are also good for flower photos, and the internet's Image file will give you good close-ups of the blossom colours and varieties.

Saturday, 15 August 2015

How to Make Paper Dollshouse Geraniums or Pelargoniums

As promised, here is a tutorial for how I make my miniature geraniums or pelargoniums.


You will need 35 tiny 5-petal blossoms, depending on the size of your punch. Mine is a 3/32" or 3 mm (I think!) punch from Hanky Panky Crafts. Punch 13 small geranium leaves; I used a tiny Punch a Bunch punch. The flower heads are built up on tiny domes; mine are made of Crayola Model Magic. Shape your tiny dome, and stick in a wire stem with Tacky Glue. Allow to dry (overnight is best). Cut 9 wires for your leaf stems. You will also need tweezers, tacky glue, ball stylus, pot, plasticine, tea leaves, and colouring materials.

Decide on the colour of your flowers; I coloured some computer paper with a dark red-purple Copic marker. You can also use this marker to colour the Model Magic domes, once they are dry. Paint is another option; I prefer to colour my dome to match the flowers. These flowers have a white centre, made with a type of white china and glass marker pencil. A sharp white colouring pencil, paint or a watercolour pencil would also work for this. Fiddly yes, but it adds depth to the flowers. The leaves were punched from hand-painted paper, darker on top and lighter on the bottom.

If you are making a pelargonium, you will need to add a little semi-circle of dark green to the top of your leaves. (See photo below.) Geranium leaves don't have this darker circle.


Bend the top 1/8 (2 or 3 mm) of your leaf wires at a right angle. Shape the leaves by "drawing" a line on the back using a blunt needle or tiny ball stylus, with leaves on a soft surface. Run larger ball stylus around the outer edge of the leaves to curl them up a little. Turn face-up and re-draw the line from the centre of the leaf to the stem end. Set aside 4 prepared leaves for later. Dip tiny bent edge of wire into tacky glue, extending stem over the bend, and glue to back of leaves. Set aside to dry.

Cup the flowers by pressing ball stylus in them while they are on a soft surface; I use a piece of craft foam. Glue flowers all over the tiny domes, and allow to dry. Glue 2 reserved leaves below each flower head. Drop a little glue on plasticine in pot, spread out evenly and dip top of pot in tea leaves. Clear off edges. (Photo below.)


Now you are ready to plant your geranium plant in the pot. Place flower heads near centre; cut wires to desired length, dip in glue, and plant. Do the same with the 9 leaf stems. Allow to dry. Once dry, you can gently bend the wires to give a pleasing shape to your potted plant.


And that's it! (My glue wasn't quite dry, I see a blob on the pot's surface.) For this project, I used a small resin pot with a diameter of less than 1/2" or 1.3 cm. As the pot is heavy, I didn't weigh it down; if your pot is lightweight, you can glue a piece of split shot (fishing weight) into the bottom of the pot. Keep in mind that this will affect how far down your stem wires will go. If your pot is larger, you may want to make additional flower heads and leaves to fill it up nicely. By the way, this photo is larger than the actual (miniature) plant!

Although I use Model Magic to create the domes, some people use beads or balls of wadded-up paper for this purpose. This method of building up flower heads can also be used for Hydrangea flowers; the dome would be slightly bigger, and you'd  use standard leaf-shaped leaves. Tall Garden Phlox has a similar shape, with long, thin leaves all up and down the stems; consult a gardening book or plant nursery catalogue for flower colours.


Monday, 10 December 2012

How to Make a Miniature Paper Poinsettia Plant


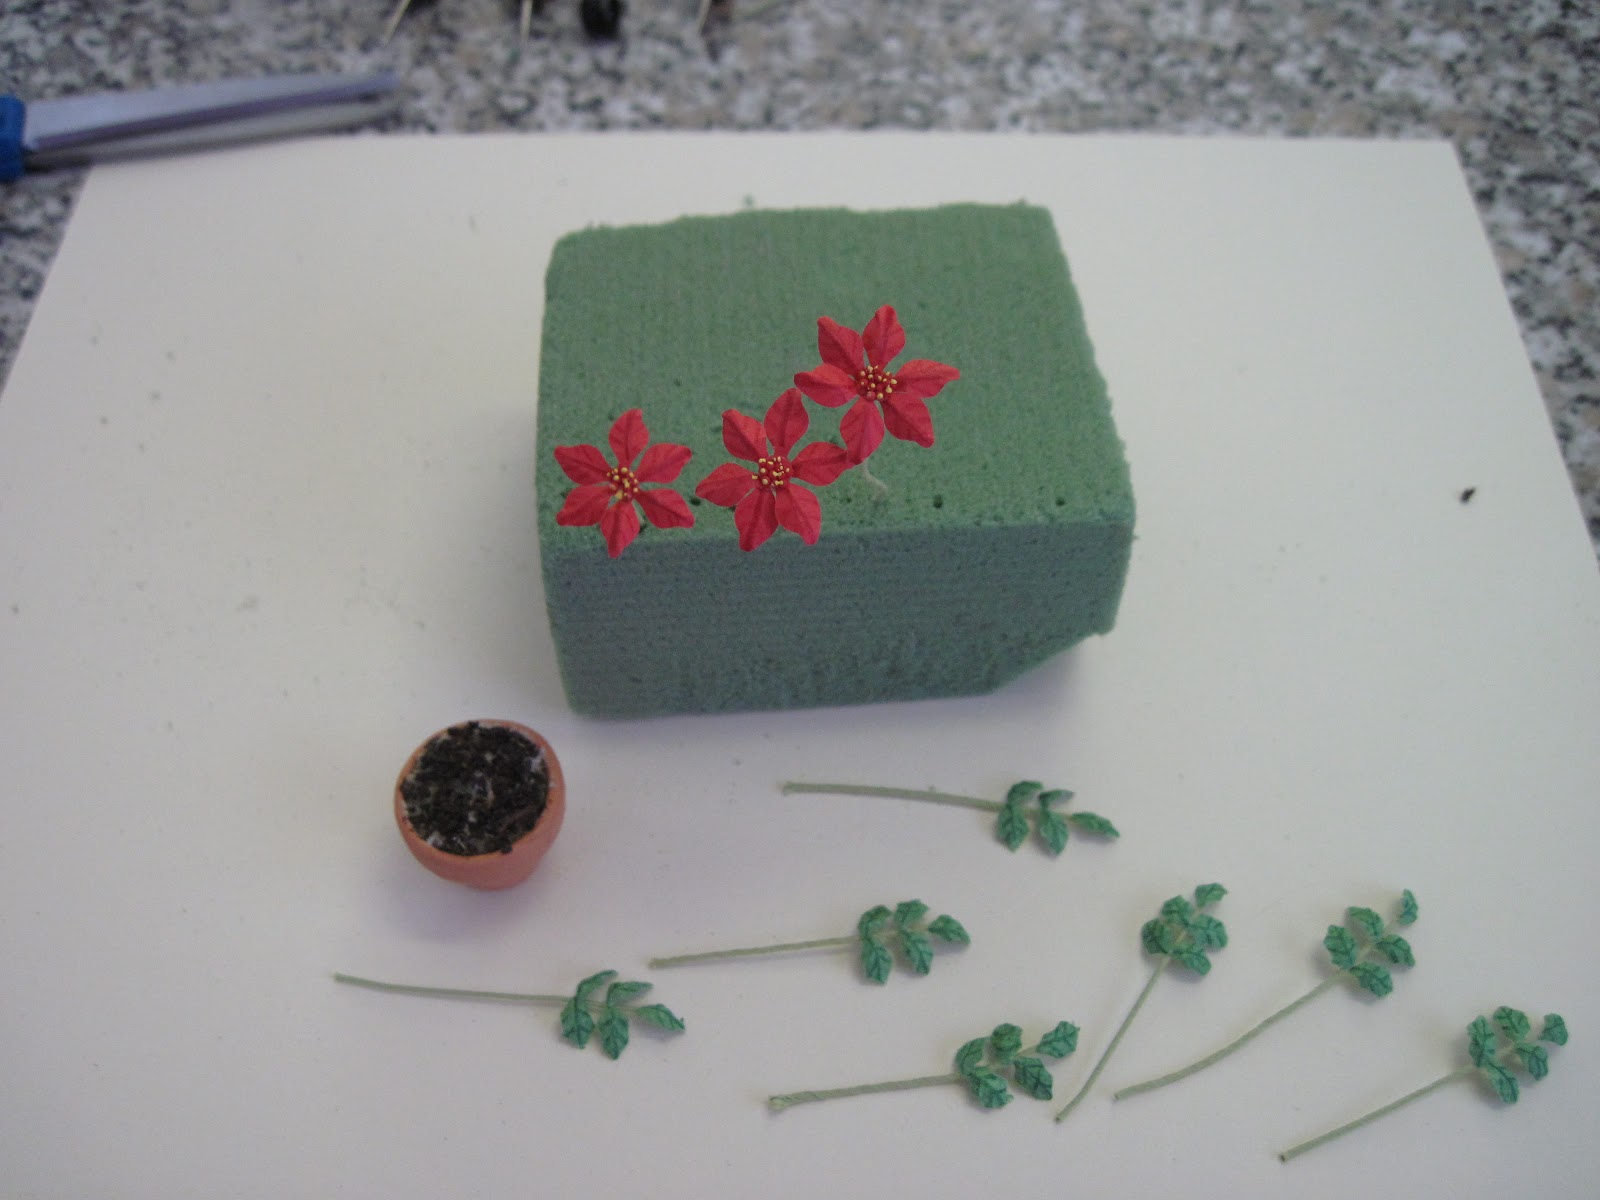
What you need is shown above: 3 x 6 red paper petal shapes, 35 green painted  paper leaf shapes, 3 small red dots, 10 pieces of paper wrapped floral wire, railroad red apples, tea leaves, tools, yellow paint, tacky glue and a prepared pot. You also need a blunt tapestry or wool needle, and a piece of craft foam for a shaping surface.

The bottom of the pot has a piece of lead split shot from the fishing dept. in the bottom, and then a plug of floral foam. I find the lead gives the pot a little heft, and makes it less like to tip over.
The red paper is commercial paper, while the green paper is hand-painted, darker on the bottom and lighter on the top. The little railroad apples were purchased at a model railroad store.

Step 1: Dip the end of 3 stems in tacky glue, stick onto the centre of a red paper dot, and allow to dry.
(Optional: Draw red veins on the tops of the petals and green veins on the leaf tops; I use a sharp colouring pencil.) Now using a blunt tapestry or wool needle, "draw" a central vein and 2 V-shaped veins on the bottom of each petal and leaf shape, echoing the coloured veining.


Step 2: Dip the tops of the red dots on the stems in tacky glue, swirl on wax paper, (this spreads and thins the glue), then dip in tiny red railroad apples. Use your fingers to push them lightly into shape. Allow to dry. The red petals and the green leaves in the photo above have been shaped with the needle. If they curl up too much, you can gently push them down over a fingertip.


Step 3: Dip the end of each petal in tacky glue, then glue to the underside of the red dot, 6 petals evenly spaced for each flower. Dip the end of each leaf into tacky glue, then place 1 on tip of each stem, and 2 pairs facing each other just below. Allow to dry. Touch the little red balls with a tiny spot of bright yellow paint; you can use a fine brush, pin, toothpick, or just the end of your finest ball stylus. Drop tacky glue on foam in pot, dip in tea leaves, push into shape and clear off edges of the pot. Allow to dry thoroughly.


Step 4: Cut the stems of your flowers to size, and plant in the centre of the pot by dipping the bottom of the stems in tacky glue. Cut the stems of your leaves to size, and plant them around the poinsettia flowers. I have also made poinsettias in hot pink, salmon pink, and pale ivory with green veining. To dress up your pots, you could wrap them in coloured foil or cellophane.

These leaves and petals were punched with dollar and craft store punches. I used a leaf with a curled tip and a stem for the coloured bracts, and a holly leaf shape for the leaves. In actuality, the leaves should all be the same, as what we think of as flowers are in fact the bracts of the plant; the real flowers are the tiny red and yellow balls!

All paper flowers should be kept out of direct sunlight, as paper will fade over time. You can spray the finished plant with a matte spray. The pink and salmon poinsettias are both several years old.

I hope you enjoyed this flower tutorial! I taught poinsettias in a class some years ago, when I was still working for our local public library. If you would like more flower tutorials, let me know and I will prepare some other plants - or, you could suggest plants and I could try to "invent" them.