Tuesday 31 March 2020

The Hinges Are Giving Me Trouble!


So I did make a lock-plate for the gate, and I painted and embellished it. However, the hinges I just tried - which took lots of time for glue etc. to dry - are now too short. The previous ones were too long. So tomorrow I'll try again, and hopefully I'll find the happy medium. (Or else I'll re-design that aspect of the gate system.)The barred gate has a wooden frame, but the other one is cardboard over foamboard. It is now black, the base colour that will later be sponge- and dry-painted to look like stone - hopefully.

Real Life has reared its head the last five days, and I really had hoped I could finally finish these two pieces. Patience is a virtue which I seem to lack....

I couldn't sleep last night, so I got up at 2:30 a.m. and worked on these two pieces until 5:30 a.m. I also did some concept drawings for the torches I hope to use. My daughter and I did get out for a walk this morning, while the sun was shining brightly. The gravel of the driveway is visible again, but there is still a lot of snow to melt. As we are out in the country, with few if any other pedestrians, we were safe, and we were keeping a safe distance from each other, despite the fact that we've been living in the same house for 3 weeks. The only unsafe thing was a motorist who decided, that since there was no traffic, he could do 90 km in a residential zone posted at 50 km. I wish we still had traffic police!

Saturday 28 March 2020

Gate to the Abandoned Tunnel


This is the start of a gate designed to close off a tunnel which ends in an endless crevasse, out of which, at times, poisonous fumes emerge. Well, you have to have a story, right?

The gate frame is made of left-over wood, although I have to fill in a bit around the key-stone. The key-stone is a scrap of foam board, with relief layers of cereal box cardboard, and a code made of nail jewels and sewing thread. My story, and I am sticking to it, is that the three clear stones on the left indicate the tunnel is 3 leagues in length, when it ends at an endless crevasse; the open-ended sewing thread design (you may have to click to enlarge the picture) indicates it is bottomless. The two purple amethysts, triangular in shape, within the funnel design, indicate poison gas, with two stones meaning unpredictable gas exhalations. The red stone means, don't go in, you idiot! I am creating a sign language that I hope will add some additional colour and sparkle to the book shelf insert.

The barred gate - which needs hinges, a hasp and a lock - is made of cereal box cardboard strips and skinny sticks from a window blind sample, that I used the raffia from in my Japanese vignette's gate house. The unpainted tabs on the right are for me to hold on to when I paint. The paint job at this point is experimental, I need to make the lintel and doorposts look more like stone, which means adding some carvings.

If I don't have a padlock, I'll have to design one. I will make loops on the left, and create some wire bits to represent the door hinges. On the left, I'll need to make a plaque for the padlock, with a hasp coming from behind with a loop for the padlock. This assembly is currently intended to go on the left-hand wall of my book insert. Almost opposite it - I have to think about my limited space - I'll add another door which will not have a gate, as the gallery it opens on to is safe. The plaque for this door will have some green stones. Along the walls will be some geometrically carved surfaces. For this, I may use some jewelry findings from the scrapbooking department, and if space is there, I'll make some floor-to-ceiling pillars, with decorations, shoring up the roofs. That leaves lots of corners for dust, stones, and similar stuff....

The counter-top for the candy shop has its first coat of paint; Real Life interfered with my time for mini-ing today, so I didn't get as much done as I hoped for. However, so far, everything is from my stash or left-over, and from the recycling box.

Friday 27 March 2020

Now What? You May Well Ask...


This is sitting next to my work space; cheap foam board, left-over fabric, empty corrugated cardboard boxes. Now what?

My little candy shop has its tiles, and the shelves are glued in. I checked the fit of the jars I want to use as candy containers, and all is well. However, I need to do the marble counter top next, and that requires the Carpenter-in-Chief and his table saw. He is exhausted from everything he has been doing lately, and is napping, so I don't want to bother him until tomorrow.

So the last couple of days, I have been looking at tutorials on-line to see if I could, perhaps, somehow, craft a book shelf insert; I do have all the required materials on hand, I think. So I gave myself permission to start something new. If you are not familiar with Book Nook shelf inserts, do take a look! The ideas are just fabulous. No scale required, use cast-offs, and if you want to learn new techniques, check out some of the builds the gaming aficionados create. My favourite right now is a  fellow Canadian at Black Magic Crafts (I hope I have that right!)

.

I LOVE fantasy and science fiction novels, and wore out my first set of Lord of the Rings a few years ago. The gap that Gandalf is defending, is slated to get a Book Nook insert. If it works I may do another, to dress up these bookshelves.


OK, this is the start. I measured the space in the bookshelf, and tailored my insert to fit. These are the walls, floor, ceiling and back wall of what I hope will be a passageway in the Mines of Moria. What does that mean? Well, I have 4" or 10 cm of width to work with, and 9 3/4" or 25 cm of length, and a height of 11" or 25 cm.. The plan, and there is one, is a view down a corridor. The lower portion will have carvings and pillars, a faux doorway, and a couple of torches. The upper portion will be rock, which I hope to imitate with layers of egg carton stone. The ceiling will have some small stalactites, probably some sort of clay, and my intention is to add subtle glitter here and there to indicate crystals and minerals in the rock faces. With luck, I can add an angled mirror to give the impression of further corridors.

The body is cheap dollar store foam board, the kind that you can peel the paper cover off of. The exposed foam is then banged and rolled with twisted baking foil. The whole is then painted with a mix of Mod Podge and black paint for strength. There is an outer body of corrugated cardboard, hence the packing boxes. The fabric will be applied last and varnished, to make the insert look like a book, and my daughter can make a title for the "front" and spine with her Cricut machine - once she gets back home!

The trick is that you sort of have to work flat, and hope you made everything to fit once the pieces are ready to put together. I hope to work with a floor, wall and back, with the other wall to be installed once everything is done.And I hope to have lighting....

It's a challenge; the "carved panels" in the walls will be made with built-up layers of cereal box cardboard in geometric designs. I hope to use cardboard to make the torch bodies too. The effectiveness of this Book Nook will depend on whether I am able to paint and embellish the space to create the right illusion, so I will be looking at further gamer gear tutorials.

I hope you will enjoy this new journey with me. Making something from nothing, or from things around the house, is kind of stimulating!


Wednesday 25 March 2020

Candy Shop Interior


Well, I thought about it, and went ahead and painted the back of the shelves white, and added a frieze of Delft tile paper around them. I like this colour scheme, and think it should work well with glass jars of colourful candies.

The counter-top that came with the kit does not leave a lip, so I have to cut a slightly deeper one; it will, hopefully, be painted up as plain white marble with some light grey veining. The base of the candy shop, as well as the outside, will be green; this colour is traditional in the region north of Amsterdam. If you want to see what it might look like, check out the outdoor museum, De Zaanse Schans, on-line. It is a working windmill museum, with a number of typical fishermen's houses that rich people pay big bucks to live in, which are painted in this traditional green. And I do have a plan for such a typical little house, so perhaps sometime in the future....

I will try to create grooves in the tile paper, which is glued onto bristol board (not fixed in place yet!), to delineate the tiles. Then I'll experiment with a glossy finish for the tiles, as I have lots of small scraps of that paper.


Maybe some day!

Tuesday 24 March 2020

Contemplating a Colour Scheme


I have done a (very) little more on my CMHH '19 project, intended to become a market candy shop. The tiles at the front are in place; I wanted something that looked like encaustic tiles, and this strip has been in my stash for years. It is a decorative element from a no-name brand of facial tissues. The colours include caramel brown and dark green, which is what I will use to finish this project with.

A lot of mistakes were made by me in putting this together; when the project imploded, I lost track of what I had intended. and made some changes that were not great. So I took courage and carefully pried off some sticks I had glued across the top of the box. (I thought the doors were supposed to go into the box, rather than sit on the base!). I am now trying out colours for the interior. The sub-roof is held in place by friction right now, as are the shelves. The wall is bristol board on which I will place my "Delft tiles".

The intention at this point is to have a plain marble counter top; jars of candy will sit on it. The back-splash - for lack of a better description - will likely be the Delft blue tile the box is currently sitting on. However, I think I need to paint the area behind the shelves white, and just have the narrow strip below the strip tiled. I need to think about this! The jars of candy should provide most of the colour, I feel.

My thought is to put a tiny trim strip below the tile level, paint it the same colour as the woodwork, and call that part done. Then I need to make a false ceiling, from which I will place some LED lighting; the cavity of the false ceiling would then hide the batteries and wires.

This past weekend was kind of a loss, work-wise, as I was trying to get in touch with my (very small) family to see how everyone was doing. Up to now, they are well, although I am very worried about an aunt who is in her late 80's, and lives on her own. We are staying in touch by phone.

Stay safe and well, please!

Friday 20 March 2020

We Are Housebound Now


A State of Emergency has been declared in our province, and no planes are flying from April 1 to April 30 - unless things change. Our daughter is preparing for the long haul, staying with Mom and Dad until things settle down. Her husband will celebrate his birthday alone, poor guy!

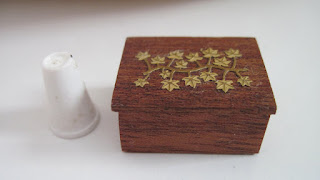
In the meantime, I am still working on minis; the piece above is a box I put together from mahogany, with a wax finish, and for size comparison I have included a glue cap....Yes, it is tiny, the lid is a friction fit, and I had to sand about 1/8" from the ends of the sides, as they were just a bit too big! It is a lovely little kit, and may end up in the Steam Punk Loft - unfinished as yet, of course. When you remove the lid, it makes a very satisfying little pop sound!

Also on the go are two pieces of "wicker", a miniature doll's bed and a cat bed. The first of these was purchased from an estate sale, and was missing 10 wires and both rockers. I found I had some similar gauge wire in my stash, and painted it white. Then I decided that the cat bed, which had quite heavy gauge wires, would be easier to do - read, less of a problem to drill properly - with smaller wires. So one has been started, and one is waiting. I'll make new rockers to fit the doll's bed, which came with a tiny rubber baby doll in a swaddling blanket. It will go into the toy shop.

While tidying up, I found some more minis, purchases and gifts from CMHH, and some of them are now on display in my wall hanger in the family room, where I can enjoy them daily and borrow from them if the right project comes along:


I picked this up second-hand somewhere, and since the cuckoo clock moved to Alberta, it has hung in its place. It's a great way to showcase some minis that I really love, but that have, as yet, no permanent home. The German saying on it roughly translates as, "Small Things Have Their Purpose Also - Anno 1879". It was probably part of one of those buy a mini a month things that were everywhere several decades ago.

I have begun a new little project, but need a cup of tea first. Stay well, please, everyone.

Tuesday 17 March 2020

Tuesday


The trunk was mostly done, I finished it yesterday afternoon - well, I have more ideas for it - after going to what is likely to be the last knitting group for a while. I want to line the inside of the trunk with appropriate paper, with an illustration inside the lid, and give it a removable tray. That way, I can exhibit it open and "full" of stuff in my attic vignette. I also need to add some worn travel stickers to it. Although they are not needed as the straps act as hinges, I'd also like to add brass hinges. The trunk is from a kilnworks.weebly.com kit that was taught at my house when we still had a big mini group.

The plant stand is another kit from CMHH. The construction is all butt-glued joints, so to strengthen the plant holders, I added bits of sewing pins to strengthen the thing. The base is still giving me problems, though, and I may have to add a square base to the centre with appropriate little feet at the ends of the pedestal base.

We are housebound like so many around the world, a good opportunity to finish some stuff. My younger daughter is sort of stuck here for the foreseeable future, and sadly for her, her husband's visit here was cancelled. She is waiting for some commissioned costume work pieces to arrive here so she can work on them. The event for which they were commissioned is end April, so hopefully things will be mostly back to normal, and the event will go on. I have a - hoped-for - miniature show the beginning of May, which started all this finishing up of my mini kits.

Saturday 14 March 2020

Today's Finished Objects (Yes!)


A mahogany bench kit, now glued up, and just awaiting its varnish coat, is another CMHH kit, made by Debbie P. from her mahogany kitchen cupboards. When they renovated their very old Nova Scotia house kitchen, she cut the original mahogany cupboards down to miniature lumber. The previously shown laundry tub and other vintage laundry paraphernalia is mahogany from that renovation as well, as is a small bookcase I still have to put together - I remembered overnight that I had a similar book case in one of my vignettes, so I dug that out to try and use it for measurements.

On the bench is a laser-cut cat treat kit, complete with a baggie of cat-shaped snacks (which I have to paint cat-treat brown), also put together. The box I will use a varnish on, as I like the laser work on it. It was made by Grandpa's Dollhouse in Ontario, and was a CMHH gift; I have another one of these to make up too.

The bench, with the addition of a cushion, can work in my Tudor Apothecary shop, a place for the rich, favoured customers to sit while awaiting their medicaments. The cat treat boxes will go into the second steam punk project (another UFO), and my older daughter's dollhouse, which was left, according to her, by an old lady to her cats. That house has been exhibited at children's libraries, with a challenge to count all the cats in it....

I have still, on purpose, not photographed all the embroidery kits I have to finish up. Hope my old eyes hold out for that!

Thursday 12 March 2020

A Surprise and a Book Shelf


The surprise was my younger daughter, who lives on the other side of the continent, suddenly appearing in my front hall! Her husband was supposed to come here for a course having to do with his job, but a few minutes ago, because of Covid virus, the instructor was cancelled, which means he likely won't be able to fly out this weekend as planned. However, she came out early and is planning to be here for 3 weeks; we'll have to see what happens with the flying bans in Canada due to that flu.

I did put the bookshelf together; it just needs the narrow little bars across the back of the shelves that prevent the contents from falling off. Things will be a little slower now that I have my kid here, time to have some fun with her, virus permitting! Another book shelf awaits the instructions being found - I think they are in an old magazine, but I need them as the shelves are slanted.

Wednesday 11 March 2020

Finished Some More Stuff


The octagonal table is done, ready to stain and/or paint. The kitchen box (to become a candy shop) is glued back up in box form. The Hallowe'en decoration is done. And a half dozen tiny drinks coasters (click on photo to enlarge!) made from an Art of Minis kit from Europe, is also done.

I am leaving my clamps on the box overnight, to make sure everything sticks. Also, if it doesn't, I don't want to know until tomorrow, as I need a decent night's sleep.

Now I am going to sand the pieces of the book-shelf, and hopefully that will come together tomorrow. We woke up to serious ice everywhere this morning, it was so bad that the garbage truck slid down our hill, and they decided to pack it in and wait until the sanding crews had a chance to grit the roads. It was the very loud sound of a garbage truck - you know, the kind that compacts your garbage as it picks it up - sliding down the road that woke me up this morning....

Monday 9 March 2020

Another Week, Some More Work

While still trying to do catch-up on all my UFO's, Real Life took some time this past week; this means that I don't have a lot finished yet, but I did start finishing things.


This is a very tiny sewing basket from a kit; there are three more rings of wood to go on top of these, then I have to tie on the cover. The kit is lovely, but I can't remember where the heck I got it! There are very basic instructions with it, but no maker. I think perhaps I picked it up in England several years ago.


The table legs are assembled, now I have to place them. I hope to use this piece in the Tudor Apothecary Shop, so I should really make a slatted shelf below this, big enough to put some carboys -
large bottles in straw baskets. They could hold all sorts of mysterious potions....


Done! Another old kit, an antique wash tub with soap shelf, laundry forks, and stocking stretchers. For now, these will go into my scullery/laundry room, if I can find space for them. This kit came from Camp MiniHaHa some years ago. I am still attempting to figure out how to make the washboard without the suggested  window framing; I think a wood sandwich should work. There is also a wash dolly, which requires drilling half a dozen holes at an angle, plus a central hole for the handle, in a very, very tiny wooden disc. I am working up to it. The instructions are in an old Nutshell News magazine.


And finally, the bottom of the wall shelf is ready to go, and the new cupboard unit that replaces the bottle holder and narrower unit is ready for gluing. I hope to have this Camp MiniHaHa project 2019 assembled and partially furnished for the beginning of May, the Moncton Miniature and Doll Show. It doesn't have to be finished, but it should give a good idea of the finished project.

I think the counter top will have to be faux marble; the back will likely get Delft tiles; and the floor should get a strip of encaustic tile. On the gluing jig right now, besides the little sewing basket, is an octagonal side table. I am gluing and then sanding the rim pieces, one at a time. A bookshelf awaits my attention....

Sunday 1 March 2020

I Really Have Been Working

Yes, I am still working away on my self-imposed project of finishing all those unfinished kits, some of which are so old that I can't always find the instructions. And along with finishing things, I am also repairing things that were broken. This takes time - the wonderful table below fell off my desk, with the result that all four legs broke off just below the apron of the table, at heir narrowest point, at least five or six years ago. I was able to glue them back, using the broken shapes to decide where they went, as well as the paintless spots that held the side braces and the shelf. That took from Wednesday to Saturday, one leg at a time, then the side supports, and then the shelf.


I think it was the paint job that I love about this - I am quite sure it was a Camp exchange gift from years ago, that had not yet found a home. It is crying out for a food prep scene.  Before it was repaired, it looked rather like the tea trolley below:


It fell in the same accident; we were moving a desk, and I forgot the hutch on it wasn't fastened down, so of course my favourite pieces fell to pieces. This is the coming week's repair project, which has to be done one leg at a time. There are tiny brass casters on each leg! This was also  Camp exchange gift, loaded with a teapot and some cakes.

Today's rehab project is a Tudor table, a carpenter's "second" I was given; four of the decorative spindles had dowel stubs on them, but two did not. I was too chicken to tackle it until this weekend, but I think I've found the solution; drill holes in the spindles, fill in the holes in the cubes and drill a hole, and use wire or fine dowel to hold the pieces together. The photo insists on coming up sideways, although it was just taken, which means you will have to wait until I sort this out to see a photo. The finished table will go into the Tudor Apothecary project.


This is a very early project! I have glued the legs on, as I now have a really good wood glue. This is a Recamier-type sofa, intended for one of my earliest projects, an artist's studio. His models are intended to pose on this. For the upholstery I need to find an old silk tie with a tiny pattern, that suggest the thing is at least a century old. The back will be glued on once it is upholstered. This photo came up right side up, I can't figure this out! (Oh yeah, the photos that worked were taken a day or two ago, while the two that refuse to come up were taken today; the batteries in my camera  died yesterday, and apparently something has gone awry with the installation of the new battery.)

The photo I just tried to load is of a book-shelf, in a plastic bag; it also comes out the wrong way up so no photo. It has been sanded, and is just waiting for me to slightly sand the rebates for the shelves and the back supports to fit. Tomorrow or Wednesday I hope to get to that. My box of unfinished kits is starting to look somewhat empty....

Yesss!