Wednesday 24 April 2024

Some Kits! Should Have Tossed Them


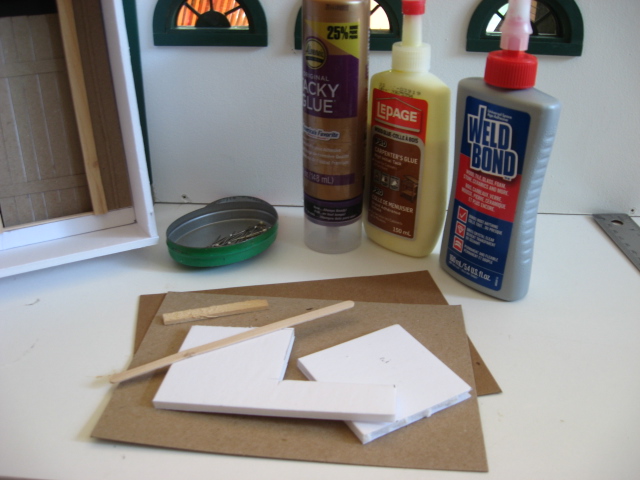
 Odd title, right? You'll soon see why. I pulled out three old (quite old!) kits today, thinking that I could finish them for the show in early May, and perhaps make some young collectors happy with low, low prices. They all came to me second-hand, and they ALL had their problems. Here they are, only one came completely sealed, the other two had been opened. I did the embroidery earlier, more about that below!


This is the oldest one, I don't know how many years I've had this, and if you look closely, one of the bars on the tapestry frame and the back rung of the chair are a different colour. They were missing, but it had been opened, and I figured I could still put it together as I had the right size of dowel in my stash. The red fabric, embroidery Aida cloth, is destined for the chair seat. The larger, quilty-looking piece, is intended to go on the embroidery frame, as per the photo. Hmmm, it's very much out of proportion with the wooden pieces provided for the frame, if you go by the photo on the front of the kit....


This is one I inherited from a mini friend who retired due to health reasons. It too had been opened, and all the dowels were missing, but again, I was able to cut them from my stash. This kit had dried out quite a bit, so there was a bit of damage on one of the frame legs, and some of the ply kind of let go when I was knocking the cross-bar dowelling in, but that was glued and sanded. The black tapestry goes in the frame, the red is again the chair seat. Folded over lengthwise, the tapestry might fit the frame....


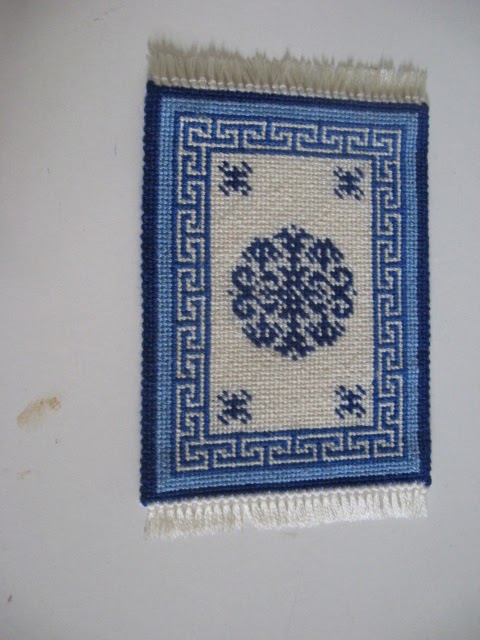
This is another inherited piece, the only one that was still sealed in its package. However, when I began to sand it, it was apparent that the cutting of the piece - they were die-cut in a piece of plywood - was done backwards, which means the rough edges of the dowel holes are on the better side of the wood. It was necessary to fill the edges of all the dowel holes on one side of the bench. It has a piece of upholstery and a little rug with fringed edges. This one might just work without too much changing around....

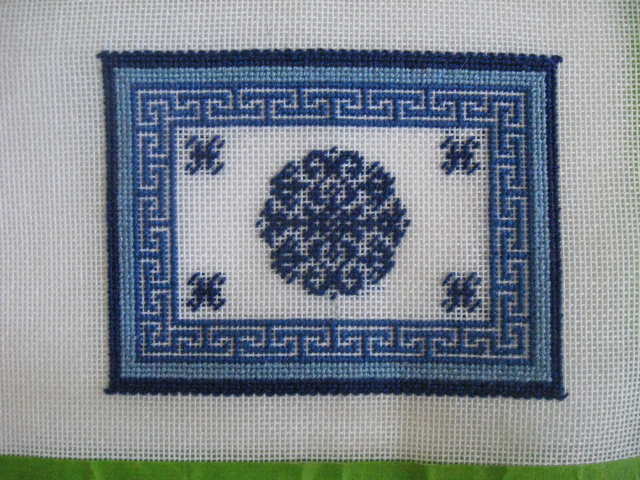
The embroidery thread which came with the kits was like very thick sewing thread, in terrible colours, so I dug into my stash of floss and used my own threads for the embroidery on all the pieces. I did begin the little tapestry and the quilt with the colours provided, and the effect of the things was, well, like it had been dragged through the mud, so I pulled it all out, and I like my colour choices much better. I also decided to minimize the amount of outline stitching in dark thread on the above two pieces, and just outlined the rose buds and their leaves, much daintier. The kit had provided black thread, but you should avoid outlining in black, but use dark brown or dark gray instead, especially on miniatures.

The package fronts show two stained kits, and one painted one. These will all be painted, as you cannot, with the best will in the world, hide the plies in the plywood. Chalk paint in white seems the best choice to me for this, and I hope to pick some up tomorrow, as the white chalk paint I had had dried out.

In order to finish these pieces, I have to re-make the frame for the quilt; it may work out best if I replace the sides of the tapestry piece with the sides for the quilt piece, using the longer sides of the tapestry frame and replacing the cross-bars with longer ones to, hopefully, show the whole of the quilt top.

I thought these would be quick little projects....

Tuesday 16 April 2024

Medieval Eye Candy


So, this is a view along one of the canals/rivers in Colmar, France, not far from the German border. The area is sometimes called Little Venice, because of all the waterways running through it; in fact, there are some bridges with houses on them. This area is widely photographed, because of the age of the buildings, and the colours used on them are supposed to be traditional; yellows and oranges from ochres, pinks from bull's blood mixed into the whitewash, green from vegetable matter. There's a lavender one in this shot.The whole effect is delightful, and the area is widely known as a Medieval Village, although it is in the middle of a small French city.

The red things attached to the fence are official Love Locks, inscribed with a couple's names, initials and the date they were there, and signifying eternal love.... These are official padlocks, sold in the area, and the only ones now allowed. Apparently, regular padlocks are too heavy, and more than one fence railing has buckled under their weight. Once the lock is attached to the railing, the key is tossed into the water.


There are whole areas where these buildings have been carefully preserved, and most of them are on very narrow, cobbled streets and alleys; this one is wider, and is a pedestrian shopping area. There are some new builds mixed in, and I found myself wishing the new builds had some sort of similar character!

These buildings are higgledy-piggledy, often crooked and bent, but I just love that they've made a real effort to retain them as they were.  We wandered through this area for a couple of hours, and every corner we turned revealed more of these old dwellings and shops. I'm above average height, and we modern visitors do have to remember to duck under doorways and beams, though!

Hope you liked this view back in time; these are the real thing, not modern reconstructions, although there most likely was some rebuilding required following WW II - there is a famous battlefield not far away, which some of our fellow passengers with armed forces connections visited.


Wednesday 10 April 2024

The Kitchen at Markburg Castle


One of the places I visited on my recent (delayed by 3 years!) 50th wedding anniversary trip was to Marksburg Castle, set on a crag high above the Rhine River in Germany. If you see an ad for Viking River Cruises on television (north America only, I'm afraid!), you will see this as the last castle in the advertisement, with its yellow walls and large square crenelated tower, topped with a narrower round tower.

It is the only castle in the area that was never destroyed; Napoleon and his army were only the last band of destructive idiots to mess up the area. His army destroyed just about every castle on the Middle Rhine around 1782-86, very much a scorched earth policy. The height of this castle, along with the pitch of the cliff, made it virtually impregnable. So this is the real thing and not a later romanticised rebuild of the original building. It was a must on my trip!

For lovers of all things medieval, this place was wonderful. A few of the rooms have been left as they were when the original inhabitants lived in it, with excellent and true-to-life reproductions along with original antiques.Wood, pewter and brass, along with pottery, make up the majority of the furnishings, and they are, everywhere in the castle, sparse by modern standards. Do enlarge the photo to see the wonderful array of medieval kitchen equipment!

To help me with my eventual Apothecary Garden, I bough a book there, Der Krautergarten auf der Marksburg (The Herb Garden of the Marksburg), as a guide for what apothecaries as well as castle communities used for medicinal and culinary purposes. 

I'll post the occasional photo of what I saw there, as well as some of the medieval neighbourhoods in towns and cities along the Rhine that we were able to explore. Did I have a good time? A huge resounding YES, although the weather was damp and chill. We did have two days of nice weather, but I'm so glad we went on this trip! No less than 3 ancient cathedrals ( Strasbourg, Koblenz, and Cologne), more preserved timbered buildings than I ever saw in one place, a real feast for the eyes and the imagination of someone like me who loves to make minis of the medieval! Hope you enjoy them in the days and weeks to come....

Saturday 23 March 2024

Back Soon!

Three years after the event, the Carpenter-in-Chief and I are heading to Switzerland, for a short Rhine cruise to celebrate our 50th wedding anniversary. That happened during Covid, so no celebration of any kind in person was possible, sadly. The 2 years after the restrictions were listed, the C-in-C was heavily re-involved in Refugee Resettlement programs, as people who had been waiting for travel restrictions were once again able to leave, and we just couldn't take the time at that point.

But now, it is happening. One fun part for me will be on the Rhine Canal, which in The Netherlands is raised above the level of both the highway and the railway. Both the C-in-C and my older daughter traveled by rail with me below this, much to all our amusement, and now we will be on the upper level.

There is a snowstorm right now, and we have to drive close to 500 km to get to the airport. Also, there are transportation strike actions going on in Germany, and we have to fly to Basel from Frankfurt. Keep your fingers crossed for us, that there will be no hitches!

Along the way, I hope to see a couple of wonderful medieval sites; a castle above the Rhine which has never been destroyed, and Colmar in France, full of medieval buildings with pastel paint jobs on the plaster areas between the timbering. If our travel permits, we may fit in a quick visit to the Puppenhaus Museum Basel, but that depends on the planes being on time. They have superb miniatures there.

There should be stories (of one kind or another!) when I get back....


Thursday 22 February 2024

The Maple Sugaring Scene Is In Its New Home

 This morning, the diorama was delivered to its new home, Kings Landing Historical Settlement in New Brunswick, Canada. It is currently ensconced in a display case in the Visitor Reception Centre at the site, ready for Maple Sugaring Weekends 2024, on March 9-10 and 16-17. This year marks the Settlement's 50th Anniversary.


Here is the overall view of the finished diorama, with the lights on. I'm very pleased with how it turned out, and I think the staff at the Landing are too. I've been a volunteer there now for 18 years, and my family has always enjoyed visiting. This was Marilyn's and my commemoration of the museum's anniversary.


The centre left holds the sap vat, with its canvas cover, weighted at the four corners by stones sewn to the fabric. The sap workers have just emptied the sap cans, and are preparing to add the sap to the evaporating pans. The sled is pulled by humans, as this is a family sugar bush operation, not a commercial one, which would use a horse-drawn sled.


Beyond the centre, at the edge of the scene, you see a tree with two sap buckets. Behind it on the snow lies an empty  barrel, used to haul water to wash the equipment with, and to make tea for the workers. The large copper cauldron, which is also used to boil down the sap, has been cleaned and is draining against some felled tree trunk sections. Beyond that is the woodpile, and the chopping block with its axe and wedges.


On the other side, the sap boilers are finishing their tea break, using the chest they employ to haul the necessary tools and equipment into the woods as their table. On the stump is a hydrometer in its case, while the sieve, skimmer and scraper are on top of the rock. The small shovel for the ashes leans against the rock. The fireplace was built of commercial miniature bricks, while the pans, smoke hood and damper are made of faux-finished cardboard.

As mentioned before, Marilyn and I used a series of how-to articles published in Nutshell News in April, June and July of 1992. The author of the articles was Ruth Armstrong,  a wonderful metalworker. As we were not metalworkers, we used cardboard and cellulose clay to create the copper and metal sheet items. I enjoy working with faux finishes, and this scene allowed me to indulge that fascination. The only item(s) not made by us were the tea pot (plastic), the two wooden buckets at the back of the scene, and the wooden barrel lying on its side.

Now I have to tidy my work space, and Marilyn is going to work on inventory for the NB  Miniature and Doll Show 2024, to be held in early May. When sugaring off starts, we know Spring won't be that far away....

Saturday 17 February 2024

Syrup Tank


 I had intended to make this using some half scale flooring that had been lying around for ages, but couldn't find how to bend really thin wood without damaging it. That meant finding another way to make the syrup tank.

It is made from two layers of cardboard, the kind on the back of writing tablets, and an outer layer of an old (and carefully used!) brown file folder. The inner cardboard was scored to represent barrel staves, as was the outer file folder card.  Paint followed on the inside - black under the rim that holds the "sap" - and the sides and cardboard hoops on the outer edge. The liquid is a circle of clear plastic from a report cover, and just sits on the inner rim.

I still want to make a "canvas" cover for the tank; in a few older illustrations, the tanks have cloth covers that are pulled back when the sap is either being poured in or out. I intend to make a weight for the corners of the canvas cover, as they had to have had something to hold the cover down as they traveled through the woods emptying the sap buckets.

I'm pleased with tank, although it should have had slightly sloping sides...

Tuesday 13 February 2024

Some More Landscaping


 This is the first time I've ever cropped a photo, but you didn't need the window frames or the white plastic table covering! This is more or less how things will be set up, once all the landscaping is in. We "planted" some dead grass, dead bushes and the like, spread some twigs and branches around, and now the next step, hopefully tomorrow, is the slushy path.

Sunday 11 February 2024

Atmosphere Being Added (Before Our Snow Melts!)

 It was well above freezing today, which meant I had to take advantage of the snow still on the ground to help me paint the snow in the diorama.  


This is the centre of the diorama, with chips, bark and sawdust added to the chopping block. The snow in the foreground has been painted a bit, but the area of the sleigh road is still unpainted, as that is my co-creator's task. We hope to get together a couple of days in the new week, to get the landscaping finished and then the lighting can be installed, as well as the last finishing details of the exterior of the diorama.


As you can see, there is still an unpainted area; this will be partly the path, and partly the mess of melted snow and ash, footprints and meltwater, around the fireplace. This is the right side.


And this is the left side. A little dead grass has been placed here and there, as well as bits of moss near the woodpile, and a few dead maple leaves have been placed near the trunks. Next up, I get to make the messy fireplace area.


Wednesday 7 February 2024

Landscaping in Place, Now We Paint and Decorate


 The diorama is currently in my work room, for the painting job to begin. Today I worked alone, as Marilyn has a stomach flu, but we hope to get together on Friday, if the flu is gone. The trees are in place, and they have bits of snow in the angles of the branches. The woodpile is also in place, as are two of the sap buckets, with more to come on the other large trees. 

The painting process in a static diorama starts with marrying up the background and the foreground. At this point, the back edges have their first coat of paint, with some faint dry brush accents in the pale mauve found in the background photo. The next step will be to add grey-beige shadows, and try to dry-brush the edge of the foreground to blend into the background. It is far too white right now!

Marilyn built up the ground with foam chunks which she then covered in crumpled paper, using a glue-type product that brushes on. On the right of the photo is a path, which she gets to mess up with "footprints" and sledge tracks. There will be an ashy, melted, sludgy area around the fireplace, and then we get to dirty that with snow, ice and ashes.

Once the background is painted, we can begin to place the larger items, gradually working towards the front of the diorama. I knitted a tiny toque today, which may hang on one of the branches of the small tree on the right side. Now I have to go hide the diorama in our guest room overnight, because if I don't, our cat will move right into our tiny forest clearing....

Sunday 4 February 2024

We Are Working Away

 Due to health problems and bad weather, we haven't been able to get together much to work on the maple sugaring diorama the last ten days or so; however, we are hoping to get back to work on the final diorama Tuesday and Wednesday, to make up for all the lost time.

Winter, old age, back problems - well, what can I say!

Monday 22 January 2024

OK, That Took Time....


 But the copper kettle is done! As mentioned before, the shape was  moulded over a small preserving jar, using paper clay. Once dry, it was cut to size and sanded, and then faux painted. The bail handle is made of wire, and is not all that visible when the kettle is placed upside-down over a log to drain, as it will be in the diorama. The "rolled" rim is cotton yarn glued around the edges, and the ears are made of card.


I am very pleased with it; the original clay was stone gray, which was then sealed all over to take the paint without softening the cellulose clay. Once dry, I painted it with a couple of coats of raw sienna paint, and when that was dry it was dry-brushed, using a mini fan brush, with a brass-colour metallic rather than a pinkish-copper metallic paint, followed by a brushing and wiping with antiquing gel. And when that was dry, the whole thing was given a coat of satin varnish. The effect is of a copper kettle that has seen a rough life out in the woods, but is still being used, dents and all, as well as being kept quite clean by the maple sugaring crew.

There are a few more small items to come, but so far I'm happy.

Thursday 18 January 2024

A New Camera, and Some Things to Show


 I'm not a woodcarver, but over the weekend I carved a paddle - complete with (cardboard) reinforcement strip on the back, a pair of wedges and an axe for the maple sugaring diorama. I also began work on the large copper kettle which will rest against a stump in the background of the scene, but took the photos with a new-to-me very fancy camera, and my old camera is unable to "read" the pictures I took.

The new camera is a bit of a learning curve, in that it is very slim, apparently has the ability to work with a higher number of pixels, and does not have a port for a cable - apparently, it is WiFi and we have to figure out how to make that work. The photo I took of the freshly-draped paper clay kettle is currently unavailable, but I did take a photo of the dried and trimmed version with my old camera.


The next step is to seal the inside and outside of the dried paper clay shell, and when that is dry I can faux-finish it to look like worn copper. The inside is unlikely to show in the final project, so I'll use that to test my finishes on. I still have to make the "ears" and the bail handle of the kettle, as well as figure out how to make it look like it has a rolled top. (I used a small preserving jar for the shape.)

Weather permitting, Marilyn and I'll be meeting up tomorrow to work on the scenery; I have some items for that to find/put together as well. Hopefully, there'll be some more photos to show you. If and when I can figure out how to download from the new camera, I'll post a photo of the wet clay draped on its form....

Friday 12 January 2024

...And, We're Back in Business

 Finally, after a busy holiday season and a lot of weather cancellations, as well as health concerns and the like, we're finally back in business on the Maple Sugaring diorama.


The curved background of the diorama has been constructed, and we are working on the actual landscaping of our scene. The major elements are in palace here, and we are about to start the placement of the various trees.The pink foam will be shaped into shallow slopes, to draw the eye of the viewer from the background to the foreground. Marilyn has taken on the landscaping on this project, and we worked together at her house today to begin that process.


There will be a number of large and small trees, to carry the viewer's eyes into the background, and Marilyn is figuring out placements. The size of the trees will decrease the further they are in the diorama, to create a sense of greater depth than there is.

There are still a few small pieces, my part of it, to create, and we hope we can get this project done in a month or so, ready for what may be an early maple sugaring season here, thanks to el nino's contribution to the weird weather. However, a storm system is expected to appear here tomorrow and the next day, so heaven only knows what will happen. 

The display will be on show near the end of March, if everything falls into the schedule we've envisioned for this project. We're going forward again!