Saturday 29 April 2017

Hydrangea Plant No. 1


Seen from the right side, the first hydrangea bush is in place. Why the first? Well, I suspect another one will be needed against the rock wall on the left, it looks a little bit lost there on its own.


As seen through the left-hand fence, there is still a fair bit of space in this corner. I wandered around my mostly dry garden this evening, to see if I could spot a good, twisted twig to become a cloud pine, but have now resigned myself to the fact that I will have to make my own pine tree armature. Hopefully, the dollar store still sells cheap, painted floral wire, because I need a fair bit of it to make a decent trunk and branches. A short cloud pine would fill this corner very nicely, if I can find dark green model railroad "grass", that is. I'll try the store on Monday; it is in a private house, and I do not really like shopping in people's homes.


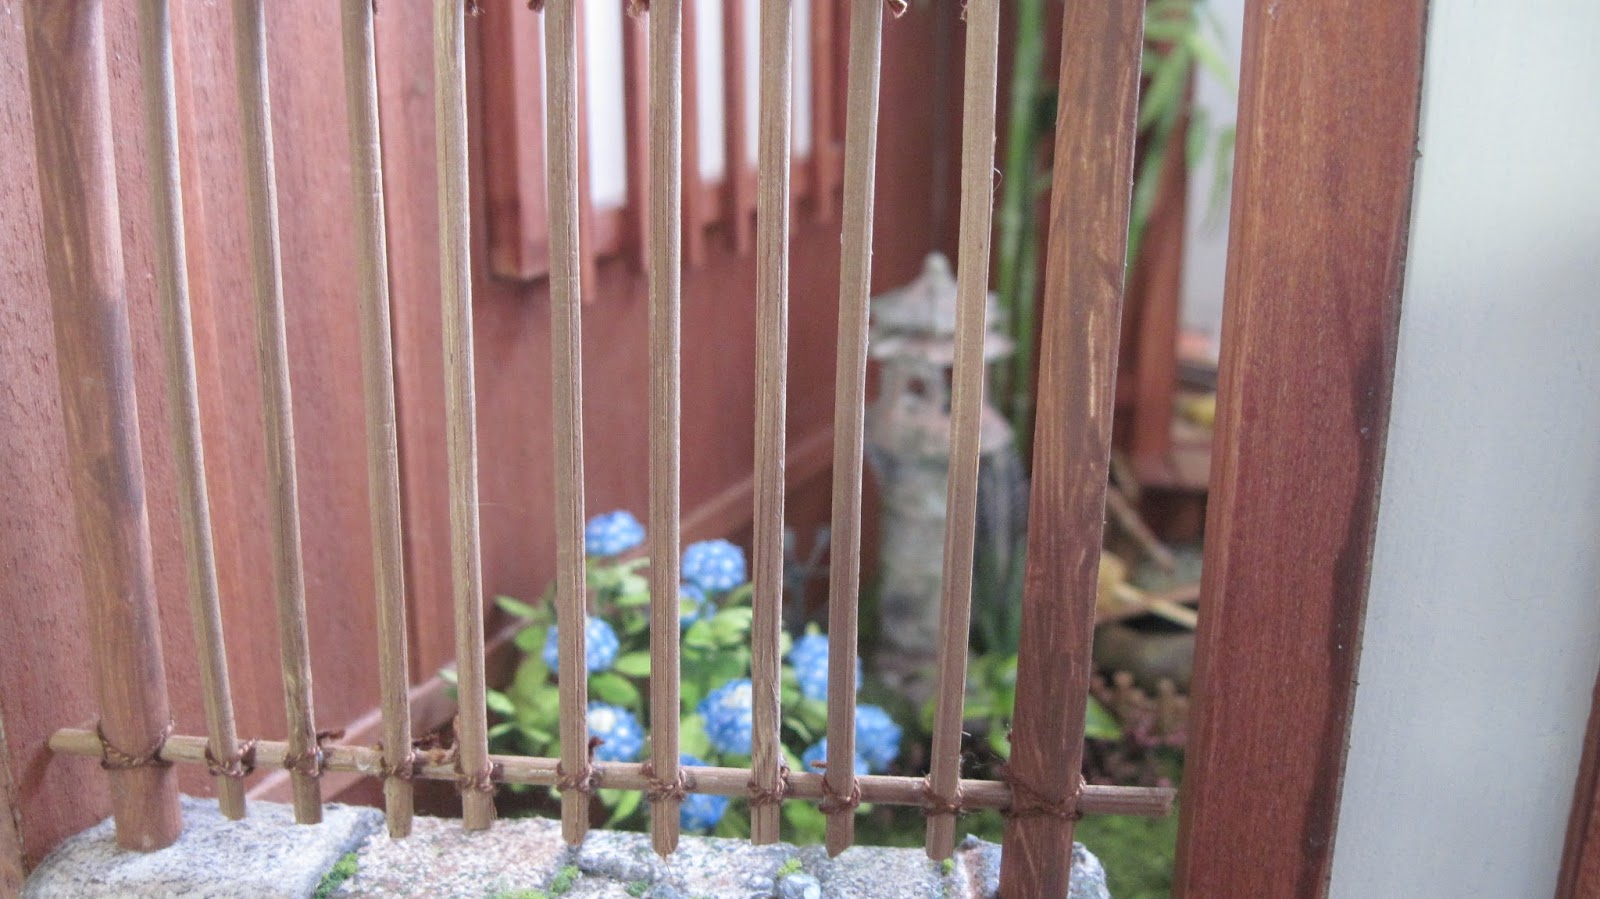
Just a peek through the main gate....

When I googled Japanese hydrangea gardens, it immediately became obvious that the hydrangea season is akin to cherry blossom season, with masses of hydrangeas and hundreds of people wandering through. Add another day of work to make the second hydrangea bush! And the show is next Saturday.

Friday 28 April 2017

One Quarter Done


The corner with the water basin and the lantern is now done to my satisfaction. I added a bush (foam ball cut in half, painted, coated in railroad coarse "grass"), a hosta plant, some pinkish stuff kind of the same colour as the Japanese maple under the hosta, and a stepping stone and grass. The grayish things to the left of the lantern are plastic plant parts, as some height in a neutral colour was required there.

Next, I have to make more hydrangeas for the bush that will go in the other quarter of this size of the garden. Five flower heads have been made, but I think I'll need at least a dozen to make a good show.
That's for tomorrow, along with many, many leaves....

Stuff Everywhere....

Landscaping takes time. You can only do a small area at a time, fitting components of the landscape in place, deciding if they work that way, drawing around them so you know where the grass grows, and then the inevitable waiting for a thick application of tacky glue to dry so you can brush off the excess of that darn staticky foam that gets everywhere.


One small corner is more or less done, with voids for where other elements of the design will go. I painted up some very good plastic fern fronds I acquired years ago, and sponged and painted them to look like Japanese painted ferns. I have some of these in my garden, right outside the window beyond my work area, and every year I kind of hold my breath in the hope that they've survived yet another Canadian Maritime winter and its snowloads.


It's a mess! Bits of plastic greenery, paper leaves and flowers being prepared, pieces of styrofoam balls here and there, and I haven't photographed the mess on the floor around my work area; boxes and bags of landscaping materials. In the foam block hosta leaves and variegated iris foliage are drying; I have to figure out how I am going to place these in the base. It will likely involve drilling holes in the MDF and bundling leaves into clusters tied with fine gauge beading wire. The little yellow container is full of printed hosta leaves ready to plant around the front corners of the vignette.

And by the way, there is a snowshoe hare sitting on my lawn, just beyond the trees of the empty lot next doors, chewing at leaves or grass or something. It is partly still white, although the more normal brown summer colour is coming through....


It's the white thing on the grass at the edge of the path....

Tuesday 25 April 2017

Green Foam Bits Everywhere....

I started some of the landscaping yesterday, and managed to finish getting the gravel onto the walkway.


I rather like the wider strip to one side; this was taken directly from a pathway nobedan I found on the internet. It mimics so-called label stones with crazy paving, with gravel at the edges and in between.

This next photo, despite the flash, is quite dark;


I'm going to pretend it is evening here! The green domes are the beginning of round mossy ground cover, that will go to the side of the lantern. Because so much of a Japanese garden depends on playing off shades of foliage with accents of colour, I am using some plastic plant pieces to mimic various ground covers. It's a good opportunity to use up some of that stuff I've been giving house room to for twenty years.

The grass has been "planted" around the bamboo, and next to the shoe-removing stone by the step to the veranda. It's a very messy job, as everything is very staticky - hence the title of this post. In order to create various shades of green, I'll mix the various colours of railroad foliage I have for the different foliage mounds. Now that most of the snow is gone, I hope to find a good twig - or perhaps I'll have to create one - to act as the trunk for a cloud-pruned pine or juniper, very Japanese and a good foil for the maple, the many hostas, blue hydrangeas, and possibly rhododendrons and Japanese irises. I also need to make a variety of sword-shaped leaves in a wide range of colours.

Which means that I won't be tidying away all the foam for a while yet!

Wednesday 19 April 2017

I Am Not a Happy Camper....

The walkway's stones are in, I forgot to chalk them so that will have to be done after the fact, and I will also have to figure out how to fix the chalk because I don't think I can spray the vignette without a great deal of masking.

Why am I not a happy camper? Things were going so well. But, I have mislaid, lost, misfiled, call it what you will, the coarse white gravel I used under the veranda of the house. I need that to fill in the gaps in the stones of the walkway.


As I really, really want this finished, I decided to try the dark gray fine beach gravel/coarse sand, but it is too dark for the gravel of the veranda. So that won't work.


So I borrowed some white gravel from a little zen garden I got years ago, but it is too white. That won't work either. I need the slightly grayish/yellowish gravel I used before. There are two more bags of sand from that batch, each finer in consistency and they are simply too fine, too much like, well, sand, to simulate gravel here.

Bah! Tomorrow I work, and then I am away for a few days. The show for which I want this finished is in about 2 weeks....


Tuesday 18 April 2017

...And Another Photo


OK, so I'm trying to encourage myself! This is the water basin in my hand....

Front Garden Tsukubai or Water Basin

I had intended to put the Japanese word in italics, but I guess you can't do that with titles.  As indicated Sunday,  today I worked on the water basin, which will go near the front door into the house behind the Japanese entrance garden.


It looks a bit unfinished right here, as the paper band holding the "bamboo" edging is visible; this will disappear once I add the "mossy lawn" to the setting (I hope!). The setting is illustrated in my book, as a Flat Garden, Intermediary Style; I am trying to stay true to Japanese garden design.

The stone basin is a repainted terra cotta planter that I picked up years ago on a yard sale table at a show. It is mounted on two layers of mat board, surrounded by "wet" stones, and has the bamboo pipe and spout behind it. There will likely be some ferns planted at the back of this element of the garden.

 Although it isn't visible here, the back of the water feature has moss growing between the stones; I think this may be seen if you look over the longer side fence into the garden. The dipper is made from manila card and a toothpick, with some faux finishing. The water inside the bowl is a piece of acetate that doesn't quite fit flush, which means it shivers realistically if the base is touched. That is what is called serendipity, I think!

The lantern also got a new paint job; now I have to wait for a sunny day to go outside and spray it to keep the chalk in place. It will also be set into the mossy lawn. After several really nice sunny days the last three have been gray, wet and miserable; we had a little snow overnight....

This morning I had an existential crisis at 3 a.m., probably as a result of attending a funeral Monday for a lady who was at least a dozen years younger than I am. It took the form of wondering if I should continue on with miniatures and other hobbies, or just finish what I have not finished yet and stop cluttering the house with my creations. I hate the thought of these miniatures being put out with the trash when I am no more; I don't know what to do with them when my time eventually comes - who is going to want this stuff? Not to mention the containers of components cluttering up the storage area in the basement. I think I will have to start giving stuff away....


Sunday 16 April 2017

That Took Some Time For Sure...

...especially with a cracked thumb on the right and a broken thumb nail on the left! Somehow, the ties I was using had an annoying tendency to either get caught up in the broken nail or on the adhesive bandage, which kept rolling up on me.


Do click on this one for a close-up view, it's actually quite convincing. This is the "moss" being applied to the cracks in the rock wall; I have a pet peeve with huge quantities of moss being applied to miniatures, as it completely wrecks the illusion. This is being done tiny bit by tiny bit, keeping in mind how the rain water and shadows of the rocks would affect how the moss grows.


I mix my "moss" up out of three or more shades of model railroad foam scatter, with tiny amounts of yellow and sometimes orange added to suggest flowering weeds in the moss; this is the  finished, mossed wall in progress in the previous photo.


This is what almost drove me around the bend; trying to tie each individual bamboo stake (reclaimed from a window blind sample) to the horizontals between the "cedar" (actually painted dowel) fence posts. This fence is a somewhat spread-out version of real Japanese fencing; it is wider apart because I wanted the garden to be fully visible, as that is the focal point of the vignette. Traditional Japanese fences tend to make what is inside of them invisible.

Now that the fences are done, although still not attached, I can concentrate on the actual landscaping of the front garden. I am thinking of trying to make shallow domes of air-dry modelling compound, to mimic the mounds of moss so often seen in Japanese gardens. Painted green, with the "moss" scatter glued on, they will add some shape to what would otherwise be a flat garden. Within groups of these mounds, I can place the water basin, lantern, and whatever else will fit in the garden.

I still have to re-tie the woven bamboo fence; for some reason, I can't wrap my head around how to get a decent cross-tie effect on this fencing. Back to the books for research!

Happy Easter, everyone. Although the last few days have been wonderfully warm, with blue skies and sunshine, today is overcast, grey and rainy....

Friday 14 April 2017

I've Got Rocks in my Head....

Today was spent, in its entirety except for a church service this afternoon, making and gluing rocks on the rock garden walls for the Japanese vignette. I am happy with it!


The rocks are a combination of egg carton stones, beach gravel, and wooden cores. Fortunately, the papier mache of the egg carton does lend itself to some bending and shaping when wet with glue. The colours were done with both sponged-on acrylics and chalk powder. The larger gaps between the large rocks were filled in with the gray-brown beach gravel.

Tomorrow, I hope to find the time to add some moss here and there in the narrower chinks between the rocks; I may also have to touch up the wood underneath in a few spots. After that is done, I have to make - and design - the open "bamboo" fencing to bring the garden walls to a proper height, likely around 6 inches (15 cm). Then it's on to the landscaping....

Wednesday 12 April 2017

Japan Again


Yesterday I experimented with "weaving" my own Korean bamboo fence screen; the raffia was too uneven, the broom straw was too stiff as well as uneven, and floral wire just wouldn't remain straight, so I gave in and painted a piece of coarse, mono needlework canvas, with at least 10 holes per inch, to represent the split bamboo latticework. The broom straw did get used, to make the bundled "reed" sides of the screen; I have to redo the tying, as the knot used in Japan looks like a cross-stitch, rather than a single stitch. This is a very old type of fence, also used in Korea. I'm happy with it.

It was very messy work, bundling the "reeds", I had tacky glue everywhere! Now that everything is firmly fixed in place, I can untie the brown strings and do proper cross-shaped ones. I did look at the particular knot that is traditionally used, but it is too complicated for miniatures....

The fence has legs of heavy-gauge floral wire, that will be glued into holes in the base. I bent the curve around a bottle, then glued the canvas on, on the bias. The canvas was then painted with two shades of straw and ochre yellow, dark brown, and a bit of green, with the bundle of broom straw right next to it in order to have the colours match, using half a dozen coats of dry brushing.

The bases for the rock walls on either side of the large gate have been cut, and painted with a sponged on mortar coat, 4 colours of paint. Most of this will be covered with egg-carton stones, but painting it beforehand means I don't have to worry too much about mortar gaps between the stones. Once they are in place, I will add bits of moss and algae to the stones of the wall.

On top of the wall I want to put a "bamboo" fence that will allow you to look into the garden; this is definitely not traditional, all the photos I viewed have the garden wall high enough to completely hide the garden. As the garden is the main point here, I am creating my own, Japanese-inspired design.

Monday 10 April 2017

Well, the Sun Was Shining


And I didn't feel like doing a test strip of stain on the iron-on veneer that will hide the raw edges of the Japanese vignette, so I made a couple of flowering plants for the shabby chic shop. The red one is a bromeliad, destined for the summer display, while the pink one will go into the spring display. I should know the name of this plant, but until I remember I will call it the Maria Malmstrom plant, as I followed the tutorial from her blog.

When looking at the photos of the interior of the shabby chic shop, I felt there was too much green and not enough colour, which means that I will have to create flowering plants to fill the gaps. Why do I keep digging myself deeper into work? Don't enlarge this photo, the illusion is not as nice as I had hoped....

Sunday 9 April 2017

Back to the Flower Shop Project

The show in Halifax was fun, which is a good thing because sales didn't really cover expenses. It was good to reconnect with some people I hadn't seen since last Fall or since 2015.

The shabby chic flower shop survived the trip very nicely. Although I still haven't found the 8 tiny rare earth magnets I hoped to use to keep the store front in place, double-sided tape helped for the show. Transport was a breeze, as I stuck everything down on acetate overlays on the various surfaces, with small and micro-size glue dots. A loosely bundled pile of gift-wrap tissue kept the furniture from sliding around during travel - the roads here are generally very bad, full of holes and bumps, at the end of winter.

The items on the tables and shelf were stuck to cut-to-size pieces of acetate from packaging, which makes it very simple to pull all the items on a particular surface off for replacement, for example. The entire front window display, coloured "floor" and all comes out ready to replaced with other seasonal displays.


The shop as it looked at the show. The light green border on the outside edges is the colour I'm using to paint the sides and back of the Japanese vignette, a soothing wasabi mustard sort of green.


The interior of the shop, with some grape hyacinths on the left to add a bit of colour to that area. The painting and shutter on the back wall were hiding the fact that I still have to add some interest to the middle of this floral shop composition, not to mention the currently blank side walls. You can enlarge the photo for a better view. The acetate sheet is virtually invisible.


I took a separate photo of the window display; the crocuses in the white "tin" planter and the Easter arrangement were among the three things I put together at the last minute - Thursday evening saw me making the Easter eggs (polymer clay) just before packing everything up. Yes, that is masking tape hanging off the left side, in the absence of the magnets I am using that to keep the front on so the cat won't be tempted to pull things out of the shop to play with....

In an hour I get to put the second coat of green paint on the Japanese vignette; then it can dry overnight and tomorrow will, hopefully, see cherry-wood stained stripwood over all the narrow MDF edges. Hopefully, using the same stain as on the house and gate will unify the piece.


Wednesday 5 April 2017

Tuesday's Work

I spent  yesterday morning making printed scrap booking cardboard flower pots with rims, and then the afternoon and evening in making the tiny succulent plants to go into them. You can see them in the corner shelf unit, and the odd one scattered here and there, in the photo below.


This was also the try-out of the FAME club project, minus the front display window etc., to see what I needed to make. There are a couple of gaps, most noticeably the wall area; however, I don't have the time to make a shelf and a wall planter, so I will put a temporary something in there.

Today, I made a crocus arrangement, a grape hyacinth arrangement, and an Easter arrangement to go into the display window. These will fill some of the gaps, but I would like to make a hyacinth basket arrangement as well; however, it will have to wait until much later in April.

There are two tall plants in front of a white shutter between the tables and the corner unit; I will have to raise them up a bit temporarily, to fill a little of that back wall space. I think there will be enough to display this project as a "Work in Progress" - still to come are a couple of buckets of roses in yellow and salmon. Now I am going to take everything out of here and make a hole to hang a wind chime so it will be visible from the shop window.

I hope to stick everything in place for travel tomorrow afternoon, after a slightly truncated work day. We head out to the show bright and early on Friday....

Monday 3 April 2017

Moving Right Along Some More


Two or more days' work, have resulted in a pillar for the fancy arrangement, a step arrangement for smaller plants, Cattleya orchids under the dome, hydrangeas under the table, and a set of 3 small ball topiaries. I am tired....

I should have lowered the photo a little, too. Tomorrow, I hope to make some polymer clay plants and pots for the Shabby Chic flower shop.