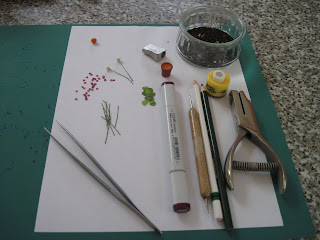
You will need 35 tiny 5-petal blossoms, depending on the size of your punch. Mine is a 3/32" or 3 mm (I think!) punch from Hanky Panky Crafts. Punch 13 small geranium leaves; I used a tiny Punch a Bunch punch. The flower heads are built up on tiny domes; mine are made of Crayola Model Magic. Shape your tiny dome, and stick in a wire stem with Tacky Glue. Allow to dry (overnight is best). Cut 9 wires for your leaf stems. You will also need tweezers, tacky glue, ball stylus, pot, plasticine, tea leaves, and colouring materials.
Decide on the colour of your flowers; I coloured some computer paper with a dark red-purple Copic marker. You can also use this marker to colour the Model Magic domes, once they are dry. Paint is another option; I prefer to colour my dome to match the flowers. These flowers have a white centre, made with a type of white china and glass marker pencil. A sharp white colouring pencil, paint or a watercolour pencil would also work for this. Fiddly yes, but it adds depth to the flowers. The leaves were punched from hand-painted paper, darker on top and lighter on the bottom.
If you are making a pelargonium, you will need to add a little semi-circle of dark green to the top of your leaves. (See photo below.) Geranium leaves don't have this darker circle.
Bend the top 1/8 (2 or 3 mm) of your leaf wires at a right angle. Shape the leaves by "drawing" a line on the back using a blunt needle or tiny ball stylus, with leaves on a soft surface. Run larger ball stylus around the outer edge of the leaves to curl them up a little. Turn face-up and re-draw the line from the centre of the leaf to the stem end. Set aside 4 prepared leaves for later. Dip tiny bent edge of wire into tacky glue, extending stem over the bend, and glue to back of leaves. Set aside to dry.
Cup the flowers by pressing ball stylus in them while they are on a soft surface; I use a piece of craft foam. Glue flowers all over the tiny domes, and allow to dry. Glue 2 reserved leaves below each flower head. Drop a little glue on plasticine in pot, spread out evenly and dip top of pot in tea leaves. Clear off edges. (Photo below.)
Now you are ready to plant your geranium plant in the pot. Place flower heads near centre; cut wires to desired length, dip in glue, and plant. Do the same with the 9 leaf stems. Allow to dry. Once dry, you can gently bend the wires to give a pleasing shape to your potted plant.
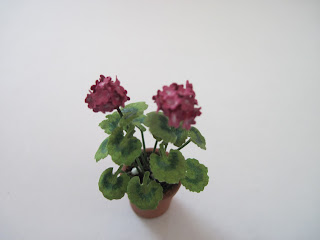
And that's it! (My glue wasn't quite dry, I see a blob on the pot's surface.) For this project, I used a small resin pot with a diameter of less than 1/2" or 1.3 cm. As the pot is heavy, I didn't weigh it down; if your pot is lightweight, you can glue a piece of split shot (fishing weight) into the bottom of the pot. Keep in mind that this will affect how far down your stem wires will go. If your pot is larger, you may want to make additional flower heads and leaves to fill it up nicely. By the way, this photo is larger than the actual (miniature) plant!
Although I use Model Magic to create the domes, some people use beads or balls of wadded-up paper for this purpose. This method of building up flower heads can also be used for Hydrangea flowers; the dome would be slightly bigger, and you'd use standard leaf-shaped leaves. Tall Garden Phlox has a similar shape, with long, thin leaves all up and down the stems; consult a gardening book or plant nursery catalogue for flower colours.


No comments:
Post a Comment