Wednesday, 22 May 2024

Gave Myself a Mini Day (Photo-Heavy)

 It is very warm and humid out again, we've gone from sort-of-spring to right into summer. The temperature today was 30C, which is rather more than we usually get here in May! So it seemed a good idea to work indoors, in our downstairs room, which is nice and cool.


This is a small project, designed by Cat Wingler, for which the instructions are in the March 2003 issue of Miniature Collector. I bought the magazine second-hand at a show, years ago, because this little scene really appealed to me. Now I've challenged myself to make my version of it, using cardboard as much as possible, and making just about everything myself. We'll see how well I do at that challenge! I do like faux finishes, and this one could have a lot of those.


The instructions were for making the box out of foam core, and then painting the base of the simple box black. There was some black foam core left over from my younger daughter's time at Art College, so that meant I didn't have to paint! The box is held together with sewing pins and Weld Bond glue.


There is a shallow false wall, with my guide lines all over it (I am straight-line challenged, after all!). It is held away from the back of the box by strips of foam core (mine is 1 cm thick, about 3/8"), and for greater thickness I glued two strips back-to-back for the spacers. In this photo, the interior of the window opening has been lined in pieces of skinny coffee stir sticks. The inside of the doorway will have the same finish.
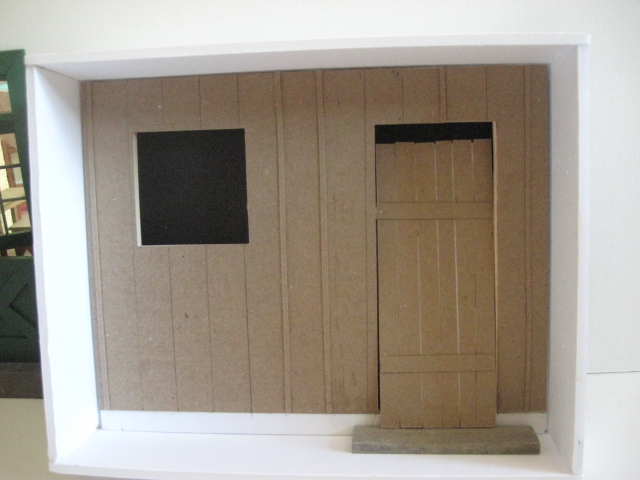

Instead of wood, I'm using cardboard strips in a board and batten design; this seemed the best way to do the walls in lieu of using the recommended stuff. I was testing an existing doorstep, but it is too low and the other piece I thought would work is too high, which means making a doorstep to size for the project.


Testing, testing, testing....
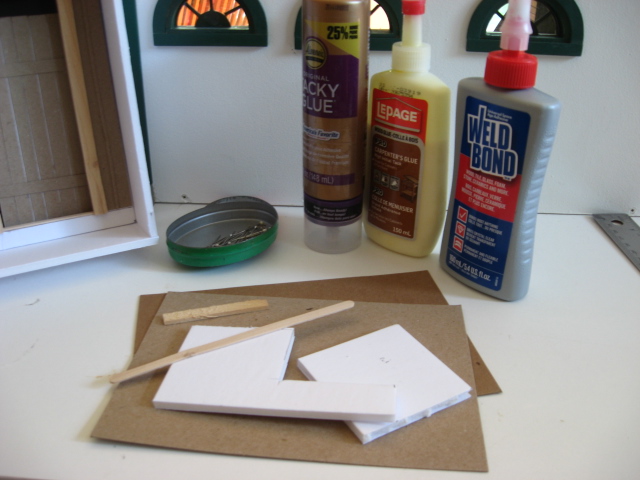

So far, all I've used is the foam core (scraps of which are in the photo), two kinds of cardboard which we get in our boxes of tinned cat food, skinny stir stick and rough piece of wood cut down from an old mandarin orange crate, along with straight pins and so far, 3 kinds of glue.

Before I go to sleep tonight, I'll give the cardboard board-and-batten walls and door surface a coat of sealer, and tomorrow or Friday, I can start painting it to look like wood. So far, this is fun!

Tuesday, 14 May 2024

Back At It


 My stock has been pleasantly depleted by the sales at the recent new miniature show, and I thought I'd better get going at creating some new pieces. In the process, I rediscovered some pieces I never did finish, and they are now going to get done, before summer hits and I don't sit indoors all that much. Right now, we are in blackfly season....

It had been my hope that the blue runner in the foreground would be an easy piece to work, but I'm finding my eyes wandering between the swirls of the border design; the centre of the piece was much easier! But if I tackle it slowly, it should work. The two long ends of this piece will be hemmed, while the two short ends will get a fringe.

The small, multi-coloured piece at left is a fire screen insert, cross-stitch on 22 ct Hardanger fabric. I don't really like cross-stitch at this small scale, so I'll try doing it on 22 or 24 ct canvas in petit-point. The bell-pull is out of scale, more suited to fashion dolls than 1/12th, so it likely won't be finished. However, I do like the cushion, as the colours "speak" very nicely to one another. The really small piece is an experiment, doing a sampler in 1/24th scale; I'll have to see what it looks like framed. The motto in the upper left is ready to be mounted and framed.

And then there are the House of Miniatures vintage kits, which I'd really love to provide with needlepoint upholstery. That will mean, in the case of the chairs, likely having to do the same design four times, which could become rather boring. We'll see! I've also pulled out some designs for plants and wooden pieces which I've long wanted to try out, plus I also want to finish at least one or two of my far too many UFO's (unfinished pieces).

Saturday, 4 May 2024

Well, the New Mini Show Was a Success!

 And we're all happy that it did go well, so there will be another one next year. It is currently the only show in the Canadian Atlantic Provinces (New Brunswick, Prince Edward Island, Nova Scotia and Newfoundland and Labrador) that we're aware of. Lots of people came to visit, lots of nice comments, and it turns out that we have the Grand Prize winner of the 2024 Creating Contest right in our area, which means we got to see her contest entry. And she has only been doing miniatures for two years! And I didn't think to ask for her name, but she has an article in American Home Miniaturist coming soon. Her entry was wonderfully imaginative and exceedingly well carried out. I'm going to find out her name, but I did have the presence of mind to give her one of my business cards. (By going through another Creatin' Contest winner's blog, I discovered her name is Christie M; all I knew from the Moncton Show was that she was Heather's daughter!)

Now I'm nearly out of stock, which means that I need to make things for next year's show. To that end, I've picked up 5 House of Miniatures (vintage) kits, all of which need upholstering, and my plan is to do some needlework upholstery for them. There were 2 matching chair sets and 2 ottoman benches, as well as a day bed, and I do believe I have more of them in my own extensive stash of HoM kits, so I can do sets if I want. And I have to get back into plants and polymer clay work too. Hopefully, I can make some stock over our long winter to come, which begins in November....  But I do have tulips blooming, and the leaves are beginning to bud on the trees, so first of all, Spring and Summer to enjoy. And of course, minis to make.

It was lovely too catching up with miniaturist friends who I only get to see at this show, as we live all over the area.

I've also got a small commission, for a couple of trout to fit into a very beautiful copper Jason Getzan fish pan. That should keep me busy!

Wednesday, 1 May 2024

Got Those Kits Done!

Here are the finished kits, and I messed up just a little with the large granny square one on the frame; my weary brain forgot that if I made the frame wider, in order to have a wider piece of work on it, that that piece of work would need a wider piece of double-sided tape to adhere it to the frame. I pieced the piece of tape provided with some of my own carpet tape, and it worked, although it is just a tad clunky. The completed piece just doesn't match up size-wise with the photo of the finished product the manufacturer provided! 


The sides of the embroidery frame itself were the ones provided with the small tapestry frame, and with the wider dowels it is much more suitable for the granny square piece. The small tapestry frame now has the frame from the first piece, and that suits the size of the black tapestry piece much better!

The chalk paint nicely sets off the colours, which were my substitutions for the colours provided; I have a baggie full of scraps of DMC and Anchor embroidery floss, which I use for small projects, and as these are intended for young collectors, I think my colours are much more appealing. Every little kit came with a sheet of cut-outs to colour, and I have left these for the purchasers of the finished products. The little rug which goes with the patio bench is a little bigger than suggested, but I like the slightly larger size, myself. I dislike tiny mats in front of larger pieces of furniture, as I tend to trip over those....

Here's hoping someone purchases them! The C-in-C has decided to come with me to this show, and has offered to be, among other things, my coffee/lunch delivery person. Also, my car needs new brakes, and his doesn't, so we'll take his somewhat larger vehicle.

Wednesday, 24 April 2024

Some Kits! Should Have Tossed Them


 Odd title, right? You'll soon see why. I pulled out three old (quite old!) kits today, thinking that I could finish them for the show in early May, and perhaps make some young collectors happy with low, low prices. They all came to me second-hand, and they ALL had their problems. Here they are, only one came completely sealed, the other two had been opened. I did the embroidery earlier, more about that below!


This is the oldest one, I don't know how many years I've had this, and if you look closely, one of the bars on the tapestry frame and the back rung of the chair are a different colour. They were missing, but it had been opened, and I figured I could still put it together as I had the right size of dowel in my stash. The red fabric, embroidery Aida cloth, is destined for the chair seat. The larger, quilty-looking piece, is intended to go on the embroidery frame, as per the photo. Hmmm, it's very much out of proportion with the wooden pieces provided for the frame, if you go by the photo on the front of the kit....


This is one I inherited from a mini friend who retired due to health reasons. It too had been opened, and all the dowels were missing, but again, I was able to cut them from my stash. This kit had dried out quite a bit, so there was a bit of damage on one of the frame legs, and some of the ply kind of let go when I was knocking the cross-bar dowelling in, but that was glued and sanded. The black tapestry goes in the frame, the red is again the chair seat. Folded over lengthwise, the tapestry might fit the frame....


This is another inherited piece, the only one that was still sealed in its package. However, when I began to sand it, it was apparent that the cutting of the piece - they were die-cut in a piece of plywood - was done backwards, which means the rough edges of the dowel holes are on the better side of the wood. It was necessary to fill the edges of all the dowel holes on one side of the bench. It has a piece of upholstery and a little rug with fringed edges. This one might just work without too much changing around....

The embroidery thread which came with the kits was like very thick sewing thread, in terrible colours, so I dug into my stash of floss and used my own threads for the embroidery on all the pieces. I did begin the little tapestry and the quilt with the colours provided, and the effect of the things was, well, like it had been dragged through the mud, so I pulled it all out, and I like my colour choices much better. I also decided to minimize the amount of outline stitching in dark thread on the above two pieces, and just outlined the rose buds and their leaves, much daintier. The kit had provided black thread, but you should avoid outlining in black, but use dark brown or dark gray instead, especially on miniatures.

The package fronts show two stained kits, and one painted one. These will all be painted, as you cannot, with the best will in the world, hide the plies in the plywood. Chalk paint in white seems the best choice to me for this, and I hope to pick some up tomorrow, as the white chalk paint I had had dried out.

In order to finish these pieces, I have to re-make the frame for the quilt; it may work out best if I replace the sides of the tapestry piece with the sides for the quilt piece, using the longer sides of the tapestry frame and replacing the cross-bars with longer ones to, hopefully, show the whole of the quilt top.

I thought these would be quick little projects....

Tuesday, 16 April 2024

Medieval Eye Candy


So, this is a view along one of the canals/rivers in Colmar, France, not far from the German border. The area is sometimes called Little Venice, because of all the waterways running through it; in fact, there are some bridges with houses on them. This area is widely photographed, because of the age of the buildings, and the colours used on them are supposed to be traditional; yellows and oranges from ochres, pinks from bull's blood mixed into the whitewash, green from vegetable matter. There's a lavender one in this shot.The whole effect is delightful, and the area is widely known as a Medieval Village, although it is in the middle of a small French city.

The red things attached to the fence are official Love Locks, inscribed with a couple's names, initials and the date they were there, and signifying eternal love.... These are official padlocks, sold in the area, and the only ones now allowed. Apparently, regular padlocks are too heavy, and more than one fence railing has buckled under their weight. Once the lock is attached to the railing, the key is tossed into the water.


There are whole areas where these buildings have been carefully preserved, and most of them are on very narrow, cobbled streets and alleys; this one is wider, and is a pedestrian shopping area. There are some new builds mixed in, and I found myself wishing the new builds had some sort of similar character!

These buildings are higgledy-piggledy, often crooked and bent, but I just love that they've made a real effort to retain them as they were.  We wandered through this area for a couple of hours, and every corner we turned revealed more of these old dwellings and shops. I'm above average height, and we modern visitors do have to remember to duck under doorways and beams, though!

Hope you liked this view back in time; these are the real thing, not modern reconstructions, although there most likely was some rebuilding required following WW II - there is a famous battlefield not far away, which some of our fellow passengers with armed forces connections visited.


Wednesday, 10 April 2024

The Kitchen at Markburg Castle


One of the places I visited on my recent (delayed by 3 years!) 50th wedding anniversary trip was to Marksburg Castle, set on a crag high above the Rhine River in Germany. If you see an ad for Viking River Cruises on television (north America only, I'm afraid!), you will see this as the last castle in the advertisement, with its yellow walls and large square crenelated tower, topped with a narrower round tower.

It is the only castle in the area that was never destroyed; Napoleon and his army were only the last band of destructive idiots to mess up the area. His army destroyed just about every castle on the Middle Rhine around 1782-86, very much a scorched earth policy. The height of this castle, along with the pitch of the cliff, made it virtually impregnable. So this is the real thing and not a later romanticised rebuild of the original building. It was a must on my trip!

For lovers of all things medieval, this place was wonderful. A few of the rooms have been left as they were when the original inhabitants lived in it, with excellent and true-to-life reproductions along with original antiques.Wood, pewter and brass, along with pottery, make up the majority of the furnishings, and they are, everywhere in the castle, sparse by modern standards. Do enlarge the photo to see the wonderful array of medieval kitchen equipment!

To help me with my eventual Apothecary Garden, I bough a book there, Der Krautergarten auf der Marksburg (The Herb Garden of the Marksburg), as a guide for what apothecaries as well as castle communities used for medicinal and culinary purposes. 

I'll post the occasional photo of what I saw there, as well as some of the medieval neighbourhoods in towns and cities along the Rhine that we were able to explore. Did I have a good time? A huge resounding YES, although the weather was damp and chill. We did have two days of nice weather, but I'm so glad we went on this trip! No less than 3 ancient cathedrals ( Strasbourg, Koblenz, and Cologne), more preserved timbered buildings than I ever saw in one place, a real feast for the eyes and the imagination of someone like me who loves to make minis of the medieval! Hope you enjoy them in the days and weeks to come....