Wednesday, 22 March 2023

Finally, Working Again!

 It has been a very dry period of getting any minis done, as we have had to cancel our weekly get-togethers for a month or so. Marilyn of Charminis was suffering from mini withdrawal, so although our other co-mini-ist Louise was unavailable, we just had to get together.

I had the good luck over the weekend of finding a bag of small plastic Easter eggs in a charity shop, an item I'd been looking for for a while, as I needed them to make lampshades for my wooden shoe factory.


I used the rounder end of the plastic eggs, but as they had a thin rim on them, I cut narrow strips of cardboard (found in between layers of cat food tins), to fill the gaps. The centre was then drilled with my pin vise to create an opening for the wired bulbs, and the hole enlarged a bit with a round rat-tail file. (The upper, more pointy end of the eggs might make good bee-hives, with the addition of rope or raffia to mimic the straw old skeps were usually made of.)


Three eggs have their strips, glued on the plastic with Aleene's Jewel Glue, held by tiny copper clamps. I pre-bend the strips by rolling over them, on my thigh, with the round handle of my Xacto knife.


The egg halves had small air holes in them, which I plugged with toothpick bits or the ends of bamboo skewers; then I sanded them flush to the surface of the eggs with an emery board. The yellow half shows the hole, the green one a plugged hole.  They were then lightly sanded with a sandpaper sponge, and given a coat of multi-purpose sealer. This was then allowed to dry while I had some lunch and awaited Marilyn's arrival.


I stuck toothpicks in the eggs to use as handles while painting them. First, I lightly sanded the surface to provide something for the paint to grab on to. The first paint was a gel one, which did not adhere at all on the plastic surface. However, plain black paint covered with no problem. When I first used an Easter egg half to make a lamp shade, we used nail polish to colour them, but I wanted worn, slightly dusty and rusty metal shades, as my wooden shoe workshop is set in the last decade of the 19th century.
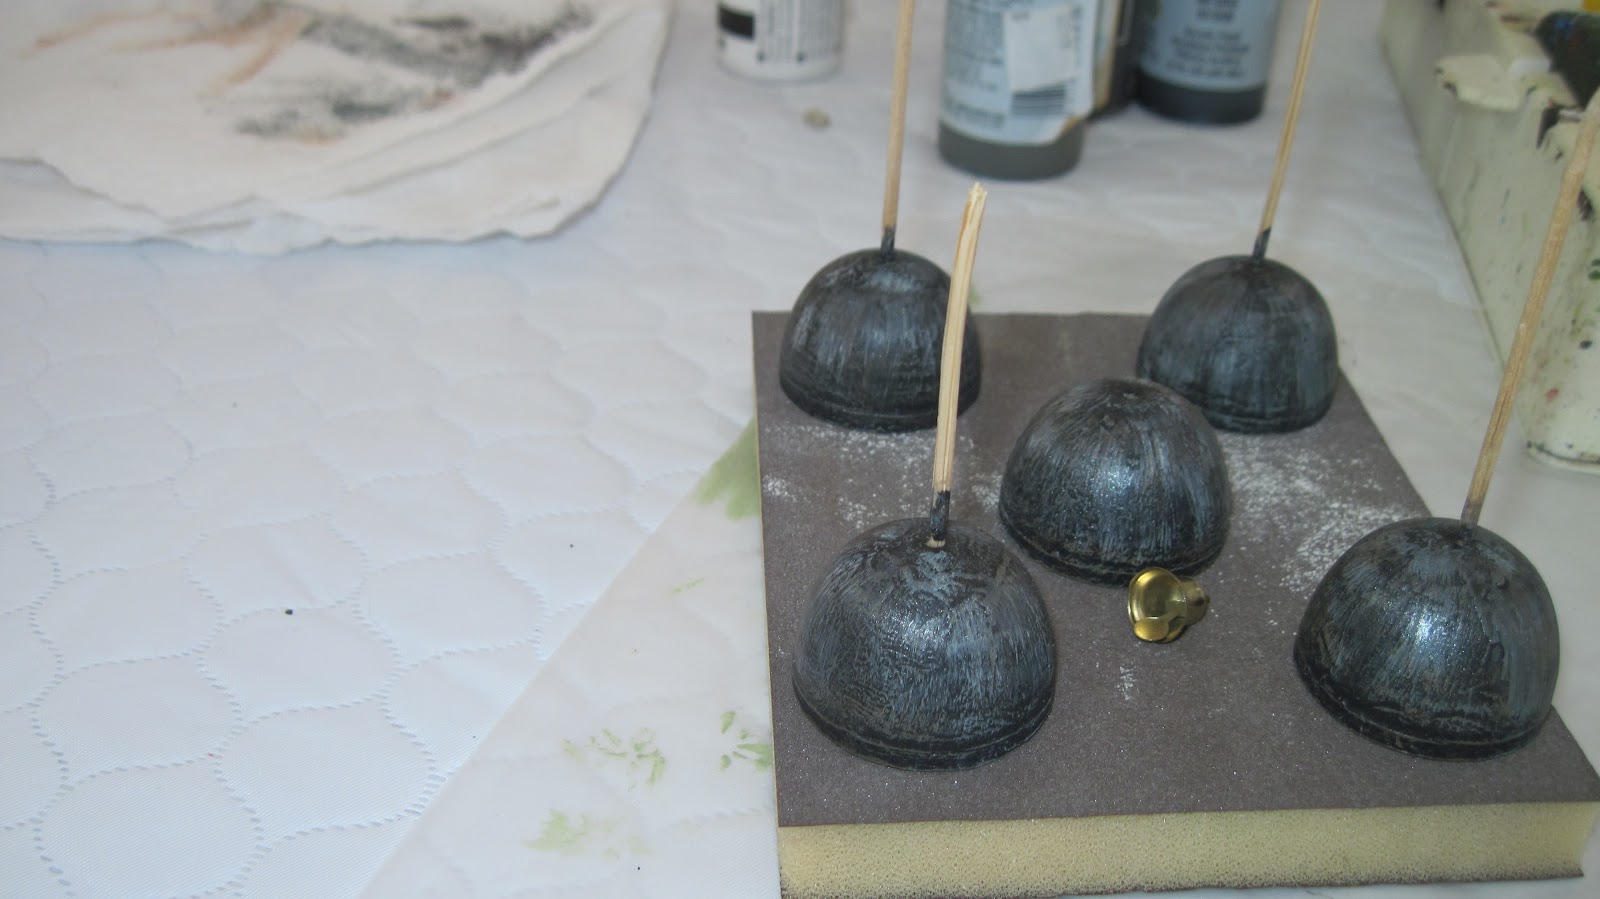

Multiple coats of dry-brushed gray, terra cotta, burnt umber and pewter paint resulted in just what I had envisioned when I started the project. The little brass bell will become the top of the shade, just as soon as I found where I "hid" the others....

The last stage will be to paint the insides a dirty white - well, the workshop produces lots of sawdust, coal dust, and so on, so the inside would not be pristine. I intend to use LED lights already on their wires as the light bulbs, threading them first through the plastic shade, then through the aged little bells, and finally through a length of fine brass tube. The wires will then have to go over the top of the workshop and down again to under the stairs, where the batteries will hide. One section of stairs will be removable so allow access to the batteries - I hope!

Now to let everything dry, then I will finish the insides of the lampshades.


Thursday, 23 February 2023

Two More Desert Plants


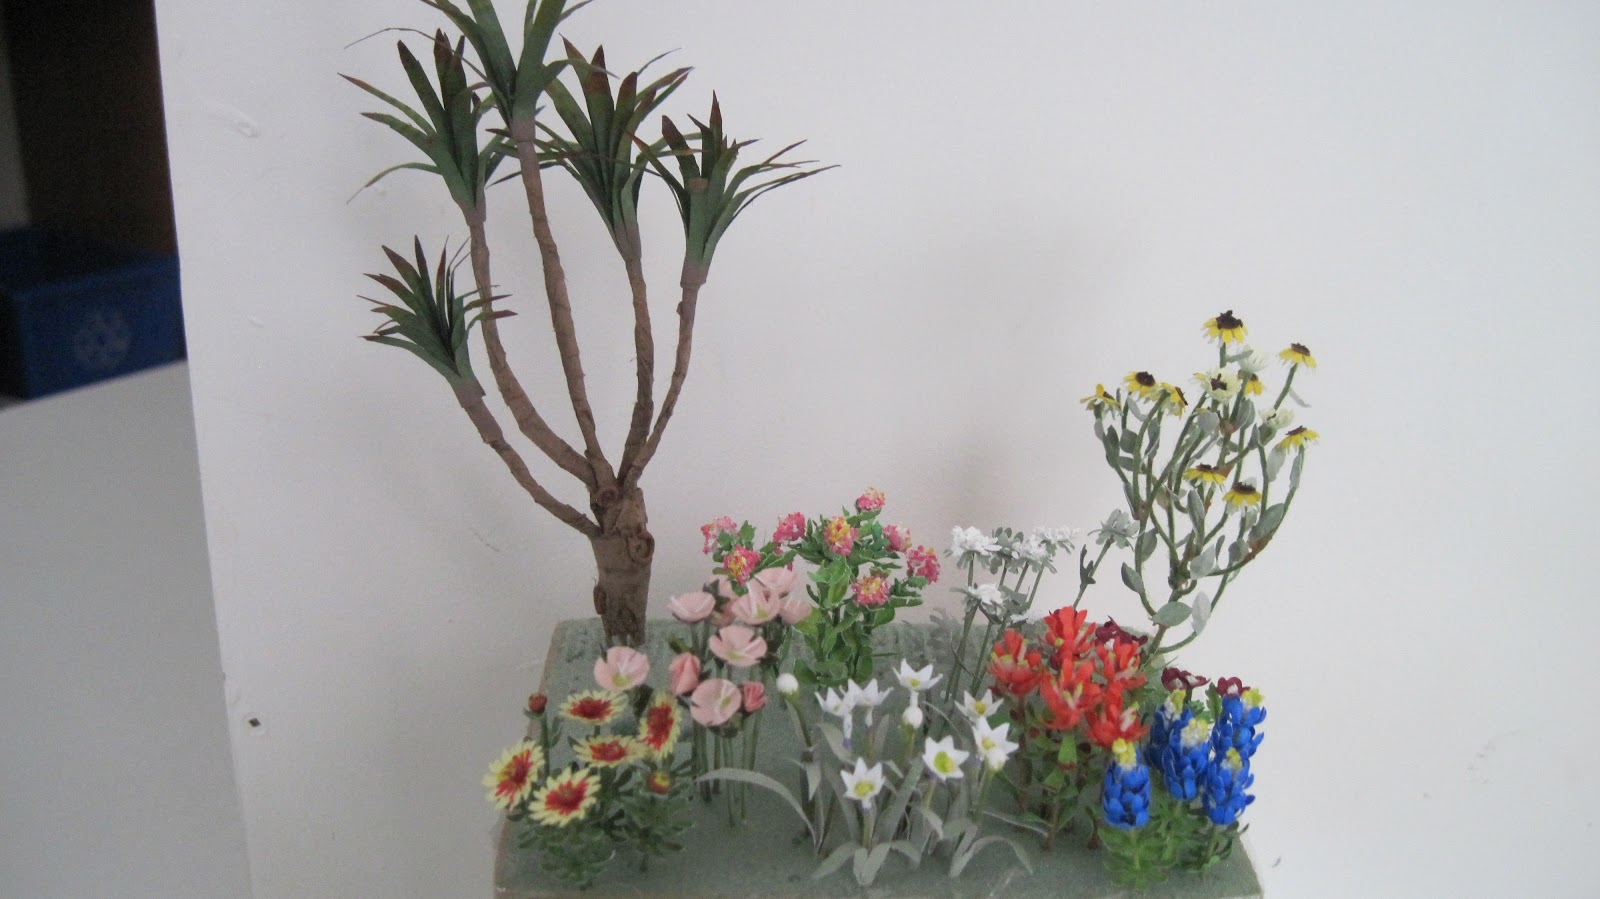
At the right back, we have a Black-Eyed Susan  plant, complete with seed heads and opening buds; this one took 3 days to glue the wires in shape; if I ever do it again, I'll use fuse wire and treat it like a very miniature tree! At its foot is a Queen Anne's Lace plant; it is a bit hard to see, as it is white and like a lot of desert plants, has gray-ish foliage. It might be more apparent if you enlarge the photo.

For the next couple of days, I'm pulling out a crochet piece for a friend who wants to turn it into a scarf; as there is alpaca in the yarn, it tends to get itself stuck, requiring the use of a fine pair of scissors to cut the one tiny offending fibre. One ball down, two or three more to go. I also did a little embroidery on a table centre I started about 2 years ago, which I want to finish in time for Easter. Both those tasks are a little kinder on my newly operated eye than minis....

Friday, 17 February 2023

More South-Western Miniature Botany

 It took quite a few days, but I managed to make a passing lantana plant; it began with squashing styrofoam balls to make my own floral foam, progressed to paint-mixing that foam, then when it was dry, carefully chopping it into tiny, tiny bits with a tissue blade. I am happy with the results, which involved a fair bit of additional painting.


The other time-consuming item is a yucca tree; my deserted desert garden needed some height, as most of the plants made for it so far are quite low. The yucca will fill that need quite nicely. The tutorial is available on-line, if you google "miniature yucca trees", and is in YouTube format.


The yucca tree is about 10 cm tall, made of paper on a wire armature, with rings of  floral wire (which I had in brown) for the knotholes. I am very pleased with this little tree. The last cluster of leaves still needs to be bent into shape, as you can see; I just finished dry-brushing in the join of the leaf cluster to the stem.

 The instructor sells kits to make these flowers, but I kind of made up my own kit in order to get closer to finishing this little garden.


She uses a circular array of yucca leaves, but I used strips of white copy paper left over from some other project. Five colours of felt-tip pen were used, two of the pens were alcohol-based artists inks, but the other three were inexpensive Crayola water-based markers. You can see the results above. This technique of blending markers is kind of intriguing, and I may explore it further.

I am coming up in a few days to my second cataract surgery, so the next week may be rather quiet here on the blog. However, I will be back, as next up I have to design the actual little garden base; there are a number of possibilities for the materials, likely a combination of card, builder's foam and paint will be the best way to go. There will be old fence posts, and perhaps miniature barbed wire, but I need both
eyes working to be able to do that!


Tuesday, 7 February 2023

Winter Makes Me Want to Make Flowers

It seems that when it is cold and snowy outside, I decide I have to make flowers. The YouTube videos by Cathy Brickner are calling out to me, so today I made some more of them.


I had made the Indian Paintbush yesterday, and begun the pieces for the Indian Blanket Flower and the Texas Bluebonnets. Today I finished them, and I am quite pleased with them. It seems to me that the technique Cathy B. uses to make her bluebonnets can also be used very effectively for hyacinths, so I plan to try those once I finish the desert flowers. As you can see, the Rain Lilies made previously have now got their leaves, using the same painted paper I also use for Dusty Miller plants.


The Blanket Flower is a bit pale for my taste; we have these growing in our Eastern Woodlands garden under the name Gaillardia, and the yellow is rather brigher, I think. In the background are the Wine Cup Poppy Mallows (I probably remembered that wrong!), waiting for their centres; I'm trying out another idea as I didn't have all that much luck painting fake snow....


A closer look at the Indian Paintbrush, Rain Lilies and Pink Evening Primrose; all of these have been made with stuff I had on hand, but I do need to acquire a large snowflake and a large daisy punch, as they are frequently used to create the foliage.

I'm (mostly) having fun....


Friday, 3 February 2023

We Got Cut Off for a Few Days

 We've had no contact with the outside world for a couple of days, as a cable was crushed somewhere and interrupted the telephone, internet and television connections to our house. Combined with cold winter weather and now, strong winds, I wish once again that people could just hibernate like the animals do! The temperature is going to -30C tonight.

I did some work, however, slowly and carefully as my new eye gets used to its lens; I had my first cataract surgery nearly two weeks ago, and am now driving without glasses for the first time in well over half a century....


Two glue pots, a right angle, and two glue brushes awaiting their bristles are ready for the bookbinder's shop. The front facade has been cut, as well as the two side walls, but I have to be patient (sigh!) for the other walls needed. As I do not have a miniature lathe, I cheated and cut apart a wooded goblet for the pot holding the brush, with a base of a small wood circle added. The other glue pot had much of its tapered base cut away, and because it was solid wood it didn't affect the pot shape. That uses up some of my far too large stash.... The right angle is painted cardboard.


Book production has also gone ahead. Some of the spines didn't bend nicely and tore a bit, but that's fine as those will become the books waiting to be re-bound! The nicer books will be the finished product for the shop.


And I recently stumbled over a series of YouTube videos by Cathy Brickner, in which she makes more than a dozen southern prairie wild flowers. Today I found a stash of a material very like Flower Soft at a local second-hand store, and I can use that to make some of the other flowers in her series. The videos are short, which means you have to pause while you work on the flowers, but that gets me up out of my chair and makes me walk over to the computer on a regular basis. (Well, I have to look for the silver lining, don't I?) The white flowers are rain lilies, awaiting their grey-green leaves, while the pink ones are evening primroses. The stems have their leaves, but I won't plant them until I've made a whole garden of near-desert flower varieties, as they are all different heights..

I'm thinking of a small flower-bed that has been allowed to go wild, with perhaps a cactus or two in it now, and a tumble-down fence - which will likely mean back to barbed wire manufacture - and if I can find one, a scale Texas longhorn skull. We'll see! And yes, we do have cactus in Canada; in Alberta you will find prickly pear growing quite happily!


Friday, 20 January 2023

Book Binders Need Books


 And that means I'm back, for a little while, in the book-making business, This kit came to me from the things we helped sort and tidy last fall, and as I had no purpose for it at that time, I filed it away. Fortunately, I filed it in a place where I could easily find it. 

These are all non-opening books, as they will be shelved ready for parceling up or for repair work. The covers of this kit are lovely and subtle , just right for the period I'm working in; moreover, they have lovely worked spines, and that is more or less what will be visible of them when they are placed in the book-binder's workshop. There are 124 covers in the kit, and I'm not sure I'll be needing all of them; however, we'll see! 

For the "pages", I'm using scraps of mat board and foam core; in some cases, one of each, in others the books are thin enough that only a piece of mat board is needed. The rest of the supplies I need, like thin packaging cardboard, are in good supply in most homes. I've found the card from tissue boxes are the best weight, and they bend nicely and don't warp when the glue is applied.

One of the really nice things about this kit is that there are a wide variety of book heights and thickness, which makes them look more "real". 


Tuesday, 10 January 2023

At Least Five Days' Work....

 The amount of time involved in making minis is directly related to how much time is spent waiting for glue and paint to dry. And the other thing is, how many times something has to be redone!


This is a gilder's cushion, with a tiny drawer underneath to hold the gold leaf bits that are applied to the more expensive books the bookbinder is working on. It measures 42 mm (1 3/16") wide, 21.5 mm (7/8")deep, and 1 cm (3/8") high at the side, has a padded suede leather top, and has brass "nails" (sequin centres or glitter!) along the edge of the cushion. It took 4 tries before the drawer stopped imploding; the fifth time it actually held. That took at least 3 days....


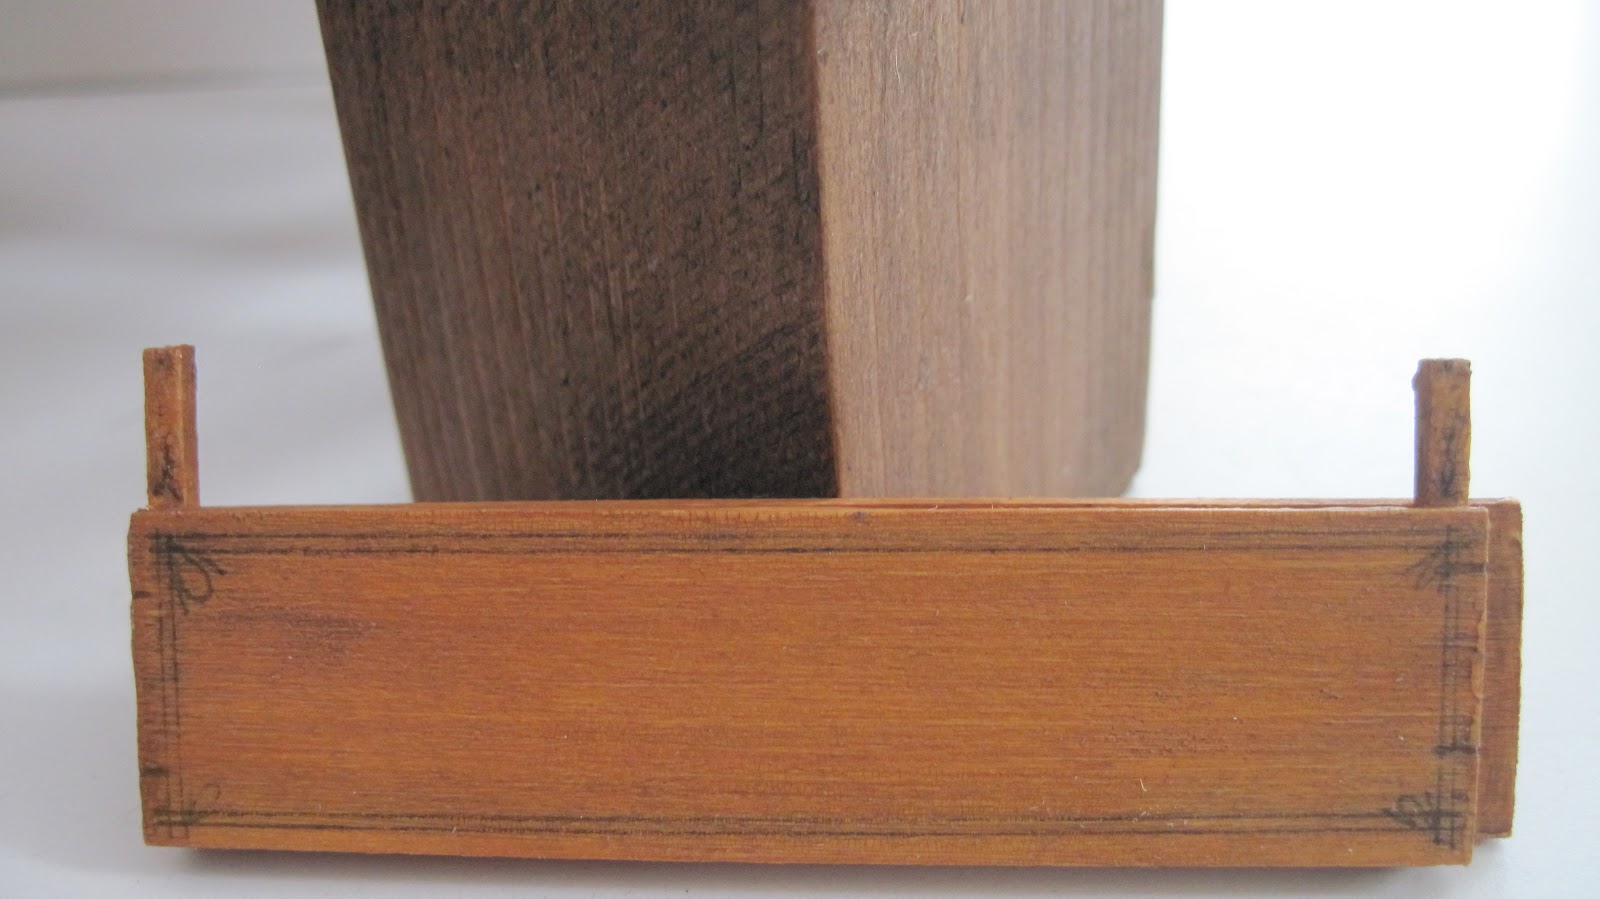
This peculiar item is called a "persknecht" in the Dutch instructions, which I think would translate to press aid in English; it appears to have something to do with the book press. There is another photo of this item below, it is actually 2 layers separated by square wooden pieces, which gives it a certain amount of springiness, or give. I used a #2.5 permanent black marker to draw the late Victorian/Early Edwardian decorative elements on it. I tried to research the press aid, without much luck, and if anyone knows what it is meant to be, please do let me know!


The work table has sturdy legs, and a fine beeswax finish. The block, most likely used for stamping designs into the leather book covers, has a veneer top, and like the table, a beeswax finish. I need to visit a bookbinder's shop to learn about the various tools used, so will do a little research to see if there is one in the area. With a couple of universities, there should be someone still re-building old and out-of-print books, and there are lots of artists in the area, as well.

Two of the walls for the bookbinder's shop have been cut, and I hope the others will soon appear on my work table. I'm thinking about how to decorate the interior; I rather like the idea of a late 19th or early 20th century scheme, lots of dark wood, anaglypta wallpaper, dark stairs with, perhaps, coconut matting, and imposing stair spindles and newel posts. I'll have to check scrapbooking shops to see if there is a good embossed paper to represent the anaglypta. We rented a house in Edmonton, AB for several years in the second half of the 70's, which dated from about 1910 (very, very old for Alberta!), which had olive-green anaglypta paper half-way up the hall and stair walls, my inspiration for this treatment for this little shop. We'll see!