Wednesday, 29 May 2024

The Set Is Ready for Dressing


I will admit that a certain amount of bad language was involved, but it has been a somewhat frustrating day! We are being invaded by warring factions of very large and smaller carpenter ants, and we can't figure out where they're getting in. I must have stepped on a couple of dozen today, and found a number that had been decapitated by, I presume, other warring ants. This seems to happen every Spring! There is currently a pile of dust, cat fur and dead ant parts to dispose of, as I have broken my downstairs dust pan....

Yesterday, I created a roof out of a strip of heavy cardboard and broken-apart dolls' house cedar shingles. There was a pile of pre-dyed shingles in my stash, so no paint was needed to age them. I will have to place small tufts of  "moss" and "lichen" on them, and see if the folded cardboard brace under the shingled strip needs painting.

At any rate, I pin-hinged the door and then reinforced that with cardboard strips on the inside, as my pin hinging leaves something to be desired; I really don't like doing it, as I always seems to go crooked, and I was working with less than 1 cm (3/8"?) thick foam core. I also had to carve a door handle, as my small wooden beads, my go-to's for inexpensive door knobs, have been put away "safely" and can't be found at this point.

The doorstep is a chunk of pink builder's foam, carved to look worn and cracked, and then painted. The front of the shed is now glued into the frame, and the next step is to dress this little "stage set", once the drywall compound on the floor dries up. Then comes a vine, a bench, birdhouse, garden tools which all have to be dirtied to look used (I had some in my stash), gravel, grass, weeds, flowers and empty pots, etc., etc. And of course, a bird or animal....

The dressing of the "set" is what I enjoy doing most; the season for this scene has not been decided yet, which gives me lots of choice depending on what I have on hand in supplies. The original was Fall, but that means grape vines and making lots of grapes. Maybe it will be summer, and I can do morning glories and clematis vines. We'll see!

Saturday, 25 May 2024

Didn't Have a Lot of Time Yesterday or Today

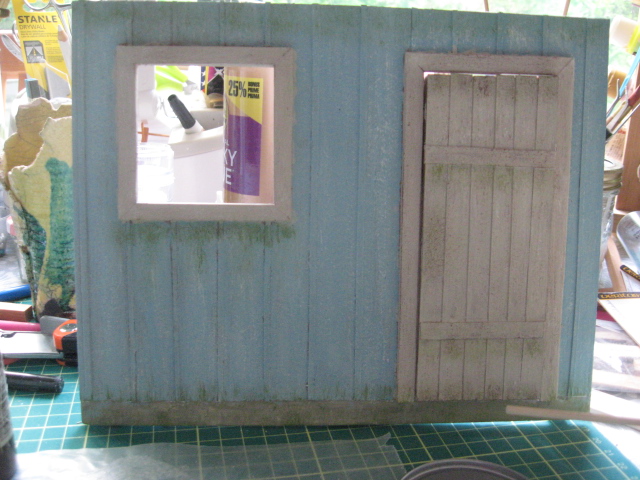
 However, I did manage to paint the front and the door to the shed vignette. I managed to put on the base coat Friday. I see this shed as once having been a lovely blue, but the sun, rain and winter have all taken their toll. Blue fades very typically on houses here, and I'm pleased with how the base coat turned out.


I used a mix of white, Cape Cod Blue, a touch of Prussian Blue, and some Jade to get this particular shade. For the aging, I used burnt umber, white and Seminole green. Some careful sanding is also still needed for extra wear.

The door, door frame and window frame were painted with aging chalk paint (I added water) in a shade of beige called Primitive, again to get that impression of an old building badly in need of a fresh coat of paint.The foundation strip is faux-painted in a dirty cement colour. I was purposefully careless with the paint work, as this shed has been around and has been repainted before, and not by professionals!


Saturday morning was the annual plant sale of our local botanical society, so that took up part of my morning. I picked up a variety of flowering plants to add to my garden. I also spend two hours every Saturday at our local multi-cultural facility, in a learn-to-knit and practice conversation in English at the same time. Great fun with ladies and girls from all over the world. I used various shades and a very dry brush to further age the building, but I think it still needs a  bit of antiquing gel to bring out the board and batten of the siding. 

Next up will be carving a handle for the door, and making a two-over two window to go into the currently empty space, as well as adding a doorstep. Once that is done and the door is hinged in place, I can glue the false back into place and begin on the roof overhang and the dirt patch in front. Then comes the fun of "set dressing"; I hope to add a wild grape vine (they grow all over our area), a potted plant or two, tools and a bench for a well-earned rest, and landscaping etc.

And I'm still enjoying the project....

Wednesday, 22 May 2024

Gave Myself a Mini Day (Photo-Heavy)

 It is very warm and humid out again, we've gone from sort-of-spring to right into summer. The temperature today was 30C, which is rather more than we usually get here in May! So it seemed a good idea to work indoors, in our downstairs room, which is nice and cool.


This is a small project, designed by Cat Wingler, for which the instructions are in the March 2003 issue of Miniature Collector. I bought the magazine second-hand at a show, years ago, because this little scene really appealed to me. Now I've challenged myself to make my version of it, using cardboard as much as possible, and making just about everything myself. We'll see how well I do at that challenge! I do like faux finishes, and this one could have a lot of those.


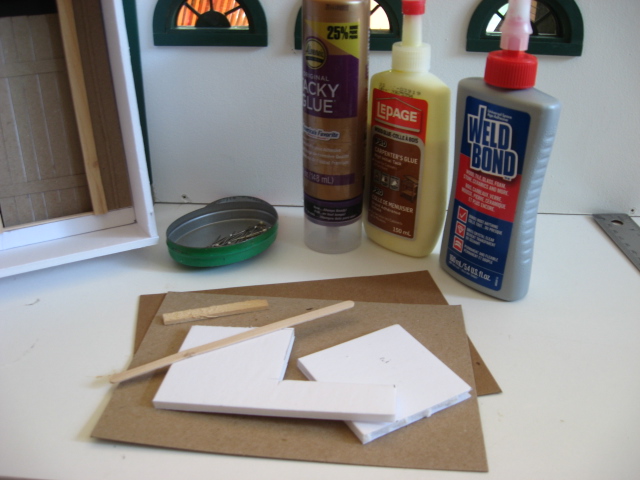
The instructions were for making the box out of foam core, and then painting the base of the simple box black. There was some black foam core left over from my younger daughter's time at Art College, so that meant I didn't have to paint! The box is held together with sewing pins and Weld Bond glue.


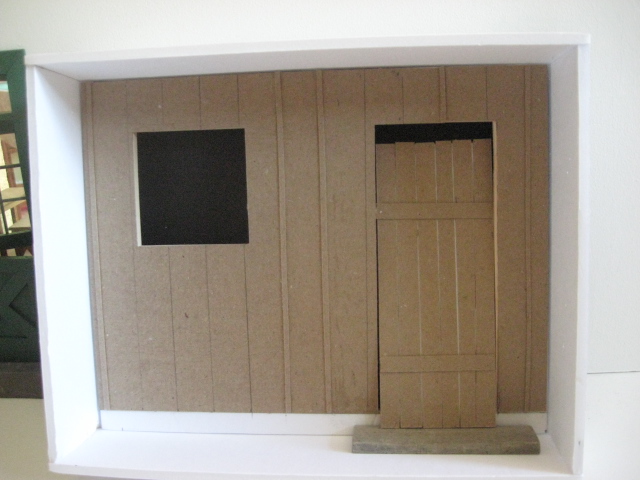
There is a shallow false wall, with my guide lines all over it (I am straight-line challenged, after all!). It is held away from the back of the box by strips of foam core (mine is 1 cm thick, about 3/8"), and for greater thickness I glued two strips back-to-back for the spacers. In this photo, the interior of the window opening has been lined in pieces of skinny coffee stir sticks. The inside of the doorway will have the same finish.


Instead of wood, I'm using cardboard strips in a board and batten design; this seemed the best way to do the walls in lieu of using the recommended stuff. I was testing an existing doorstep, but it is too low and the other piece I thought would work is too high, which means making a doorstep to size for the project.


Testing, testing, testing....


So far, all I've used is the foam core (scraps of which are in the photo), two kinds of cardboard which we get in our boxes of tinned cat food, skinny stir stick and rough piece of wood cut down from an old mandarin orange crate, along with straight pins and so far, 3 kinds of glue.

Before I go to sleep tonight, I'll give the cardboard board-and-batten walls and door surface a coat of sealer, and tomorrow or Friday, I can start painting it to look like wood. So far, this is fun!

Tuesday, 14 May 2024

Back At It


 My stock has been pleasantly depleted by the sales at the recent new miniature show, and I thought I'd better get going at creating some new pieces. In the process, I rediscovered some pieces I never did finish, and they are now going to get done, before summer hits and I don't sit indoors all that much. Right now, we are in blackfly season....

It had been my hope that the blue runner in the foreground would be an easy piece to work, but I'm finding my eyes wandering between the swirls of the border design; the centre of the piece was much easier! But if I tackle it slowly, it should work. The two long ends of this piece will be hemmed, while the two short ends will get a fringe.

The small, multi-coloured piece at left is a fire screen insert, cross-stitch on 22 ct Hardanger fabric. I don't really like cross-stitch at this small scale, so I'll try doing it on 22 or 24 ct canvas in petit-point. The bell-pull is out of scale, more suited to fashion dolls than 1/12th, so it likely won't be finished. However, I do like the cushion, as the colours "speak" very nicely to one another. The really small piece is an experiment, doing a sampler in 1/24th scale; I'll have to see what it looks like framed. The motto in the upper left is ready to be mounted and framed.

And then there are the House of Miniatures vintage kits, which I'd really love to provide with needlepoint upholstery. That will mean, in the case of the chairs, likely having to do the same design four times, which could become rather boring. We'll see! I've also pulled out some designs for plants and wooden pieces which I've long wanted to try out, plus I also want to finish at least one or two of my far too many UFO's (unfinished pieces).

Saturday, 4 May 2024

Well, the New Mini Show Was a Success!

 And we're all happy that it did go well, so there will be another one next year. It is currently the only show in the Canadian Atlantic Provinces (New Brunswick, Prince Edward Island, Nova Scotia and Newfoundland and Labrador) that we're aware of. Lots of people came to visit, lots of nice comments, and it turns out that we have the Grand Prize winner of the 2024 Creating Contest right in our area, which means we got to see her contest entry. And she has only been doing miniatures for two years! And I didn't think to ask for her name, but she has an article in American Home Miniaturist coming soon. Her entry was wonderfully imaginative and exceedingly well carried out. I'm going to find out her name, but I did have the presence of mind to give her one of my business cards. (By going through another Creatin' Contest winner's blog, I discovered her name is Christie M; all I knew from the Moncton Show was that she was Heather's daughter!)

Now I'm nearly out of stock, which means that I need to make things for next year's show. To that end, I've picked up 5 House of Miniatures (vintage) kits, all of which need upholstering, and my plan is to do some needlework upholstery for them. There were 2 matching chair sets and 2 ottoman benches, as well as a day bed, and I do believe I have more of them in my own extensive stash of HoM kits, so I can do sets if I want. And I have to get back into plants and polymer clay work too. Hopefully, I can make some stock over our long winter to come, which begins in November....  But I do have tulips blooming, and the leaves are beginning to bud on the trees, so first of all, Spring and Summer to enjoy. And of course, minis to make.

It was lovely too catching up with miniaturist friends who I only get to see at this show, as we live all over the area.

I've also got a small commission, for a couple of trout to fit into a very beautiful copper Jason Getzan fish pan. That should keep me busy!

Wednesday, 1 May 2024

Got Those Kits Done!

Here are the finished kits, and I messed up just a little with the large granny square one on the frame; my weary brain forgot that if I made the frame wider, in order to have a wider piece of work on it, that that piece of work would need a wider piece of double-sided tape to adhere it to the frame. I pieced the piece of tape provided with some of my own carpet tape, and it worked, although it is just a tad clunky. The completed piece just doesn't match up size-wise with the photo of the finished product the manufacturer provided! 


The sides of the embroidery frame itself were the ones provided with the small tapestry frame, and with the wider dowels it is much more suitable for the granny square piece. The small tapestry frame now has the frame from the first piece, and that suits the size of the black tapestry piece much better!

The chalk paint nicely sets off the colours, which were my substitutions for the colours provided; I have a baggie full of scraps of DMC and Anchor embroidery floss, which I use for small projects, and as these are intended for young collectors, I think my colours are much more appealing. Every little kit came with a sheet of cut-outs to colour, and I have left these for the purchasers of the finished products. The little rug which goes with the patio bench is a little bigger than suggested, but I like the slightly larger size, myself. I dislike tiny mats in front of larger pieces of furniture, as I tend to trip over those....

Here's hoping someone purchases them! The C-in-C has decided to come with me to this show, and has offered to be, among other things, my coffee/lunch delivery person. Also, my car needs new brakes, and his doesn't, so we'll take his somewhat larger vehicle.