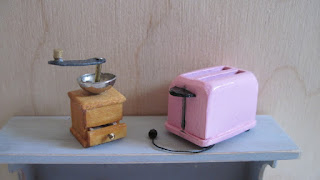
That kitchen scale is still giving me all kinds of grief, primarily because I can't find a dial for it that fits. Our computer will not scale photos down far enough, and my efforts, twice, to draw my own have resulted in ink that refuses to dry and smears. I will find a way!
The coffee grinder is done! What caused the most trouble, at the end, was not the teeny scale of the things, but finding a way to fix the crank handle and the coffee receptacle in place on the wood. And I still need to find my tiny silver stickers, to make a label for it. Yes, the drawer does open....
I ended up using a piece of thickish card for the crank handle, with a tiny bit of decorative toothpick for the knob. Those were then threaded on to a small piece of brass tubing, and a pin run through the lot and glued in with tacky glue and super glue. I hope it holds!
The toaster looks good! But it still wants a label. The cord is buttonhole thread, though I may eventually change that to cordonnee embroidery cotton - it looks a little delicate right now. The feet are seed beads, the groove was filed into the side of the wooden toaster block, and the handles are half circles of manila file folder glued onto cut-off pins that are glued into the body of the toaster.
The toaster was based on a tutorial on-line, but I changed quite a bit of it. The body was a sandwich of a slab of wood, with thin pieces on the edges, another slab, and another slab with thin pieces on the edges. I painted the inside black before assembling, except for the top edges. Once the pieces were glued together and thoroughly dry, I sanded the corners and added a base with rounded corners.There are at least 3 coats of pink paint, with sanding in between coats, and then a coat of gloss varnish.
I'm happy! The coffee grinder with the movable drawer is by far the smallest piece I've ever done. And I discovered that there are grinders with domed tops; those tops, however, have a little sliding door into which the beans are put - far too complex for miniatures!
Saturday, 27 June 2020
Thursday, 25 June 2020
I'm Going Cross-Eyed
The last several days have been packed with non-mini things, which means I am not much further along with making accessories to fill the blue shelf unit - which, by the way, I am unable to find. I seem to have put it somewhere so safe that I have no memory of it....
The Lego block is there to give an idea of the scale at which I'm working. The vintage toaster probably has enough paint that I can continue to finish the details of it, like the handles, lever, feet and cord and plug. The coffee grinder is giving me grief; I fear the wood I used for it is the crappy stuff from Michael's. The drawer has been rebuilt three times and the knob will not glue in place, so I am going to stain it and then super-glue that knob! (And hope that staining it will not cause it to swell and reject that darn little drawer!)
The design for the coffee mill is from a Dutch mini magazine, and I kept thinking there was something wrong with it. I finally figured out what that was this morning; the construction has the dome on top with the flat side down! In a real coffee grinder, the domed part is where the grinder 's crank handle is, and it is open to allow one to put in the coffee beans. The ground beans are then accessed through the little drawer. Hah! It was designed by a man....
The metal part is part of a cheap earring, with a hole punched through the bottom. I'll glue a spacer bead under it, and then string the crank handle and shaft on a head pin through the hole and the spacer. As the wood is so thin, I think I'll make the crank handle from sturdy cardboard, the kind you find on the backs of notepads. Painted it should look like metal - I hope!
I also hope to make a vintage breadbox from the tutorial in 1" Minis by Kris. It is made of mat board and cardboard, and should be another interesting challenge.
Wednesday, 17 June 2020
Vintage Kitchen Items Are Done
And as you can see, I gave in and did them in apple green. If you enlarge the photo, you will see a small border and design on just about every piece; this was done using an artist's India ink pen in dark brown, after painting and before the crackle finish. Once everything was dry, I used antiquing gel to highlight the crackles in the pieces.
From left to right, top: plate rack, drawer shelf, which needs drawer knobs, (I think I might put some cup hooks on the upper bar), and the soap/sand/soda rack. On the floor, the bottle rack and the fly safe, with the egg holder on top. The fly safe door needs to be hinged and to have a knob (I ran out!)
They give off an Edwardian era air, when everything greenery-yallery was very popular....
I am happy with them!
Friday, 12 June 2020
Old-Fashioned Kitchen No. 6
I had cut the pieces for this on Thursday, and assembled the drawers - well, no knobs, I have to buy some! I left this one to the last as I had to free-hand the shapes of the sides of the drawer shelf, and to estimate where all the various pieces fit together. As mentioned before, the full-scale diagrams do not print out at the proper scale, they are much larger. And I still worry about drawers; these went through a lot of sanding to fit properly! But this drawer/shelf unit was put together during our Friday mini session on-line. The other pieces all have their base coat of stain, this one will get done this evening.
Now I have to make the final decision re colour of this six-piece, old-fashioned kitchen set. My heart is still set on leaf green, but it is not an easy colour for most interiors!
I have also begun a vintage toaster, and a vintage kitchen scale. For the latter, I need to find a printie of a kitchen scale dial, if anyone has any good ideas in that area! Lots of clock faces, but no scale dials were to be found. The lure of the internet is great, but I can only give it so much time....
Thursday, 11 June 2020
The Cupboard is Done...
...except for a coat of beeswax. I chose a light grey chalk paint, over the distressed finish, then sanded in wear. Once the wear was good - I didn't want to overdo it - I used artist's pastels to darken all those areas that see lots of use, or perhaps are difficult to reach into to clean properly.
I am very pleased with this look; it will set off pastel shabby chic, natural wood and vintage accessories quite nicely! Now I get to play with tiny things to give the cupboard a lived-in look.
The three drawers for the last part of the old kitchen pieces are made, and all the other pieces are cut. I am still wobbling about the colour for that, especially as it's supposed to get painted decorations.
Today was a pajama day for me; I woke up several times overnight, then slept way past my usual getting-up time. That sort of threw off the whole day. It didn't help that it is dark and overcast again. However, hope is there as I have Siberian iris in deep purple with splashes of white, as well as pale lavender German Iris, happily growing in my garden. It is so nice to see some colour!
Wednesday, 10 June 2020
Item 5, I Think, of the Old-fashioned Kitchen
The plate rack was made during our virtual mini meeting this afternoon; there is only one more item in this collection, a shelf unit with some drawers. I am still deciding what colour to paint this grouping; apple green is very inviting, but sadly not very sale-able! It needs some hand-painted designs on it. This grouping was made to match the little robin's egg blue bench in the scent shop, with a naive design in cinnamon and cream, vining stylized flowers. We'll see!
Monday, 8 June 2020
Mostly, I've Been Cleaning
However, the klompenfabriek carcase has been more or less fitted together. It is still living in the workshop, as indoor work is dependent on the weather. We hope the frost has finally gone, and that the garden can get going. Today, the grass was cut for the first time this year.
It doesn't look like much right now, does it? The narrower dividing wall on the left has to be placed before I can glue in the buttresses, disassemble the whole thing and finish the walls. From left to right; a staircase with a "necessary" under it, and under the half-round window will be a small sink and grate for washing and water. The painter will work in this small space. Then the dividing wall for the workshop itself, with the functioning Dutch door near the right end. This is the area where the wooden shoes will be carved. Under the second window from the left will be a small table with a two-burner, gas cylinder powered hot plate for making tea and coffee. At the far right will be a small metal stove to keep the place warm in winter. Tools, wood, klompen in various stages will all be visible in this area.
I am sorting through all my mini materials; some of them are running quite low, and there is so much now that I've forgotten half of what is in storage. I did a lot of work yesterday; today, I went through my plastic plant-making material. I used up the last bits of an old kit for yellow daisies; they will go into my stash for making arrangements. Next up are the landscaping materials. It's going to be messy.
Tomorrow the public library will be open for five hours, I desperately need some reading material. During our self-isolation, I've re-read many books in my collection, and decided on quite a few that will be donated. It will be a while before the second-hand stores open again, so I have to make sure there are enough books to read in case we have to completely isolate again.
Saturday, 6 June 2020
Learned Something from a Mess
I put together a cupboard, meant to hang on the wall, that I think of as Grandma's Cupboard. As it was meant to look old, I varnished the whole thing in oak, and then mixed up some white, antique gold and a speck of red to create a warm, eggshell colour to paint it with. It was an unmitigated disaster!
Last evening, we had an absolutely mad thunder, hail, wind and rain-storm; the power, of course, went out. So while trying to fall asleep, I was thinking of what I might be able to do to save this little cupboard. Okay, I thought, it is acrylic paint, cheap $ store stuff, and thus not waterproof. What if I wet it down? Would the ugly paint job come off?
Tepid water, paper towels, Q-tips and what I think is a lobster-pick of some sort, helped to get rid of that awful paint job. In case you ever find yourself in the same boat, here is what I did.
With a barely damp cotton swab for the narrow spaces, and a barely damp paper towel for the larger, I rubbed each area individually; you can see that the side closest to the bowl is free of paint, and that there is an area of scratched paint in the centre. The rubbing seemed to soften and dissolve the paint a little, and I used the ends of the lobster pick - one is spatula-shaped, the other has a tapered and rounded point - to carefully scrape/lift off the cream paint. It had to be done a little at a time, as the dampish paint soon dried out again. It took a couple of hours, all told....
Interestingly, the finish looks kind of pickled now! Up close, it looks like an old piece of furniture that has been thoroughly scraped prior to repainting. I'll run some very fine sandpaper along the components, to settle the grain down a bit, and then I will try to paint again, with pale grey chalk paint. If that works, I'll rub back the edges for wear, and I'll have a usable piece of furniture.
The power didn't come on again until around 10 a.m. today. Fortunately, we have a generator. The Carpenter-in-Chief has gone out for wood to make the staircase for the Klompenfabriek; I thought I'd like to get back to that.
Thursday, 4 June 2020
Baskets Are Done (Except for Filling!)
An even dozen of tiny carry baskets in 6 colours; red, two shades of green, two shades of brown and golden yellow, with varnished interiors and handles.
Today, I started making the shabby chic grandmother's wall shelf unit; some pieces needed to be re-made, so I have some staining to do before sanding the whole thing and then painting it and aging it.
That's for tomorrow, probably.
Tuesday, 2 June 2020
Well, That Took Longer Than Expected!
There are an even dozen of these tiny carry baskets; now they will all need to be painted, and then filled. They measure 3.2 x 2.4 cm each (1 1/4 x 7/8" ). I thought this would go quickly, but....
I cut out the handle supports, sides and ends in stacks, and of course, the stacks shifted as I cut them. All the original short sides (24 of them!) had to be discarded; I followed instructions, but they were .3 cm too short.
Drilling the holes for the crosspiece was also interesting; my pin vise does not take large drill bits, so I drilled first with a thin bit, then with my largest bit. That was followed with my 5/64th bit, which doesn't fit into the pin vise; I had to twirl that one by hand. And after that, I needed to use a needle file to ream the holes out some more. And of course, several cracked as I assembled the handles, as I was using stir sticks. Did I mention my wood supply is emptying fast?
The handles had to be shaped; I used an emery board for that, and now my arm hurts. I'm going away and eat tacos!
Monday, 1 June 2020
Weekend Results
This weekend, I made another item just from a photo; I made a quick sketch of something that caught my attention, and decided to go for it. It is another mostly craft sticks project, with the exception of a couple of pieces of wider flat wood from the scrap pile for the bottom shelf and drawer of the display.
It is unpainted as yet, as I am not sure where it will go. As you can see, the drawer works, the whole thing stands up, but I wouldn't want to drop it as it is all glued butt joints. My first thought was another item for Boutique Pulchinella, a display for garden items like gloves, pots, seed packets, vases, and the like, but there may be another purpose for it too.
Now I am going to try to make an antique Dutch wall cupboard; shabby chic in Dutch - as well as in a number of other European languages - is "brocante" and I intend to age and paint this item to fit that adjective. It has two drawers, a good test of my ability to, perhaps, cut straight lines!
Subscribe to:
Posts (Atom)