Saturday, 28 March 2015

Sewing for Male Miniature Dolls

There was some discussion on The Camp, an international miniaturists' group on the internet that I am a member of, regarding sewing for male dolls. I remembered these two, made in the year 2000, which never sold and are still living with me. Both of these dolls were dressed using the patterns and instructions in Sue Atkinson's book, Making & Dressing Dolls' House Dolls in 1/12 Scale; this is pretty much the best book I've come across, so far!


These are Grandmere, who is a widow in light mourning, and her butler, Chadwick. Both dolls are one of a kind (OOAK), made of polymer clay. Grandmere has a natural mohair wig, gentle silvery curls with a coronet of braids, under her day cap. Chadwick has a wig made of commercial wigging fibres, blended for a little bit of colour variation. And yes, he stands completely on his own, and his tray can be removed - I tend to make my doll's hands so they can "hold" things.

Their clothing is largely assembled on a sewing machine, with the final "fitting" done by hand with tiny stitches. Grandmere's dress trim is glued on, while the only gluing on Chadwick's costume are the buttons (made of polymer clay) on his waistcoat and shirt front. Although these dolls were made 15 years ago, there has, so far, been no yellowing of the glue (Aleene's Tacky Glue).


Grandmere refused to stand on her own today, so she is posed inside a silver napkin ring, just visible at her dress hem. Her petticoat and bloomers are made of white batiste, lace-trimmed with embroidery-floss ribbon beading, and a tiny bullion-stitch rose on the petticoat front. The lace trim came from a shop in Boothbay Harbor, ME that has since closed; they sold the most wonderful tiny French and Swiss laces, and my supply is getting very low.


Slightly blurred photo of Grandmere, minus her day cap, showing her hairdo.


And Chadwick, also slightly out of focus; I can't access the macro setting on my camera, guess it's time to study the user's guide again! I have to admit that I've developed a block with making dolls, but I keep on trying (and squashing my failures!). In the meantime, on with foods and the like, one of these days my doll-making mojo just has to come back.

Sunday, 22 March 2015

Still Working Away, This Time With Wood


Every once in a while I get this desire to work with wood; definitely not my forte, I have a hard time cutting anything straight (which is why I like the Tudor period!). This week, off and on, I've been making small, mostly shabby chic, wooden accessory pieces. The raw wood ones were today's effort. It snowed overnight, the wind has been blowing, and it was not at all pleasant outside, a good day to work by the window downstairs.

Anyway, I've finished two small shabby chic utility shelves; things can sit on the top, and towels etc. can hang from the rail. The bucket bench has been getting messed up - that's the blue shelving unit in the back - with water rings and similar stains. There is also a small garden trug, another little shelf unit that needs some towel hooks in it, a small utility bench and a paper towel holder. The last four need painting, but I want everything to dry overnight before I do the seal coat. Then I'll paint a basic white coat, and when that's dry, I'll add the pastel top coat. That will be sanded back for wear before the matte varnish or beeswax finish coat goes on. These small pieces finish fairly quickly, and allow me to use pieces of "left-over" wood from my building supply stash.

Last fall, I picked up some paint colours that are atypical for me; the pale green is one. There is also pink and mauve, as well as pale turquoise. I'm kind of having fun experimenting with them. In small doses, pastels do work.

One bigger piece I'd like to spend some extra time on is a very old Christina Dierckx vanity table; it dates back a dozen years or more, from my first Camp MiniHaHa visit, I think. Over the years it has had a number of paint colours, but currently it is the blue-gray of the larger shelf unit in the foreground of the photo. This colour really works, so I've accented it a bit here and there with gold wax, and hope to "dress" the top of it to give a really nice, shabby chic impression. And maybe someone at one of the shows I'm attending in the next couple of months would be willing to give me some money for it....

I am finishing some small UFO's, at least!

Tuesday, 17 March 2015

A Little More Mini Fast Food

Well, it's been a week; I got the flu, worked an extra day at my volunteer job (a special event), went to a funeral, and got hit by yet another snow storm/blizzard. But I did finally get up and get to work and put together some more miniature food.


Tiny hot dogs in buns, and baked potatoes with parsley and butter in foil. Now I have to go and buy supplies, i.e. a certain colour of polymer clay I am completely out of, and some ecru cotton batiste fabric to dress one of the ladies for the Tudor market. Her shoes and leather vest are ready to go, but she needs her undergarments before I can continue working.

This Saturday I am scheduled to work another day at the special event, but there is yet another snow storm in the forecast....

I am so very sick of winter!

Monday, 9 March 2015

"Artists Who Care" Seniors' Outreach Program Event

As mentioned in earlier blogs, I was scheduled to teach a miniatures workshop with a group of able-bodied seniors today, and what a blast it turned out to be. The teachers/artists for this program donate their time, but are able to get expenses for materials reimbursed. As I worked mostly with free items and internet downloads, the expenses were very minimal.

Thirteen seniors attended; the oldest was 91! One had had outpatient surgery early this morning, and  "played" until the freezing of her excision wore off; that's dedication for you. They all received a Michael's hutch (the last of my stash, unfortunately), and a Ziploc bag with all the other necessary items. Below is  photo of some of the ladies working away at their projects;


Before the ladies left, I was able to take photos of their projects. Be aware, this blog entry is photo-heavy! (I think I only missed 2 projects; their creators said they weren't ready for viewing yet....)


We used wallpaper and scrapbooking paper to paper the inside backs of the shelves. Then we set to work creating things to fill the interior, mostly from printables, beads, card, and paper. The easiest items were the doily, greeting card, clock and family portrait; then we made a non-opening book, a vase of flowers, a row of books, a bookend, and a mug to hold  pencils and pens we made out of toothpicks. Each participant also got an Easter shopping bag, in which the ladies stuffed a bunch of silk flowers and a flocked bunny. Some also put together a decorative box - quite a fiddly project - and paper lace to edge their shelf.


And every project turned out to be different, although each participant received the same components in their kits.


The choice of wallpaper patterns and colours varied, with each participant picking their own colour scheme.


We had the option of making a bookend with a tiny plastic bear decoration on it. Some did this, others used the little bear as an ornament.


Some real keeners created a potted plant in a card plant pot, using plastic aquarium foliage. This hutch has paper lace on the shelf edges.


Our oldest participant played around with her printed items, placing them in unexpected spots; the effect is quite unique!


All in all, it was a fun 4 hours, but I am so tired that I just want to do nothing for the rest of the day....

Thanks very much to Liz of Grandpa's Dollhouse in St. Thomas, ON who donated some of the plastic items for the project, and the shopping bags; to Bates Laminating in Fredericton, NB who donated a bag full of mat board pieces, and the members of Camp MiniHaHa who donated items from their stash two years ago to enable these outreach miniature programs to happen.

This was the second program I was able to do using these donated items; however, I am all out of the hutches, and until Michael's makes them available again, we can't do more of these programs. I am told, however, that the hutches are back in the US, by popular demand....


Saturday, 7 March 2015

....And the Rest of the Food


Fish and chips, with ketchup and a lemon wedge, in a basket - it actually looks like a real take-out basket! Each piece of fish has had a bite taken out of it, to show the succulent white interior, and each basket has two pieces of battered fish. The fish batter is actually a coating of blended, powdered chalk pastels, very effective for making thin coatings. The pastels are brushed onto the unbaked polymer clay, and adhere to the clay during the baking process. Once baked, the items are given a coat of matte varnish to prevent the chalks from eventually rubbing off. The French fries are also dusted with powdered chalks; underneath, they are a raw, creamy potato colour.


Fried chicken and french fries, with ketchup, of course! Half are a breast piece and a wing, the other half a drumstick and thigh. These were fun to make; they used modeller's varnish and glass stain to get the effect of fried chicken, with yellow decorator's sand creating the "crunchy" coating. The fried chicken instructions were by Kiva Atkinson , from an old issue of Dolls House and Miniature Scene magazine.


And last, this might not be so familiar to North American fast food gourmets; it's battered sausages and chips, with mustard for the sausage and ketchup for the fries. This very British Isles dish is a version of our corn dogs, or pogos, except that they use a flour-based batter, like that used for fish. As mentioned earlier, anything that doesn't sell can go into my snack shack vignette, which is British (as no one here could read Dutch if I made it a Dutch market with Dutch signage!), and which will go into the between-the-wars  market setting. The sausages, like the steak pies, were made with caning, in which a covering is wrapped around a filling, just like the real thing, and once again, blended powdered chalks provide the colouring.

That's it for now; tomorrow I have to finish up the stuff for the hobby class I'm teaching on Monday, and then there is a Ball-Jointed Doll sweater to finish up. Once that is done, back to minis for the shows.


Friday, 6 March 2015

Miniature Foods


Eight miniature pizzas, in boxes. The two closed boxes in the front contain duplicates of some of the other pizzas. There a 5 different varieties of pizza, including a California pizza with Vidalia onion slices. These were fun to make, and finding the non-specific pizza boxes on the internet really added to the presentation. I'm happy! The sweet  pepper bits were cut down from pepper rings I made years ago, and have a translucent inner side. There's bits of ham, mushroom slices, black olives, pepperoni slices, and pineapple on these tiny pizzas, and a garnish of real, finely crushed oregano leaves.


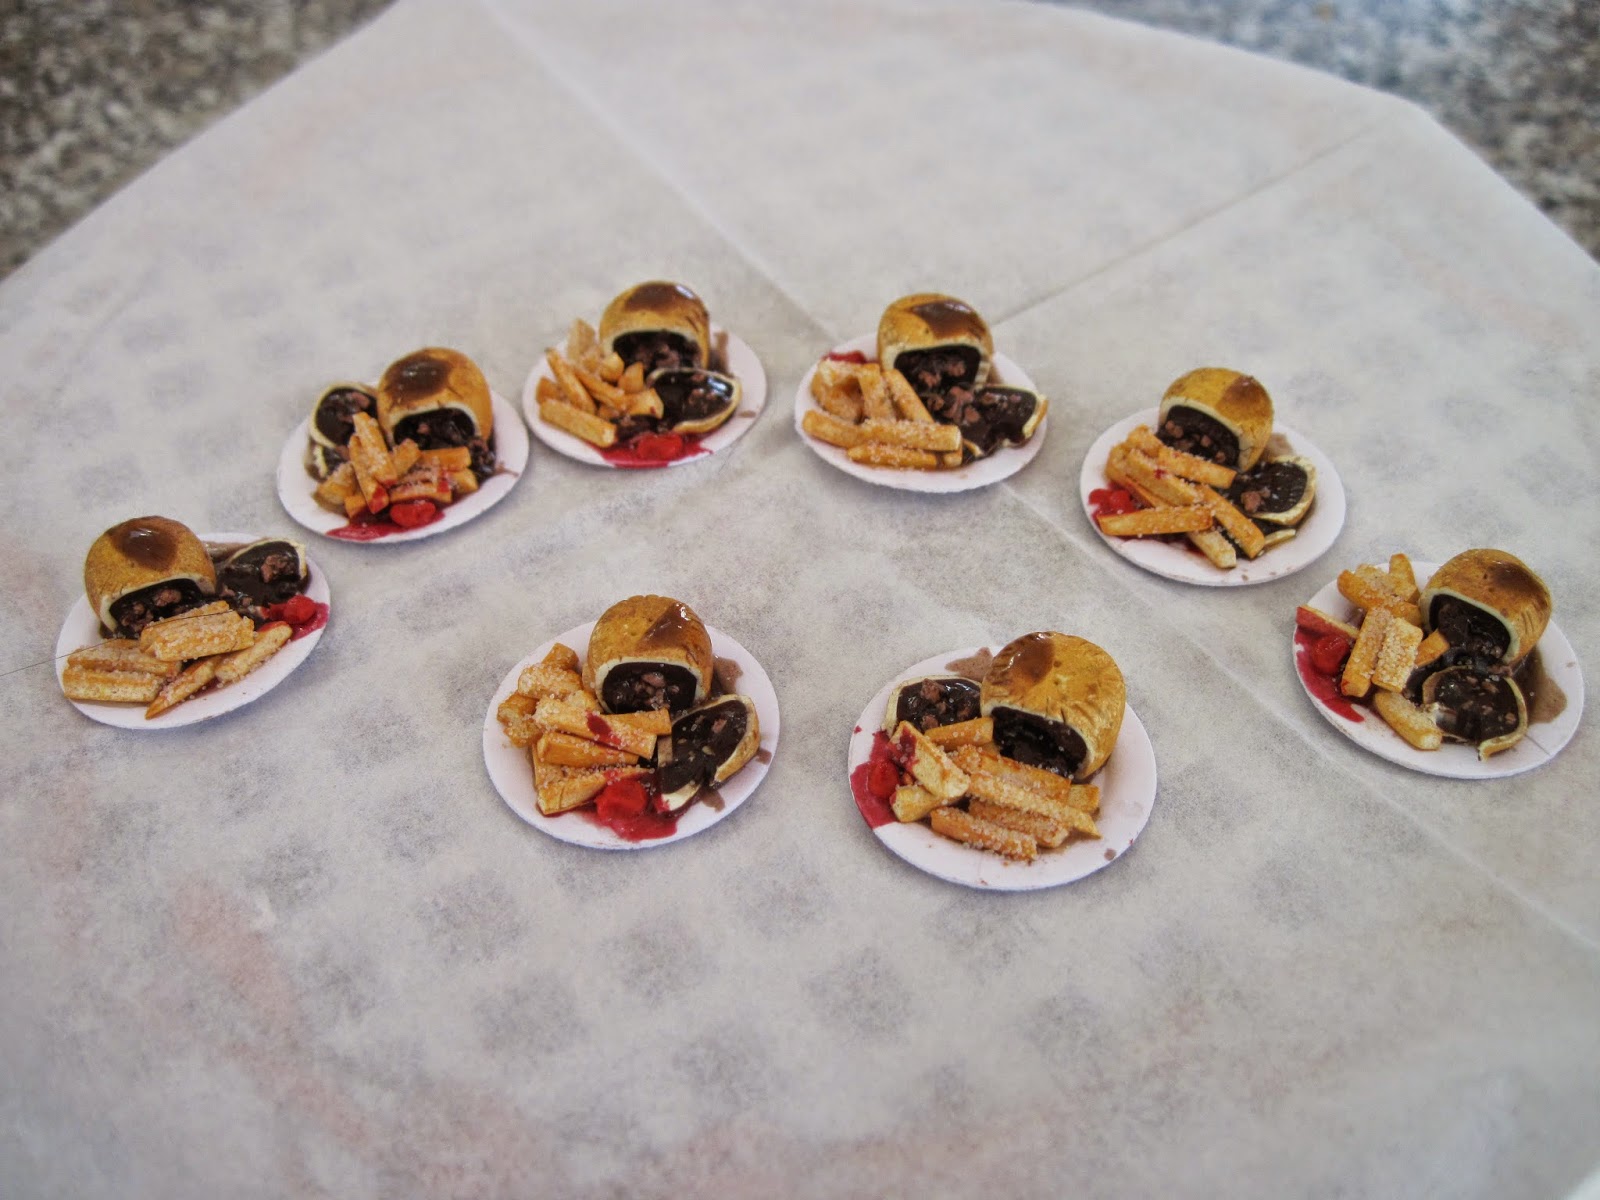
And then there are eight steak pie and chips plates, complete with gravy and smears of ketchup. The fries have salt, a.k.a. fine white decorator's sand, on them, although that doesn't show all that well in this small photo format. The white paper picnic plates were a purchase three years ago, at Birmingham Miniatura; I was able to get 3 different sizes at a very good price. Unfortunately, the dealer's name wasn't on the package, but I seem to remember it was Janet Brownhill who carried these at her table.

I did find a very good basket for the other fast foods; my husband reduced it down for me and then printed me a page of 49 of them, far more than I need for this project! Guess there'll be more cooking in my future. They are proving very fiddly to put together, but the effect is great. Those photos will be up tomorrow, as I am currently cooking some daubs of ketchup to go with the fish and chips baskets.

As well, today we booked our flight to London; I am really, truly getting to visit the Kensington Dolls House Festival in May! We also hope to visit the Weald and Downland Museum, where the full-size version of my Tudor market can be found, as well as a whole bunch of other Tudor buildings. And I am finally, finally getting to visit the British Museum; in the course of my life, I've been in London at least 8 or 9 times, and have yet to get to the museum. My husband and I both studied Art History with an excellent professor, and we are looking forward to seeing some of the things we studied in university at first hand, in the flesh, so to speak.

These wonderful miniature edibles were made following basic instructions in the February and March issues of Dollshouse and Miniature Scene magazine, and there are more food articles coming. I am looking forward to experimenting with some ethnic cuisines in miniature in the future. My tendency is to read and study the articles, look up similar ideas available on the internet, and then re-interpret them based on techniques I've used successfully in the past, but I always learn new techniques this way.


Wednesday, 4 March 2015

Working Away....

The last couple of days I have been on a cooking binge, miniature cooking, that is. To date, I have produced 8 assorted pizzas in boxes, 8 steak pie and fries plates, and the components for an equal number of chicken and fries, battered sausage and fries, and fish and chips take-aways. Some of the latter have still to be put on plates. (Sliced black olives in miniature are very tiny indeed!)

In vain, I have been searching for a take-out flat basket of the sort you get nachos, etc. in; all I seem to be able to find is logo-covered advertising, which I hesitate to use, and I don't really want to do any free advertising anyways. I may have to design my own, but am not clever enough to be able to put a pattern on the container.

Tomorrow I hope to have some photos; maybe not of everything, but of things made up and things  just about done. The fries actually have "salt"! These items will go to stock my shop in a box that I take to shows, and anything that doesn't sell can go into the snack shack from the previous post.

It's been fun, and part of the work has been experimenting with liquid polymer clay; that is something of a learning curve!

In between miniature cooking, I am getting kits together for a hobby class I am doing with seniors next week, weather permitting. We are decorating the inside of my last Michael's hutches, and putting together a number of small paper, card and bead craft projects to begin filling them up. I hope to take photos of people's projects at the end of the hobby session to share with you.