Saturday, 5 October 2019

Camp MiniHaHa 2019 Project


This is the prototype of the Ruffled Rooster Kitchen project, designed by Connie Sauve, that we were doing at camp, with her permission, this year. It is jam-packed with cupboards, drawers and cubbyholes, and the camper who cut out the pieces for us figures there were upwards of 4,000 or so to have enough for all the campers and the extra kits people asked for.

I have mentioned, in the past, that we tend to do as many variations of our project as there are campers, and you will see some in the photos below. There are a lot of photos, so this is a long blog entry.
Unfortunately, people started to pack up mid-afternoon on Sunday, so there are a lot of examples I was unable to get photos of.


Debbie P.s kitchen is a lovely grey-blue, the photo does not do it justice. You can see where things have been switched about to personalise the project.


This is Janice's kitchen, in blue-grey and yellow. As you can see, more switching around of the kit's components!


Myra works small, so her "kitchen" became a three-story house! This is probably 1/48th scale, as the box is 15 1/2 cm (6") wide and 17 1/2 cm (7") high. I did tell you it was a compact kit....


Iris and Kelly were both reproducing a 1700's restaurant kitchen/stove they had visited in Spain; the restaurant has been operating for nearly 300 years, and is believed to be the oldest restaurant ever. The sides and stove hood were tiled, hence the tile work; the stove portion - a huge metal beast - will go into the open space.


Aleeta is making the wardrobe scene from The Lion, The Witch and The Wardrobe. The kitchen has been transformed into a wardrobe, and you can see the door opening which has been cut, and which will become the entry to Narnia; she plans to do the scene of the snowy forest, street lamp and Mr. Tumnus the Faun in behind the wardrobe, thus expanding the scene.

Brandy carved her doors; she painted background scenery on the kit doors, then cut some thicker doors and carved them with trees, foliage, bear cubs, rocks and stones, to be applied over the painted background. Sadly, I didn't get a photo of that. And Patricia was creating a theatrical dressing room, complete with light bulbs around the mirror, from her kit. (No photo of that either...) Lynn and one other camper were turning their kits into Hallowe'en scenes.

Already in existence, in the prototypes, were 2 complete, beautiful kitchens, a laundry room with many flamingo accessories, and an optometrist's office. I hope to get some more photos up at some point, as three of the prototypes were made by members of my local mini group.

It was a a rather exhausting camp, with all the many pieces that needed to be assembled. My own version is partly stained, partly painted, partly done, partly not done; you get the idea. My stain had deteriorated, and they don't make it any more in the water version, only in oil, so I have to re-stain all the pieces with smelly stain. I am pulling out the bottle drawer (long and narrow on lower portion of kitchen), and will enlarge the shelves to allow for more "stuff". There are lots of little glass jars and bottles in my stash, which all need to be filled with polymer clay candy, not to mention the bins and shelves of the kit shop. I also want to add a shelf unit to the left-hand door to accommodate some jars. The drop-down table in the project will be my store counter, with a small scale on top. Did I mention that my project is intended to become an old-fashioned candy shop? It will become part of my between-the-wars market setting. To that end, I have to figure out how to make "glass" fronts for the 3 tiny drawers. That should be a challenge! And I would love to be able to figure out a way to make the tip-out "glass" shelf on the top portion into a pair of tip-out bins.

Next time, I will show some of my camp goodies, but this is enough for now, I think.

Tuesday, 24 September 2019

One Cloud Pine in Miniature


It turned out better than I expected; my only problem is that using matte varnish over scenic cement has resulted in a somewhat shiny trunk. The depth of the foliage is quite good, with a little scatter of several lighter shades just over the top to give some lightness. The evergreen foliage is actually quite dark. Hopefully I can figure out a way to dull that shine permanently.

Now I am off to Camp MiniHaHa followed by a short family, visit until next week.

Saturday, 21 September 2019

Finally, The Cloud Pine


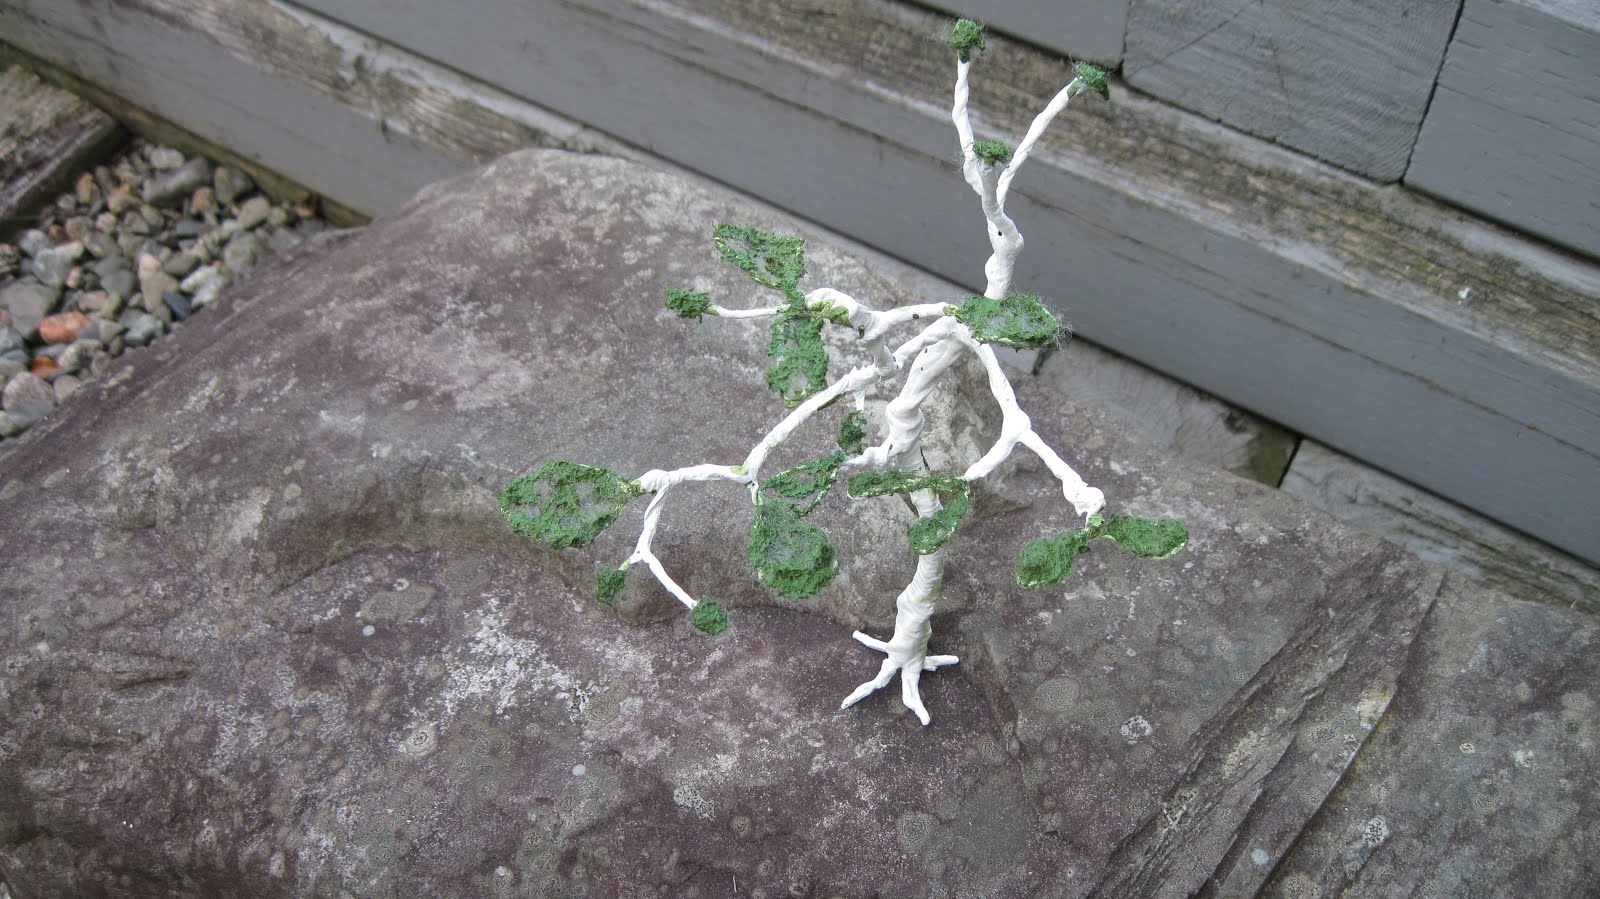
No, it isn't a ghost tree; I put several coats of gesso on the framework of my cloud pine tree, and allowed it to dry thoroughly (several weeks, I procrastinated!), and today, with the last of the floral arrangements for my shop in a box done, I got back to the tree as I will be showing the Japanese vignette at Camp.

I looked at quite a few different how-to videos, and the one that triggered this idea was a model railroad tree builder from Australia. He uses the coconut liners for hanging baskets to create the frame for his trees, thinning it out and cutting it to fit his ideas. I don't have coconut liners, but I do have a bag of polyester fill for toys; and it pulls out very much like the landscaping fibres you can purchase from the model railroad stores, except that it is white, of course.

I pulled the fibres as thinly as I could, and glued them to the wire support loops. After they dried, I used sludge green paint diluted with water and a soft, floppy brush to brush on the colour. And found that slopping on the diluted colour also allowed me to shape the fibre mats somewhat. This has to dry at least overnight, then I will use spray glue (part of my quilt supplies) to spray the mats and then sprinkle on evergreen-coloured railroad scatter.

Once the mats are covered with foliage, I will likely have to scrape glued-on scatter off the branches and trunks; when that is done, I will paint those with lots of dark grey, brown, sludge green, etc. I do hope it all works out!


This is the last of the floral arrangements for sale; it is a zinc tub of calendulas, or pot marigolds; the petals of these flowers are edible, and look good in salads. I am told they are peppery in flavour.


And just for fun, I made some forsythia and pussy willow branches in vases. I leave for camp on Wednesday....

Wednesday, 18 September 2019

Anthurium


This anthurium has been living on my dining room table since Valentine's Day; the tag on the plant says it is "the world's longest blooming plant". And since February I've been thinking it might be fun to do this one in miniature. It's in a glass vase lined with spaghnum moss, but I used a similar shape of vase from my stash:


Hey, I'm happy with it!  If it doesn't sell it can go into my flower shop's summertime window display.
Hopefully, you are not getting tired of miniature plants.

Tuesday, 17 September 2019

Is It Because Winter Is Coming?

It seems I am a little obsessed with florals right now; perhaps it is something to do with the gloomy, dark weather today, and the fact that the trees, sigh, are starting to go orange, bronze and red. Here are a couple more floral offerings:


I had to include those interesting shelf fungi peering out of the crack in the retaining wall! This is an "antique" salt box, planted with old-fashioned, pastel violas. I quite like the way this little arrangement turned out.


And here is a larger arrangement, an old crate planted with a variety of spring flowers and greenery. I still haven't found my miniature ladybugs, and would really like to put one on the leaf at the front.

To close for today, below is a photo of a genuine Tudor house interior; those of you who have been with me for a few years are aware of my joy in late Tudor-era buildings. This is the Yeoman's House Interior from the Weald and Downlands Museum in Kent (or is it Sussex?) in the UK. I find this such a lovely contrast to the wealthier Tudor interiors one usually sees in miniature. The wall hanging is painted on canvas:


In the middle of the floor is the fire, complete with the clay damper. No chimneys at this time, the smoke found its way out through the rush roof. And I love the triangular stool at the table, as well as that triangular chair in the left foreground. Furniture was sparse...

I have more interesting interior photos, and will occasionally include them, as Food for Thought, and also as inspiration for myself, as I need to furnish the Tudor Apothecary and Workshop.

Nine days to Camp MiniHaHa! I wonder how many more florals I will turn out to try and keep winter at bay a little longer.


Monday, 16 September 2019

This Is My 400th Post!

This is my 400th blog entry, since I began this blog some years ago. To celebrate, today is a double offering of flowers, a pair of identical arrangements.


I have another version of this in my Floriana flower shop, and like it a lot, so I thought I would try a couple for sale. The dishes are from my stash - I've decided I will never use all the miniature pottery I collected over the years, there is not enough room in the flower shop for them all, so share the wealth! In the process, I found another way to make daffodils, and it is much less labour intensive. I am not completely satisfied, but will continue to work on refining the technique.

The flowers are paper, the bunny is cardboard, the bird house is wood and card, while the little eggs are Fimo. This is, of course, an Easter arrangement, and the bunny has left the eggs for the birds and is heading off to get more eggs for other birds (or something!)

The base for this photo is an old treenware tobacco pot, that belonged to my late father. I love the worn look of this, but these days it contains potpourri and lives on an antique marble-topped washstand in my bathroom. The floral shop lives next to it, so I see both every time I make use of the, uh, convenience. Dad used to collect stamps, and when he quit smoking in the sixties, the tobacco pot  became a place to keep cancelled postage stamps for his collection or for charitable donations, so I'm just continuing the re-purposing.

The white wall in the bathroom and the white marble top make a good backdrop for photos; that's where most of them are being taken these days. The dark wooden thing with the yellow and blue enamel piece on top is another piece that used to be my father's, which I use to keep ear buds in on my bathroom counter. Very useful for mini photograph, and handy with good light, too!

Saturday, 14 September 2019

Another Experiment, and Lessons Learned


The experiment in this case was making a "zinc" tub or pail to hold a floral arrangement. In the process, I "invented" a method of making wire look like miniature twigs, by using paint, tea leaf dust, glue, and tiny (and I do mean tiny!) bits of model railroad foliage.

Also, while working on a previous arrangement, I decided to experiment with bits of cut punch-out fern leaves, to create a substitute for reindeer moss; natural materials tend to deteriorate with age and then the arrangement is spoiled. Some of my very early floral or garden settings using some dried, natural materials are, sadly, disintegrating due to the dry air in our winter-heated house.

I picked up a set of inexpensive, fine-pointed colouring markers a year or so ago, and I find that with shading from colour pencils, they are nice to add some depth to paper flowers.

The tub was cut from manila file folder using a reduced bucket pattern, with an applied rim top and bottom. I also added a length of buttonhole thread to add textural interest below the upper rim, but I don't know whether it shows. I will use this general idea again for arrangements for my flower shop.

Now, if only I could find my sheet of miniature ladybugs, I could finish off another floral piece! I really have too much stuff....