Sunday, 3 May 2026

Sad News

Two weeks ago today, my husband had a very severe stroke. Since then, I've been more or less living at the hospital. He is, unfortunately, not expected to survive.

Until things are a bit sorted here, there will be a hiatus in my blogging. Please do check in, in June, most likely, after a whole lot of difficult decisions may have to be made.

Prayers are appreciated!


Sunday, 22 March 2026

The First Bookend is now Done


 I had fun with this one! Nothing was purchased to make this bookend, it all came from my mini stash. As with the main construction, much of it was made with re-used and/or recycled items. The vines over the little porch roof are fake silk pieces. The "grass" is moss ribbon, with the tiny "flowers" cut off the heads of plastic greenery. The straw under the fruit and vegetables is finely cut raffia, glued on to a piece of acetate, with red ball apple-shapes from a Christmas pick, and the pumpkin and gourd coming from a fall-theme pick. And the flagstones are cut from egg cartons.

 The door hinges are cardboard from the back of a small note pad, cut and shaped, with some decorative outlines done with a very fine ball stylus. The nailheads are 1/16" ( 1 or 2 mm?) cardboard punchies and then the whole thing is painted. The door handle is carved from a scrap of wood (I have a bag full of useful scraps!), and the lovely door knocker is an orphan stud earring with a leaf design, missing its fake jewel. The jewel was replaced with a bead, and the whole painted to look just like the hinges.

A piece of book-binding type fabric was used under the sidewalk to hold the base to the bookend's base, and the same fabric was glued to the back to hold everything snug against the working portion of the bookend. The wood-look banding around the edges of the recycled foamcore and cardboard structure is a strip of brown, used file folder. File folder cardboard is wonderful, as it is beautifully smooth, takes paint well, and can easily and neatly be cut with a craft knife; for strength, I applied a coat of matte varnish to the edges.

Now I have to design the other bookend....
 

Wednesday, 25 February 2026

Bookend Challenge 2.0

 Yes, I had to rethink my ideas; I began the project on the wrong side of the bookend! When I measured the height required for a porch scene with steps, the bookend had to be so high that it would tower over the books it was meant to hold in place. This one is just about done; the basic stage set is there, all that needs doing is to dress the set.


The scene is a door, in this case held together with tape, built on the narrow lip of the bookend. The bookend pair is intended in my case for a shelf on a stair landing. Our house is built into the side of a hill, which means that we have a full-height basement with large windows and glass doors out on to a patio. The shelf is actually the knee wall of the house, i.e. the concrete block foundation upon which the house is built. On the shelf, we keep a few lovely antique leather-covered books, and lately, the shelf has also been holding my growing collection of knitted gnomes.


Here, Tertius is demonstrating his height in relation to the door. At this point, the door and the wall in back are in place. Since this photo was taken, a canopy has been added above the door. Today I hope to shingle that canopy. Once that is done, I hope to add greenery, "moss", and the like to further bring the scene to life.

The wall and floor are made of twice recycled foam core, while the door is made of mat board, which I textured with a ball stylus to look like wood grain. The step is a piece of foam core wrapped in the edge of an egg carton, while the stones on the path are made of flat sections of egg carton. The bark texture was done by gluing torn sections of recycled gift wrap tissue, allowing them to wrinkle quite nicely. The paint job includes dry brushing with several colours of paint to look like tree bark. You have to imagine the door built into the base of a tree deep in the woods, in between the tree's roots.

I made four pairs of socks for Christmas gifts for family members, and I think that it would be fun to gift each of them a gnome made with left-over yarn from their socks. Sock pair 5 is almost made, and will have a gnome to match. Primus was made with yarn from my socks, while Secunda was made with left-over yarn from a doll's sweater project. I have another gnome (Quintus) on the needles, made of left-over yarn a friend gave me, but he is a much larger one and will not really fit into the bookend setting; he'll likely live on top of a piece of furniture in my living room. 

The edges of the bookend will be wrapped in one of my favourite mediums, file folder cardboard, to hide the edge of the foam core and the mat board. File folder cardboard holds up very nicely as edging, and was used in the desert garden project as well as the loft project. Now back to work....


Friday, 13 February 2026

A New Challenge Begins


 Marilyn D. issued a challenge to Louise M. and myself, to make a pair of bookend vignettes, and gave us the bookends to get going with. They're well on the way with theirs, but I was having a bit of a problem coming up with a theme. At our last get-together, a lighbulb blinked and I though it might be fun to do a front door/back door theme with the bookends. (Yes, that is deep snow in the woods outside my window!)

I'm using recycled foamcore for the body of the vignettes, and the first thing was to establish a base on which to work. Then you have to hollow out enough of the foam core for the base of the bookend to fit underneath seamlessly. It took a bit of experimentation, but I managed to do it to my satisfaction. I think that fabric may end up being the thing to best hold the foamcore to the metal bookends, once the construction is done, as anything thicker would make it difficult to use the bookends as, well, bookends.


By this time, it was dark and therefore the core shape of the steps isn't all that visible! I layered slices of foamcore to create a pair of three-step stairs, one for the front door and one for the back. There is still some experimentation going on in regards to how the steps will be positioned. My template for the basic design is from a Dutch website, minimaakje.nl (which you can find by googling that title), their project #76 for a raised veranda with a door and at least one window.

Next up, I have to make a decision using some doors in my stash, as to how high the foamcore walls of the project will be. The idea is that the front door step area is beautiful and therefore has high curb appeal, while the back door one is, uh, well, rather more utilitarian and may include dirty boots, a bag of garbage and, given the weather outside my window visible on the photos, perhaps a bunch of snow removal tools!

The vignettes will have a narrow porch with a railing, a door, and a window, as well as the steps. Then I get to play with the rest of it. Today I hope to measure for the height from the "ground" to the porch level and then add in the height of the door with frame, and of course of bit of "wall" above that. And I don't really like arithmetic....

It is my hope to once again use recycled/re-used construction materials, mostly foamcore and cardboard of various thicknesses, and things that already exist in my rather alarmingly large mini stash.

Posting is still difficult, as the Carpenter-in-Chief has to hunt and peck each time photos are uploaded to the computer, but I hope they can increase a little bit in frequency! Stay tuned.


Friday, 26 December 2025

More Gnome Silliness and Merry Christmas!


Primus got a partner in blue, named Secunda. Together, they've decided to use the fresh snow to carry some of their belongings to a new place. Primus is prepared to light the way through the forest as the sun sets, while Secunda is carrying a loaf of bread in her basket along with a bottle of wine.

I'm borrowing items from my mini stash. A third gnome is on the way, as Santa brought me the requested gnome book; I'm learning a technique that requires less sewing, as I don't enjoy sewing knitted items. I will, however, have to knit on an item that is partially stuffed and weighted. Learning something new is supposed to be good for creating new neural pathways....

We'd been looking at a green Christmas, but while we were sleeping snow fell, and allowed us to wake up to a beautiful snowy, misty and sunny Christmas morning.

The crow on the front of the sleigh is one of a couple of dozen that appeared in my Christmas stocking; they have different poses and will work beautifully in one-twelfth scenes.

Saturday, 20 December 2025

When Hobbies Collide....


So you know from my previous post(s) that I have too many hobbies, and now that I've finished the socks that needed to be ready for Christmas, there are a lot of little tiny balls of left-over yarn.

Well, Dutch children when I was growing up were very aware of gnomes (kabouters), as many of the books we loved features these little mythical creatures. I stumbled across a page of gnome designs on-line, and realized that here was a use for those little left-over balls of yarn after all....

This is Primus, my first gnome; the photo is a little dark, but Primus is wearing a multi-coloured robe that features purple and green, and his hat is actually purple. The collision occurred when I thought what I'd do with my little gnome. I had a tiny plastic lantern in my mini stash, and with the aid of some paint and a piece of heavy-gauge floral wire, he is now set to be the leader of what may turn out to be a parade of gnomes, equipped with the tools of life, from my mini stash. The Carpenter-in-Chief spotted the sleigh among Christmas decorations at a hardware store, and thought it would be a perfect accessory, and I agree. The rope is a bit heavy, but I can always make another one out of left-over yarn....

I did knit a friend for Primus; Secunda is currently about half a dozen knit bits, awaiting assembly.  And I'm hoping Santa will bring me a book all about knitting gnomes!

We're at the tail end of a wind storm, and electricity is being provided by the generator. Thousands of people in the Canadian Maritimes are without power right now, and the streets and roads are littered with fallen tree branches. And the rain that preceded the wind storm has melted all the snow. That will make the C-in-C's sister sad as she is coming here and hoping for a White Christmas. However, the weather here changes from minute to minute, so who knows, we may yet get snow.

This year we are also having the joy of our son and his wife spending Christmas with us; they moved this year from Alberta in Western Canada to a wonderful old home and property across the street from the Gulf of Maine in Nova Scotia. The climate there is a little more welcoming than the wide open prairies.

There may be another gnome guest on the blog occasionally!

Thursday, 20 November 2025

Haven't Disappeared Again

 Just finishing up some socks and quilting as it needs to get into the mail before there is another strike! Back soon....

Sunday, 26 October 2025

Some of the New Furniture


 There are two large shelf units, to hold all the paraphernalia of a bookbinder's workshop (much of which still has to be made!). There are two tall, deep shelf units. Bookbinders use animal hide, fabric, book-board and lots and lots of paper in their craft. The long table is the general worktable, where more of the messy work is done, while the smaller table is for the finer stuff, like gilding and tooling of leather and buckram covers and spines. The ladder-like unit is a utility shelf which hold smaller bookbinding necessities. Fancy and plain endpapers - I especially like the marbled ones - and tissue to go between plates would also be held on the premises.


I had already prepared the solid wooden block and the wooden mallet; these would be used to thin out leather, along with sharp scalpel-like knives used to "skive" and thin out the edges of leather covers that are crimped or folded over at the corners and the spine.

On this table are a ledger, and a notebook for office use, as well as a simple leather-covered book. Glue pots are a necessity, along with brushes. There is a right angle on the table, as well as the first of a series of bone folders, used to define the creases of the folded signatures. The little box with the padded chamois top has been shown before; it is filled with gold leaf for the tooling and titling, and a rubber mallet used to make those rounded ridges on old leather books, over a filler of twine or rope.

Many books have been prepared to sit here and there. I'll need to make spools for twine, rope, tapes, and threads used in the book preparation. I'd like to try to make some convincing-looking roller tools for the tooling, and am regularly researching bookbinding and making sites. Not a bad way to spend breaks, with a good cup of coffee or tea, and a cookie.

Next up is the floor press; the wood has been cut and sanded, now I need to find a decent maple stain. If I can't find one, it will be done in the golden wood tone I've already used.

Thursday, 23 October 2025

Somewhat of a Mystery Item


 This has been one of the more complex items to make for the bookbinders' workshop, and I believe it is a form of bookbinder's plough, a type of office guillotine machine for cutting the page edges evenly. Once upon a time, this was done by a type of chisel and a hammer, which of course left the edges of the pages rather ragged; these days a version of that is the deckle edge, which most often in my experience shows up in modern books of poetry. Every once in a while, a collector's edition of a novel might also have a deckle edge.

The plough consists in this case of a clamp, operated via the handle at the top. The circular edge just peeking out of the housing is the knife blade. However, what I can't figure out is how this arrangement allows the blade to cut the pages. The modern version of a bookbinder's plough has a very different shape.

It was an interesting item to make in miniature; the vertical posts are square in cross-section, and fit into square openings. The horizontal bar moves up and down by means of the handle at the top of the plough, to hold the signatures in place, but how does that knife cut a stack of pages?

If anyone has any ideas, please enlighten me....

It was great "fun" hollowing out the housing for that circular knife in the base of the plough, and involved a lot of sandpaper strips in between applications of emery boards and scalpel blades! I am almost convinced there has to be some sort of a handle involved in manipulating that circular knife blade.

Soon I'll begin tackling the building, but I have some other projects to finish up first.

Friday, 17 October 2025

A Lovely Book Sewing Bench


 This is probably, so far, one of my favourite pieces for the bookbinder's shop. It is very similar to the sewing benches being used nowadays by modern, bespoke bookbinders and bookbinding hobbyists. It is the item on top of the table, and you are looking at the back of it, where the folded and pressed papers would sit while they are being sewn together. 

It would be used to sew the signatures, i.e. the stacked pages in equal groups that are folded and then sewn through at the fold. A group of these signatures makes up a book, with sewing through the stitches at the folds forming the spine, which are done in another tool. Again, there are moveable threaded rods, and an adjustable beam to keep the cords taut.


This is the side one works from: the stacked signatures are laid against the cords, which can be tightened by the brass keys at the bottom. The cords go through a slot in the bench, and there is also a slanted finishing edge. The upper beam has a rounded top. All the shaping was done with hand tools; a pin vise drill, sharp scalpel, assorted emery boards and fine sandpapers. I'm not dirtying this one up!

The item leaning against the front of the table is called, in translation, a press aide (persknecht),which I think means that it is used with the presses. It consists of 2 layers of wood, one slightly longer than the other, and has slats at the ends which protrude. The middle is hollow, allowing a certain amount of give. This one is decorated with a thin line of black, with decorative elements at the corners, all around the top of the press aide, and has been antiqued to suggest use.

I need to visit a bookbinder, to learn how these tools all work....

Wednesday, 15 October 2025

A Pair of Hand Book Presses


 As promised, here is the start of some of the items I've made for my current project, a late 1800's book bindery in a small community. They still use tried and true hand-operated tools, often heirloom family business items, so much of the equipment is simple to operate.

These two presses are slightly different, in that the lighter one doesn't have the brass strip in the lower beam or the feet, like the darker one has. I was able to purchase threaded screw rod locally, which the Carpenter-in-Chief cut to size for me for the screws. Technically, they should be wooden screws, but I haven't the ability or the equipment to make those. The threaded rod was given a light brushing with dark stain to suggest age and use, and the equipment is a bit banged-about and nicked, as well as antiqued. The screw handles were hand carved, and do actually work, while the knobs are wooden beads drilled to take the threaded rod. The upper beam slides and can be held on the books by turning the handles, while the lower beam is fixed. The small slat next to the dark press would be used between books, if several were in the press at the same time, to ascertain the leather or fabric covers wouldn't be unduly marked.

The table is a finishing one, for the more delicate work of adding titles and gilding to leather or fabric book covers, and will have some gilding tools and equipment on top in the completed setting. As some hammering is required even in this part of the work, the table has sturdy legs.

More soon! The photos are on my desk top ready to put on the blog.

Wednesday, 8 October 2025

Back in a Week

 It's ten thirty at night, and the Carpenter-in--Chief  has just gone out at the request of one of his clients. We're supposed to be on the road at 6 a.m. and the whole day has been like this. Needless to say, there is no photo today, as the computer has been filling out endless government forms. 

This is all volunteer work, and a few days' rest are desperately needed. I'm going to try and get some sleep, and see you soon. Happy Thanksgiving to all my Canadian mini enthusiasts.


Monday, 6 October 2025

Return to the Bookbinder' Workshop

 Looking back at my older posts, the first two components for this workshop project arrived on my work table for Christmas 2022. The other components (so far) arrived for my birthday last year around this time, I believe. However, I have been working all along on the items to go into the workshop, as they can be made with hand tools while the others need table saws and drill presses. MDF is the basic wood for miniature structures, as it forms the "carcass", as it's often called, for the finished project. There will be layering of decorative features on the outside eventually.


The building is based on typical Dutch village architecture in the Zaan River area, northeast of Amsterdam. These were wooden fishermen's houses, two stories with decorative false fronts, generally two rooms up and two rooms down, with a central staircase. Shops and businesses were housed in very similar structures, and were traditionally painted a vivid green colour, with white bargeboard (Victorian gingerbread) trim. You can check out an open-air museum that houses a number of these homes, along with a large collection of operating windmills, by looking up "Zaanse Schans Museum".


This building has one large room upstairs, and one downstairs. There will be a false back wall with windows and if I can fit it, a door, leading outside, with the actual back wall featuring a photo of a country scene along a river or perhaps an industrial backyard - it depends on what I can find! Along the left wall is a staircase with a half landing, leading to the upper floor. This floor is storage, office space and mail room space, with a table to sit and eat your lunch at. The front facade has one upper window in the peak, and a central door flanked by two windows. I may change that to one large window, however, with an offset door.


This is an overview of the equipment realised so far; shelving and work tables, of course, but also a block for hammering leather along with the heavy wooden maul, hand book presses, a press aide, sewing bench, bookbinder's guillotine, a small box with a padded leather top and a drawer that holds gold leaf sheets, and some small tools, brushes, glue pots, small hammer, etc. Still to come are a bookbinder's saddle and a large floor press.

And of course, endless tool-type items; knives, engraving rollers for decorative leather work, paper, glues, cardboard, and the usual sort of workshop clutter. Funny thing: I volunteer for museum accession work, and this past week a question came up regarding some tools found in a museum storage area that no one was able to identify. However, I recognised them as the engraving rollers from a bookbinder's workshop. A quick look at the original file listed the tools as.... engraving rollers for leather work on book covers! Research for minis can make you look very clever....

I'll feature the items in more detail starting this week. We're away for Canadian Thanksgiving, which is also a family birthday and a family wedding weekend, as well as our first chance to see the house and land my son and his wife (and puppies) moved on to in July. My son will be away, but we'll visit with our daughter-in-law and my husband's sister, the birthday girl. The wedding is a small affair, the widower of a cousin of whom we are all fond, to an old friend. We're all happy they found each other again!

Thursday, 2 October 2025

Testing....


 This is a test to see if we can move photos, and it appears this one, at least, worked. It's not an item I made, as it is life-size, but one I'm hoping to make in scale for my bookbinder's workshop project, based on this photo and the measurements that were included with it. (This Real Life press is/was offered for sale, and I love the sturdy wooden gestalt of it much more than the instructions for the press that came with the project). It's my hope that I can now begin to showcase photos of some of the pieces I have made in scale for that project.

It's become a very frustrating multi-step job to do the photo thing; we've had to move all old photos off my old camera off the card into a file. Moving a photo at the moment involves the "gallery" setting as well as moving between various files, but we're hoping to simplify the process. If we can't, I'll hire a computer guru to come and work with me at home for a couple of hours. The new computer we got earlier this year lost my entire address book while the info was being transferred, and the newer program has just made every function that much more complicated, and I'm not happy with the whole experience. There was some sort of non-communication with older, less pixilated photos on the old photo card. I'm barely literate in computer stuff....

I wish I could just verbally dictate to my computer, along the lines of "just take that photo of the press and move it to the top of the new blog entry"  -- but I suspect that isn't far off with all the AI stuff currently.

That would be a whole another thing, as I am very much NOT impressed with AI sub-titling; we end up laughing ourselves silly sometimes about the errors a supposed marvelous "brain" makes!

Friday, 5 September 2025

Just About Ready to Give Up....

 Well, here we are half a year later, and I'm still not able to move photos into my blog page. The Carpenter-in-Chief is trying to find time to help me, but all we know at this point, after a visit to a camera store and then a computer geek outfit, is that my new camera will not interact with old photos taken on the older camera. This has something to do with the amount of pixels, I understand. The solution is to move all old photos to a memory stick, delete them from the camera card, and then the current camera card should, once again, be able to interface correctly with the new computer. 

Time is very difficult to come by, as the C-in-C is involved in a lot of volunteer work. When he does have time, other things like a vacation to visit family out west or a dying garden  (we're in a drought) understandably take precedence, along with his increasing volunteer work helping newcomers deal with government paperwork.

The bookbinder's workshop I began last Fall is still being worked on, with a lot of the furnishings and the tools, machinery etc. being well under way or done, but there is no time really to deal with the actual building carcass. I had hoped to have the building ready to accept all the furnishings in six weeks from now, but that is unlikely to happen. 

The wooden shoe workshop needs its lighting done before I can finish that project. Several smaller projects I started to fill in time are also waiting for help, as it's becoming increasingly difficult to source needed materials on the internet (we have no hobby shops here in town!).

In the meantime, our son and his wife moved from Alberta to Nova Scotia, and we have yet to go visit and see their new house. We did visit with our daughters in Alberta, as well as with my brother on Vancouver Island, and while I was out there my youngest daughter gave me a book nook project kit that I'm dying to start on. However, given the backlog of projects currently on my storage shelves, I can't in good conscience start something else before I finish some nearly finished projects....

I'll soon have another birthday, and just hope I can hang around long enough to finish my projects (and that includes my other hobbies, like quilting, sewing and knitting).

I need to find the Fountain of Youth!

Wednesday, 5 February 2025

Still Around, Believe It or Not!

 A lot has happened since my last post - in October - and I'm still at it with  miniatures, although with all the mess I created while "cleaning up" not all that many minis have gotten done.

I'm still not able to get at my photos, but as I've now changed computer programmes, I hope to figure that out in the near future. I had been operating on Windows 12, but I'm now somewhat more modern!

Our mini get-togethers have changed to Tuesdays, and as I prescribed a thorough sort-out of all my far too many hobby projects, I've been taking various knitting, sewing and embroidering projects rather than mini ones to those.

Don't give up on me, I will now be able to at least blog again.


Monday, 21 October 2024

Oh Boy!

 My house looks like a disaster area, as my daughter has used her last day with us here to go through all the boxes that need to move to the other side of the country. In the process, we discovered that two large portfolios of art work were totally destroyed by mould; somehow, they got wet and then the fungus began to grow. It's kind of heart-breaking to see all those sketches, drawings and paintings end up in a bonfire.

We have NOT had time to go over the camera, so the Carpenter-in-Chief will try, once again, to help me figure out how to move photos to the blog. Our daughter's flight leaves at 5:45 tomorrow morning, which means having to be at the airport at 4:45, and it is at least a half hour's drive. I will be more than just slightly worn out tomorrow, and will have to make do with perhaps three hours of sleep, as we are having a visit with her mother-in-law this evening.

However, the good news is that our mini/craft afternoons will be resuming, and I will definitely stay awake for that. Both of my mini partners have moved from houses to apartments, so it has been a very long job to thin down decades of accumulation for them. Many minis have also had to go....

I've had a significant birthday, and have received the beginnings of a very large 1/12 scale pub, that was begun at least 25 years ago, so I had better get moving.

Thank you for continuing checking out the blog, one way or another I will start posting progress on a great many projects within a few days.

Friday, 27 September 2024

Still Here, Still Working....

 The previous owner of my newest camera arrives in a week, and will hopefully give me some help in how to move photos from the camera to the desktop and from there to the blog. I was, kind of, under the impression that improvements in electronic technology meant that operating these various computer-assisted items would become easier, but it appears that they just become more and more complex, difficult for those of us who are, ahem, older! I long for the day when all my devices will respond to my voice commands!

There is another carpet in the making, rather a complex design that I can only do for a little while each day, as my fingers cramp up. There have been a few non-urgent health issues, that have required in the last month three or more doctors' visits to deal with; among other things, I dealt with a bout of shingles on my, shall we say, "sitting surfaces", which made me rather short-tempered and not at all prepared to deal with complicated stuff. Lots of simple knitting, some puzzles, and a couple of nice days out have helped to deal with it all. The end of the road to recovery is just around the corner now, but I desperately need a week of decent sleep to be up to par again.

On my work table right now are two Christmas vignettes, one of which I hope will leave with my visitor, my younger daughter, as it is hers; we began it together, but with the distances between us now (6 or so hours by plane) it has languished, but I really would like it to be usable this coming Christmas. The other Christmas vignette is a Christmas market stall, mine unless one of my children or their partners would like it, that just needs a little tweaking and gluing to be done. I need space for the other vignettes I've been working on!

I hope to have everything up and running again in a week and a half or so. Thanks to all of you for sticking with me, it is much appreciated.

Sunday, 25 August 2024

Please Bear With Me and My Camera(s)....

 This may be a bit of a messy post, as we're experiencing camera woes once again. The camera I was using has developed a mind of its own, and is flipping photos I want to import to the blog from horizontal to vertical;  no amount of editing is fixing the issue.


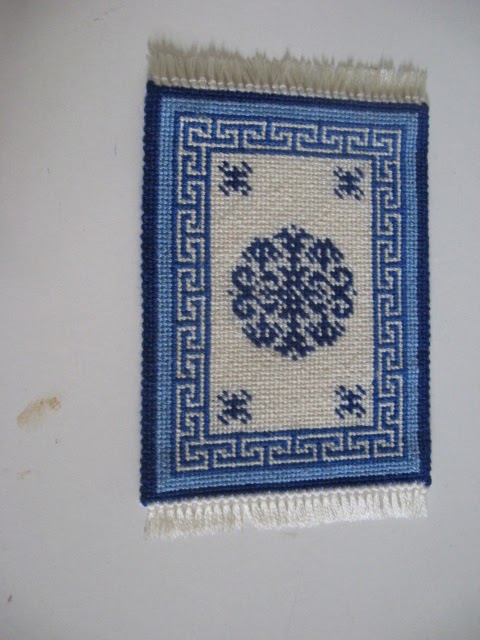
This little rug is now done; it was partially done, but I ran out of the background floss colour, which had no number or band on it, and finally broke down during my recent vacation and pulled out the entire previous background. I don't like pulling out! The colour scheme is interesting; it is from a very old (50 years or so) pamphlet I picked up second-hand some years ago. The size makes it useful for both 1.12 as a small rug, or in half scale as a full-size rug.


Now, this is the photo that absolutely WILL NOT behave! I have flipped it numerous times, and even cropped it to get rid of the stain on the surface to the left, but nothing works. It is from the book that I was given recently, and I did it first because I really like this blue and cream colour scheme. It is also a smaller rug - I worked it in 22 ct. instead of 18, as the pattern recommended - and will also suit both 1/12 and half scale.

This is where the mess really took off. The old camera was replaced by a new-to-me camera, that has more pixels. It came to me without a manual, and although we have managed to get it to show the thumb-nail photos on the old card, it will not allow me to take photos yet. It appears to take the photo, the flash goes, but then when I go to download it to the computer, there is no photo there. So, you'll just have to trust me when I say that I also finished a lovely Bokhara rug, in browns, reds and cream. When we figure out the new (old) camera, I'll post a photo.

In the works also are grapes; they are still too purple for my taste, which means discarding that batch of clay and starting over. I've "lost" my recipe for lovely red grapes I made a few years ago, and suspect that the instructions I tried to use this past week just gave the wrong quantities of clay to mix. I'll try again!

Baskets are also on my work table; I'm making a wooden basket with two bail handles, hopefully for the grapes when I make them. I'd also like to try making woven baskets out of card, as with a bit of patience and paint they can be made to look a lot like ash splint baskets.

Hopefully we can figure out what is going on with the cameras soon!

Tuesday, 20 August 2024

Here's Hoping This Works!

My camera isn't responding well, which means the following photos are likely over-exposed or out of focus, but I thought I'd try anyways!


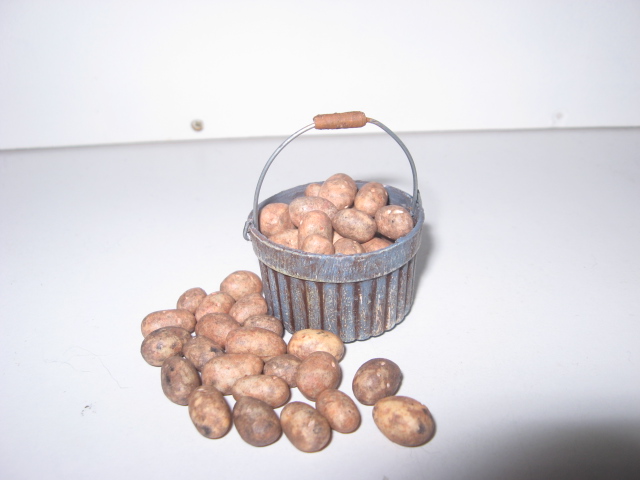
Last Wednesday, I did some clay work for the Autumn vignette, and these are freshly dug potatoes, which I think came out fairly well.


The apple photos are very sad, in that I can't adjust the flash mechanism; we're at the tail end of the current tropical storm, which is leaving us pretty much in the dark and the camera won't work without the flash, and with the flash the colours don't show at all well. However, I'm quite pleased with the apples, they were coloured with chalks before the polymer clay was baked.

On Friday, we spent the day at a huge outdoor flea market, but it may be the last time we go, as the offerings were very very boring! It used to feature lots of antiques dealers, but nowadays seems to have personal garage sale stuff, discounted stuff, lots of homemade bath products and endless piles of crocheted novelties. However, I did find a couple of things that can be used for minis.


Although the pictures aren't that great, the frames are very nice and in 1/12 scale; I'll fill them with my own paintings one of these days.


These rather thick little 1/12 scale containers will work well in prep board settings; I think the two-handled pot will work for something like baked beans, while the little pitcher might work for pancake batter. They were very inexpensive, and small porcelain items are hard to come by locally.

Wednesdays are still "Mini Days", and I hope to make grapes for the Autumn vignette tomorrow. And I hope the endless rain stops soon.....