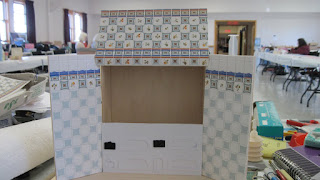
This is the prototype of the Ruffled Rooster Kitchen project, designed by Connie Sauve, that we were doing at camp, with her permission, this year. It is jam-packed with cupboards, drawers and cubbyholes, and the camper who cut out the pieces for us figures there were upwards of 4,000 or so to have enough for all the campers and the extra kits people asked for.
I have mentioned, in the past, that we tend to do as many variations of our project as there are campers, and you will see some in the photos below. There are a lot of photos, so this is a long blog entry.
Unfortunately, people started to pack up mid-afternoon on Sunday, so there are a lot of examples I was unable to get photos of.

Debbie P.s kitchen is a lovely grey-blue, the photo does not do it justice. You can see where things have been switched about to personalise the project.

This is Janice's kitchen, in blue-grey and yellow. As you can see, more switching around of the kit's components!

Myra works small, so her "kitchen" became a three-story house! This is probably 1/48th scale, as the box is 15 1/2 cm (6") wide and 17 1/2 cm (7") high. I did tell you it was a compact kit....

Iris and Kelly were both reproducing a 1700's restaurant kitchen/stove they had visited in Spain; the restaurant has been operating for nearly 300 years, and is believed to be the oldest restaurant ever. The sides and stove hood were tiled, hence the tile work; the stove portion - a huge metal beast - will go into the open space.

Aleeta is making the wardrobe scene from The Lion, The Witch and The Wardrobe. The kitchen has been transformed into a wardrobe, and you can see the door opening which has been cut, and which will become the entry to Narnia; she plans to do the scene of the snowy forest, street lamp and Mr. Tumnus the Faun in behind the wardrobe, thus expanding the scene.
Brandy carved her doors; she painted background scenery on the kit doors, then cut some thicker doors and carved them with trees, foliage, bear cubs, rocks and stones, to be applied over the painted background. Sadly, I didn't get a photo of that. And Patricia was creating a theatrical dressing room, complete with light bulbs around the mirror, from her kit. (No photo of that either...) Lynn and one other camper were turning their kits into Hallowe'en scenes.
Already in existence, in the prototypes, were 2 complete, beautiful kitchens, a laundry room with many flamingo accessories, and an optometrist's office. I hope to get some more photos up at some point, as three of the prototypes were made by members of my local mini group.
It was a a rather exhausting camp, with all the many pieces that needed to be assembled. My own version is partly stained, partly painted, partly done, partly not done; you get the idea. My stain had deteriorated, and they don't make it any more in the water version, only in oil, so I have to re-stain all the pieces with smelly stain. I am pulling out the bottle drawer (long and narrow on lower portion of kitchen), and will enlarge the shelves to allow for more "stuff". There are lots of little glass jars and bottles in my stash, which all need to be filled with polymer clay candy, not to mention the bins and shelves of the kit shop. I also want to add a shelf unit to the left-hand door to accommodate some jars. The drop-down table in the project will be my store counter, with a small scale on top. Did I mention that my project is intended to become an old-fashioned candy shop? It will become part of my between-the-wars market setting. To that end, I have to figure out how to make "glass" fronts for the 3 tiny drawers. That should be a challenge! And I would love to be able to figure out a way to make the tip-out "glass" shelf on the top portion into a pair of tip-out bins.
Next time, I will show some of my camp goodies, but this is enough for now, I think.


